How To Install phpMyAdmin with Docker Compose

phpMyAdmin is a popular web-based tool for managing MySQL databases. It provides an intuitive graphical interface that simplifies database administration tasks, such as creating tables, executing queries, and managing user permissions. Docker Compose, on the other hand, is a powerful tool for defining and running multi-container Docker applications. By leveraging Docker Compose, you can easily set up and deploy phpMyAdmin alongside a MySQL database container, streamlining the installation process and ensuring a consistent environment across different systems. In this article, we will guide you through the step-by-step process of installing phpMyAdmin with Docker Compose on a Linux system, highlighting the benefits of this approach and providing troubleshooting tips along the way.
Prerequisites
Before we dive into the installation process, let’s ensure that your system meets the necessary requirements. To follow along with this tutorial, you’ll need:
- A Linux-based operating system (e.g., Ubuntu, Debian, CentOS)
- Docker installed on your system
- Docker Compose installed on your system
If you haven’t installed Docker and Docker Compose yet, don’t worry. The installation process is straightforward. You can refer to the official Docker documentation for detailed instructions specific to your Linux distribution. Once you have Docker and Docker Compose up and running, you’re ready to proceed with the phpMyAdmin installation.
Setting Up the Docker Compose File
The first step in installing phpMyAdmin with Docker Compose is to create a docker-compose.yml file. This file defines the services, networks, and volumes required for your application. Let’s break down the process of creating the Docker Compose file:
Creating the docker-compose.yml File
- Open a text editor and create a new file named
docker-compose.yml. - Begin by specifying the version of the Docker Compose file format. For this tutorial, we’ll use version ‘3’.
- Define the services section, which will include the MySQL and phpMyAdmin containers.
Defining Services
In the services section of the docker-compose.yml file, we’ll define the configuration for the MySQL and phpMyAdmin containers.
MySQL Service Configuration
mysql:
  image: mysql:latest
  environment:
    MYSQL_ROOT_PASSWORD: your_root_password
    MYSQL_DATABASE: your_database_name
  volumes:
    - mysql_data:/var/lib/mysql
Here, we specify the MySQL service using the latest MySQL image. We set the necessary environment variables, including the root password and the name of the database to be created. Additionally, we define a volume named mysql_data to persist the MySQL data.
phpMyAdmin Service Configuration
phpmyadmin:
  image: phpmyadmin/phpmyadmin
  depends_on:
    - mysql
  ports:
    - "8080:80"
  environment:
    PMA_HOST: mysql
    MYSQL_ROOT_PASSWORD: your_root_password
For the phpMyAdmin service, we use the official phpMyAdmin image. We specify the dependency on the MySQL service using the depends_on directive. The ports section maps the host’s port 8080 to the container’s port 80, allowing access to phpMyAdmin via a web browser. The environment variables PMA_HOST and MYSQL_ROOT_PASSWORD are set to establish the connection between phpMyAdmin and the MySQL container.
Running Docker Compose
With the docker-compose.yml file in place, we can now start the containers using Docker Compose.
Starting the Containers
To start the containers, open a terminal, navigate to the directory where your docker-compose.yml file is located, and run the following command:
docker-compose up -d
The -d flag runs the containers in detached mode, allowing them to run in the background.
Verifying the Setup
After running the docker-compose up command, you can verify if the containers are running correctly by using the following command:
docker-compose ps
This command will display the status of the containers defined in your Docker Compose file. If the containers are running without any issues, you should see the MySQL and phpMyAdmin containers listed with a status of “Up”.
If you encounter any issues during the startup process, you can check the logs of the containers using the following command:
docker-compose logs
This command will display the logs of all the containers, helping you identify and troubleshoot any problems.
Accessing phpMyAdmin
Now that the containers are up and running, you can access phpMyAdmin through your web browser.
Connecting to phpMyAdmin
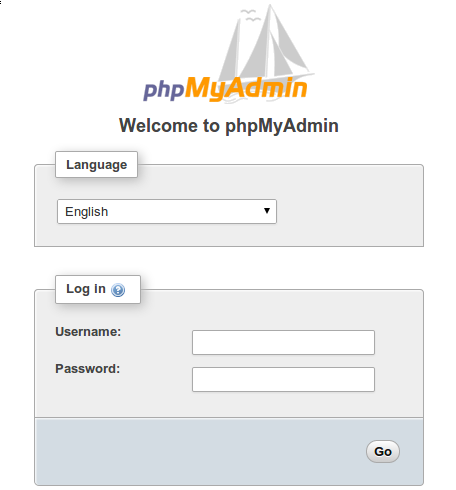
To access phpMyAdmin, open your web browser and navigate to http://localhost:8080. You should see the phpMyAdmin login page.

Enter the MySQL root username (default is “root”) and the password you specified in the docker-compose.yml file. Click on the “Go” button to log in.
Managing Databases with phpMyAdmin
Once logged in, you’ll be presented with the phpMyAdmin interface. From here, you can perform various database management tasks, such as:
- Creating new databases and tables
- Browsing and editing existing databases
- Executing SQL queries
- Importing and exporting data
- Managing user permissions
phpMyAdmin provides an intuitive and user-friendly interface for managing your MySQL databases, making it easier to perform administrative tasks without the need for command-line interactions.
Advanced Configuration
While the basic setup of phpMyAdmin with Docker Compose is straightforward, there are additional configuration options you can explore to customize your setup further.
Customizing the Docker Compose File
You can modify the docker-compose.yml file to adjust various settings according to your requirements. For example, you can change the MySQL version, set different environment variables, or modify the port mappings.
Here are a few examples of common customizations:
- Changing the MySQL version:
mysql: image: mysql:5.7 - Setting a custom phpMyAdmin port:
phpmyadmin: ... ports: - "8888:80" - Enabling SSL for phpMyAdmin:
phpmyadmin:
  ...
  environment:
    ...
    PMA_ABSOLUTE_URI: https://example.com/phpmyadmin/
Feel free to explore the official Docker images’ documentation for MySQL and phpMyAdmin to learn more about the available configuration options.
Adding Persistent Storage
By default, the data stored in the MySQL container is not persistent. This means that if the container is removed or recreated, the data will be lost. To ensure data persistence, you can use Docker volumes.
In the docker-compose.yml file, we already defined a volume named mysql_data for the MySQL service. This volume will persist the MySQL data across container restarts.
You can also specify a specific host directory to be mounted as a volume. For example:
volumes:
  - /path/on/host:/var/lib/mysql
This will mount the specified host directory (/path/on/host) as the MySQL data directory inside the container.
Security Considerations
When setting up phpMyAdmin with Docker Compose, it’s important to consider security aspects to protect your databases and prevent unauthorized access.
Here are a few security tips:
- Use strong and unique passwords for the MySQL root user and any additional users.
- Limit access to phpMyAdmin by configuring appropriate network restrictions or using authentication mechanisms like HTTP Basic Auth.
- Regularly update your Docker images to ensure you have the latest security patches.
- Avoid exposing unnecessary ports to the host system.
- Consider implementing SSL/TLS encryption for secure communication between phpMyAdmin and the MySQL database.
By following these security practices, you can enhance the security of your phpMyAdmin and MySQL setup.
Troubleshooting
While the installation process of phpMyAdmin with Docker Compose is generally smooth, you may encounter issues along the way. Here are some common problems and their solutions:
Common Errors and Solutions
- Error: “Connection refused” when accessing phpMyAdmin
- Ensure that the MySQL container is running correctly.
- Verify that the
PMA_HOSTenvironment variable in the phpMyAdmin service is set to the correct MySQL service name.
- Error: “Access denied for user ‘root’@’localhost'”
- Double-check that the MySQL root password specified in the
docker-compose.ymlfile matches the password you’re using to log in. - Ensure that the
MYSQL_ROOT_PASSWORDenvironment variable is correctly set in both the MySQL and phpMyAdmin services.
- Double-check that the MySQL root password specified in the
- Error: “MySQL container keeps restarting”
- Check the MySQL logs using
docker-compose logs mysqlto identify the cause of the issue. - Ensure that the specified MySQL version is compatible with your system and the phpMyAdmin image.
- Check the MySQL logs using
Useful Commands for Debugging
When troubleshooting issues with your Docker Compose setup, the following commands can be helpful:
docker-compose logs: Displays the logs of all containers.docker-compose logs <service-name>: Displays the logs of a specific service (e.g.,docker-compose logs mysql).docker-compose ps: Shows the status of the containers.docker-compose exec <service-name> bash: Opens a bash shell inside a running container (e.g.,docker-compose exec mysql bash).
These commands can help you inspect the containers, view logs, and debug issues more effectively.