How To Install phpMyAdmin on Linux Mint 22

phpMyAdmin is a powerful, open-source tool for managing MySQL and MariaDB databases through a user-friendly web interface. For system administrators and developers working with Linux Mint 22, installing phpMyAdmin can significantly streamline database management tasks. This comprehensive guide will walk you through the process of installing phpMyAdmin on Linux Mint 22, covering everything from prerequisites to troubleshooting common issues.
By the end of this tutorial, you’ll have a fully functional phpMyAdmin installation, allowing you to efficiently manage your databases with ease. We’ll cover system updates, web server setup, database installation, PHP configuration, and of course, the phpMyAdmin installation itself. Let’s dive in and unlock the power of phpMyAdmin on your Linux Mint 22 system.
Prerequisites
Before we begin the installation process, ensure that your system meets the following requirements:
- A Linux Mint 22 system with at least 2GB of RAM and 20GB of free disk space
- An active internet connection for downloading packages
- Sudo access or root privileges on your system
- Basic familiarity with the Linux command line interface
You’ll also need to have the following software packages installed:
- Apache web server
- MySQL or MariaDB database server
- PHP and necessary modules
Don’t worry if you don’t have these installed yet – we’ll cover the installation of each component in the following sections.
Updating the System
Before installing any new software, it’s crucial to ensure your system is up-to-date. This helps prevent compatibility issues and ensures you have the latest security patches. To update your Linux Mint 22 system, open a terminal and run the following commands:
sudo apt update
sudo apt upgrade -y
The first command refreshes the package lists, while the second upgrades all installed packages to their latest versions. The ‘-y’ flag automatically answers “yes” to any prompts during the upgrade process.
Installing Apache Web Server
Apache is one of the most popular web servers and is well-suited for hosting phpMyAdmin. To install Apache on Linux Mint 22, use the following command:
sudo apt install apache2Once the installation is complete, start the Apache service and enable it to run at boot:
sudo systemctl start apache2
sudo systemctl enable apache2
To verify that Apache is running correctly, open a web browser and navigate to http://localhost. You should see the default Apache welcome page.
For basic Apache configuration, you can edit the main configuration file:
sudo nano /etc/apache2/apache2.confHere, you can adjust settings like the document root, server name, and security options. Remember to restart Apache after making changes:
sudo systemctl restart apache2Installing MySQL/MariaDB
phpMyAdmin requires a database server to manage. While MySQL was traditionally the go-to choice, MariaDB has become increasingly popular as a drop-in replacement. For this guide, we’ll use MariaDB. To install it, run:
sudo apt install mariadb-serverAfter installation, secure your MariaDB server by running the security script:
sudo mysql_secure_installationThis script will guide you through setting a root password, removing anonymous users, disallowing root login remotely, and removing the test database.
To create a test database and user for phpMyAdmin, log into MariaDB as root:
sudo mysql -u root -pThen, execute the following SQL commands:
CREATE DATABASE testdb;
CREATE USER 'testuser'@'localhost' IDENTIFIED BY 'password';
GRANT ALL PRIVILEGES ON testdb.* TO 'testuser'@'localhost';
FLUSH PRIVILEGES;
EXIT;
Replace ‘testdb’, ‘testuser’, and ‘password’ with your preferred values.
Installing PHP and Required Modules
PHP is the scripting language that powers phpMyAdmin. To install PHP and the necessary modules for use with Apache and MariaDB, run:
sudo apt install php php-mysql php-mbstring php-zip php-gd php-json php-curlAfter installation, restart Apache to ensure it recognizes the new PHP modules:
sudo systemctl restart apache2To verify PHP is working correctly, create a test file:
sudo nano /var/www/html/phpinfo.phpAdd the following content to the file:
<?php
phpinfo();
?>
Save the file and navigate to http://localhost/phpinfo.php in your web browser. You should see a page displaying PHP configuration information.
Installing phpMyAdmin
Now that we have all the prerequisites in place, let’s install phpMyAdmin. There are two primary methods: using the package manager (apt) or manual installation. We’ll cover the apt method as it’s simpler and ensures automatic updates.
To install phpMyAdmin using apt, run:
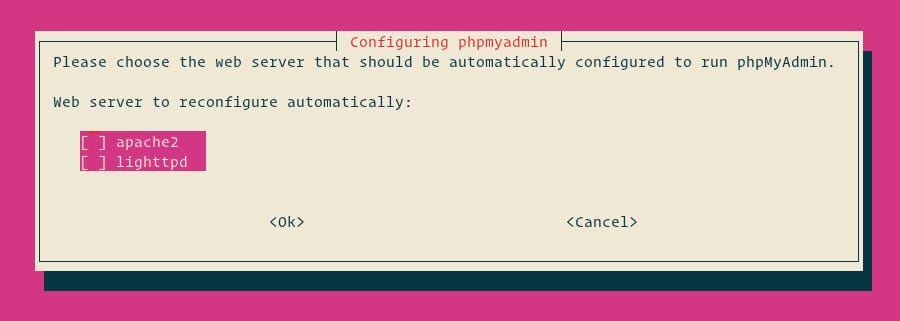
sudo apt install phpmyadminDuring the installation, you’ll be prompted to choose a web server to configure. Select ‘apache2‘ using the spacebar, then press Enter.

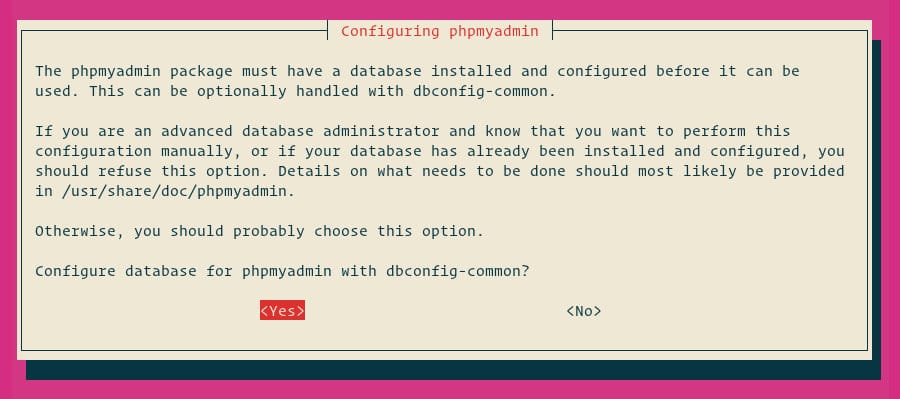
When asked if you want to configure the database for phpMyAdmin with dbconfig-common, choose ‘Yes’.

Enter a password for the phpMyAdmin application to register with the database server.

After installation, we need to configure Apache to serve phpMyAdmin. Create a configuration file:
sudo nano /etc/apache2/conf-available/phpmyadmin.confAdd the following content:
Alias /phpmyadmin /usr/share/phpmyadmin

<Directory /usr/share/phpmyadmin>
    Options SymLinksIfOwnerMatch
    DirectoryIndex index.php

    <IfModule mod_php.c>
        <IfModule mod_mime.c>
            AddType application/x-httpd-php .php
        </IfModule>
        <FilesMatch ".+\.php$">
            SetHandler application/x-httpd-php
        </FilesMatch>

        php_value include_path .
        php_admin_value upload_tmp_dir /var/lib/phpmyadmin/tmp
        php_admin_value open_basedir /usr/share/phpmyadmin/:/etc/phpmyadmin/:/var/lib/phpmyadmin/:/usr/share/php/php-gettext/:/usr/share/php/php-php-gettext/:/usr/share/javascript/:/usr/share/php/tcpdf/:/usr/share/doc/phpmyadmin/:/usr/share/php/phpseclib/
        php_admin_value mbstring.func_overload 0
    </IfModule>

    <IfModule mod_authz_core.c>
        # Apache 2.4
        <RequireAny>
            Require all granted
        </RequireAny>
    </IfModule>
    <IfModule !mod_authz_core.c>
        # Apache 2.2
        Order Deny,Allow
        Allow from All
    </IfModule>
</Directory>

# Disallow web access to directories that don't need it
<Directory /usr/share/phpmyadmin/templates>
    Require all denied
</Directory>
<Directory /usr/share/phpmyadmin/libraries>
    Require all denied
</Directory>
Save the file and enable the configuration:
sudo a2enconf phpmyadmin
sudo systemctl reload apache2
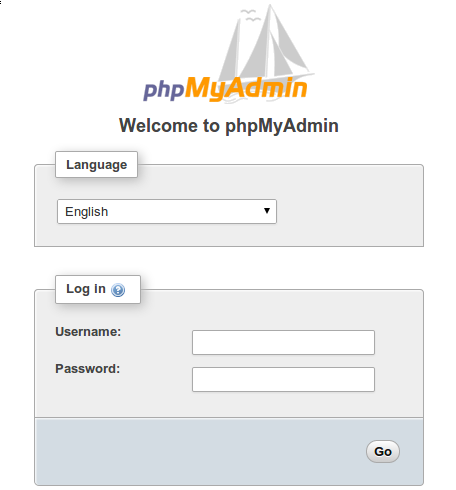
You should now be able to access phpMyAdmin by navigating to http://localhost/phpmyadmin in your web browser.

Securing phpMyAdmin
While phpMyAdmin is now functional, it’s crucial to implement additional security measures to protect your databases from unauthorized access.
- Change the default phpMyAdmin URL:
sudo mv /usr/share/phpmyadmin /usr/share/phpmyadmin2
sudo sed -i 's/Alias \/phpmyadmin/Alias \/secretadmin/' /etc/apache2/conf-available/phpmyadmin.conf
sudo systemctl reload apache2
Now, phpMyAdmin will be accessible at
http://localhost/secretadmin - Implement IP-based access control:
sudo nano /etc/apache2/conf-available/phpmyadmin.confAdd the following lines within the
<Directory /usr/share/phpmyadmin>block:Order deny,allow Deny from all Allow from 127.0.0.1 Allow from ::1Replace the IP addresses with your allowed IPs.
- Enable SSL/TLS encryption:
sudo a2enmod ssl
sudo systemctl restart apache2
sudo openssl req -x509 -nodes -days 365 -newkey rsa:2048 -keyout /etc/ssl/private/apache-selfsigned.key -out /etc/ssl/certs/apache-selfsigned.crt
Configure Apache to use the SSL certificate and redirect HTTP to HTTPS.
Troubleshooting Common Issues
Even with careful installation, you might encounter some issues. Here are solutions to common problems:
- Permission problems:
sudo chown -R www-data:www-data /usr/share/phpmyadmin sudo chmod 755 /usr/share/phpmyadmin - Database connection errors:
sudo nano /etc/phpmyadmin/config.inc.phpEnsure the
$cfg['Servers'][$i]['host']value is correct. - Apache configuration issues:
sudo apache2ctl configtestThis command will check for configuration errors.
- PHP module conflicts:
sudo phpenmod mbstringEnsure all required PHP modules are enabled.
Optimizing phpMyAdmin Performance
To enhance phpMyAdmin’s performance:
- Adjust PHP settings in
/etc/php/7.4/apache2/php.ini:memory_limit = 256M max_execution_time = 300 post_max_size = 32M upload_max_filesize = 32M - Optimize Apache for phpMyAdmin by enabling the following modules:
sudo a2enmod expires headers deflate - Enable database query caching in MariaDB’s configuration file.
Congratulations! You have successfully installed phpMyAdmin. Thanks for using this tutorial for installing the latest version of phpMyAdmin on the Linux Mint 22 system. For additional help or useful information, we recommend you check the official phpMyAdmin website.