In this tutorial, we will show you how to install Pritunl VPN Server on AlmaLinux 8. For those of you who didn’t know, Pritunl VPN is currently one of the most secure open-source VPN tools that can be used for multi-cloud VPN peering. Pritunl VPN server uses MongoDB and can be deployed on any cloud infrastructure.
This article assumes you have at least basic knowledge of Linux, know how to use the shell, and most importantly, you host your site on your own VPS. The installation is quite simple and assumes you are running in the root account, if not you may need to add ‘sudo‘ to the commands to get root privileges. I will show you the step-by-step installation of the Pritunl VPN on AlmaLinux 8. You can follow the same instructions for Rocky Linux.
Prerequisites
- A server running one of the following operating systems: AlmaLinux 8.
- It’s recommended that you use a fresh OS install to prevent any potential issues.
- A
non-root sudo useror access to theroot user. We recommend acting as anon-root sudo user, however, as you can harm your system if you’re not careful when acting as the root.
Install Pritunl VPN Server on AlmaLinux 8
Step 1. First, let’s start by ensuring your system is up-to-date.
sudo dnf update
sudo dnf install epel-release
Step 2. Installing MongoDB Server.
Run the following command to add MongoDB repository:
sudo tee /etc/yum.repos.d/mongodb-org-4.2.repo<<EOF
[mongodb-org-4.2]
name=MongoDB Repository
baseurl=https://repo.mongodb.org/yum/redhat/8/mongodb-org/4.2/x86_64/
gpgcheck=1
enabled=1
gpgkey=https://www.mongodb.org/static/pgp/server-4.2.asc
EOF
Once is done, install MongoDB using the following command:
sudo dnf install mongodb-org
After that, start and enable MongoDB services:
sudo systemctl start mongod
sudo systemctl enable mongod
Step 3. Installing Pritunl VPN Server on AlmaLinux 8.
Now we add the Pritunl repository to your system:
sudo tee /etc/yum.repos.d/pritunl.repo << EOF
[pritunl]
name=Pritunl Repository
baseurl=https://repo.pritunl.com/stable/yum/centos/8/
gpgcheck=1
enabled=1
EOF
Next, add Pritunl VPN GPG key:
sudo gpg --keyserver hkp://keyserver.ubuntu.com --recv-keys 7568D9BB55FF9E5287D586017AE645C0CF8E292A
sudo gpg --armor --export 7568D9BB55FF9E5287D586017AE645C0CF8E292A > key.tmp; sudo rpm --import key.tmp; rm -f key.tmp
Once is done, install Pritunl using the following command below:
sudo dnf install pritunl
Then, you can set up the start, stop and enable the Pritunl VPN server to automatically start up when the server boots:
sudo systemctl stop pritunl
sudo systemctl start pritunl
Step 4. Accessing Pritunl Web Interface.
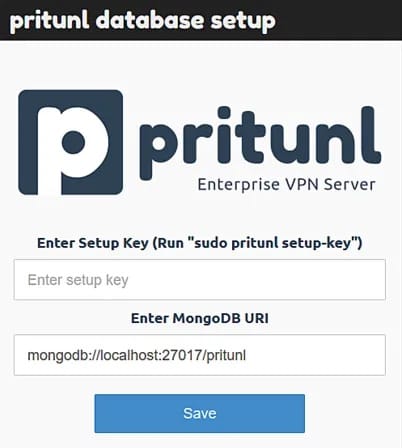
Once succesfully installation, open your web browser and access the Pritunl web Interface using the URL https://your-server-ipaddress. You should see the following screen:

But before then, let’s acquire keys used to authenticate The Database:
sudo pritunl setup-key
When accessing the web interface, the following interface will be displayed. Paste the output of the previous command into “Enter the setup key“Field and save
You will be redirected to a login page asking for a username and password. Use the following command to obtain credentials from the server:
sudo pritunl default-password
Now login with the default username and password, and set up your environment from Pritunl dashboard.
Congratulations! You have successfully installed Pritunl VPN. Thanks for using this tutorial for installing the Pritunl VPN Server on your AlmaLinux 8 system. For additional help or useful information, we recommend you check the official Pritunl website.