How To Install ProjectSend on AlmaLinux 9

In today’s digital landscape, efficient file sharing and management are crucial for businesses of all sizes. ProjectSend is a powerful open-source application designed to facilitate secure file sharing with clients, making it an invaluable tool for professionals. This article provides a comprehensive, step-by-step guide on installing ProjectSend on AlmaLinux 9, ensuring you have everything you need to get started.
Understanding ProjectSend
What is ProjectSend?
ProjectSend is a web-based file sharing application that allows users to upload files and share them securely with clients. It features user management, client-specific file access, and an intuitive interface that makes file management straightforward. With ProjectSend, businesses can streamline their document sharing processes while maintaining security and organization.
System Requirements
Before diving into the installation process, it’s important to ensure your system meets the necessary requirements:
- AlmaLinux 9 operating system
- Web server (Apache or Nginx)
- PHP version 7.3 or higher
- MariaDB or MySQL database server
- PHP extensions: mysqli, gd, xml
Preparing Your AlmaLinux 9 Environment
Prerequisites
To ensure a smooth installation process, it’s essential to prepare your AlmaLinux environment. This includes updating your system and installing the necessary packages.
Updating AlmaLinux
Start by updating your system to ensure all packages are current:
sudo dnf updateInstalling Required Packages
You will need to install several packages to set up a LAMP stack (Linux, Apache, MySQL/MariaDB, PHP). Execute the following command:
sudo dnf install httpd mariadb-server php php-mysqlnd php-gd php-xml unzip wgetSetting Up the Database for ProjectSend
Starting MariaDB Service
Next, start the MariaDB service and enable it to run at startup:
sudo systemctl start mariadb
sudo systemctl enable mariadb
Securing MariaDB Installation
Run the security script provided by MariaDB to enhance security settings:
sudo mysql_secure_installationThis script will prompt you for several configurations, including setting a root password and removing anonymous users. Follow the prompts to secure your installation.
Creating a Database and User for ProjectSend
You need to create a database specifically for ProjectSend along with a user who has permissions to access it. Log in to the MariaDB shell:
sudo mysql -u root -pCreate the database and user with the following commands:
CREATE DATABASE projectsend;
CREATE USER 'projectsenduser'@'localhost' IDENTIFIED BY 'your_password';
GRANT ALL PRIVILEGES ON projectsend.* TO 'projectsenduser'@'localhost';
FLUSH PRIVILEGES;
Downloading and Installing ProjectSend
Downloading ProjectSend
The next step is to download the latest version of ProjectSend. Use the following command:
wget https://github.com/ignacionelson/ProjectSend/archive/master.zipExtracting the Files
Once downloaded, unzip the files and move them to your web directory:
unzip master.zip -d /var/www/html/projectsend
sudo mv /var/www/html/projectsend/ProjectSend-master/* /var/www/html/projectsend/
Configuring ProjectSend
You will need to configure ProjectSend by renaming the configuration file and entering your database details. Navigate to the ProjectSend directory:
cd /var/www/html/projectsend/config
cp sys.config.php.example sys.config.php
nano sys.config.php
Edit the database settings in `sys.config.php` as follows:
'db_host' => 'localhost',
'db_user' => 'projectsenduser',
'db_pass' => 'your_password',
'db_name' => 'projectsend',
Configuring Apache for ProjectSend
Creating Apache Virtual Host File
Create a new virtual host configuration file for ProjectSend:
sudo nano /etc/httpd/conf.d/projectsend.confSetting Up Virtual Host Configuration
Add the following configuration settings to your virtual host file:
<VirtualHost *:80>
    ServerAdmin admin@example.com
    DocumentRoot /var/www/html/projectsend
    ServerName projectsend.example.com

    <Directory /var/www/html/projectsend>
        Options Indexes FollowSymLinks
        AllowOverride All
        Require all granted
    </Directory>

    ErrorLog /var/log/httpd/projectsend-error.log
    CustomLog /var/log/httpd/projectsend-access.log combined
</VirtualHost>
Enabling Rewrite Module and Restarting Apache
If you’re using Apache, ensure that mod_rewrite is enabled. Then restart Apache for changes to take effect:
sudo dnf install mod_rewrite
sudo systemctl restart httpd
Finalizing Installation via Web Interface
Accessing the Web Interface
You can now access ProjectSend through your web browser by navigating to `http://your-server-ip/projectsend`. If you set up a domain name, use that instead.

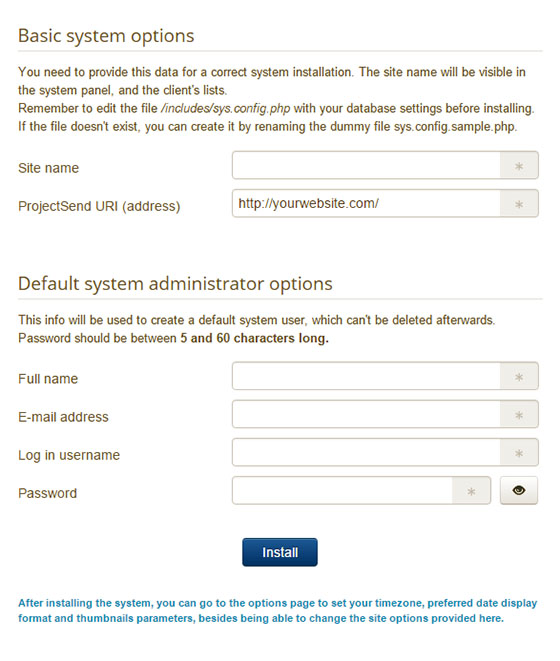
Completing Installation Steps
The web installer will guide you through final setup steps. You’ll need to fill in details such as site name and admin credentials. Follow the prompts carefully.
Troubleshooting Common Issues
Common Errors During Installation
If you encounter issues during installation, here are some common problems and their solutions:
-
- Error establishing a database connection: This usually indicates incorrect database credentials in `sys.config.php`. Double-check your username, password, and database name.
- No write permissions: If you see errors related to permissions, ensure that Apache has write permissions on the ProjectSend directory:
sudo chown -R apache:apache /var/www/html/projectsend
sudo chmod -R 755 /var/www/html/projectsend- Error 404 or 403: This may occur if your virtual host configuration is incorrect or if mod_rewrite is not enabled. Verify your configuration settings.
- PHP errors: If you encounter PHP-related errors, check if all required PHP extensions are installed. You can install missing extensions using DNF.
Congratulations! You have successfully installed ProjectSend. Thanks for using this tutorial for installing ProjectSend open-source self-hosted file-sharing on AlmaLinux 9 system. For additional help or useful information, we recommend you check the official ProjectSend website.