![]()
In this tutorial, we will show you how to install Rocket.Chat on Ubuntu 22.04 LTS. For those of you who didn’t know, Rocket.Chat is an open-source self-hosted chat platform that can be used as an alternative to Slack. It comes with many features that you would like to have in your self-hosted environment e.g. video conferencing, group chats, and integration with other platforms. So if you have a small business, team, or some organization where you need to contact multiple people on your team, Rocket.Chat might be the go-to software to try today.
This article assumes you have at least basic knowledge of Linux, know how to use the shell, and most importantly, you host your site on your own VPS. The installation is quite simple and assumes you are running in the root account, if not you may need to add ‘sudo‘ to the commands to get root privileges. I will show you the step-by-step installation of the Rocket.Chat on Ubuntu 22.04 (Jammy Jellyfish). You can follow the same instructions for Ubuntu 22.04 and any other Debian-based distribution like Linux Mint, Elementary OS, Pop!_OS, and more as well.
Prerequisites
- A server running one of the following operating systems: Ubuntu 22.04, 20.04, and any other Debian-based distribution like Linux Mint.
- It’s recommended that you use a fresh OS install to prevent any potential issues.
- SSH access to the server (or just open Terminal if you’re on a desktop).
- A
non-root sudo useror access to theroot user. We recommend acting as anon-root sudo user, however, as you can harm your system if you’re not careful when acting as the root.
Install Rocket.Chat on Ubuntu 22.04 LTS Jammy Jellyfish
Step 1. Update Your Ubuntu system.
First, make sure that all your system packages are up-to-date by running the following apt commands in the terminal.
sudo apt update
sudo apt upgrade
sudo apt install wget apt-transport-https gnupg2 software-properties-common
Step 2. Installing Rocket.Chat on Ubuntu 22.04.
By default, Rocket.Chat is not available on Ubuntu 22.04 base repository. Now we install Rocket.Chat server using Snap. If Snapd package manager is not already installed then you can install it by running the following command below:
sudo apt install snapd
sudo ln -s /var/lib/snapd/snap /snap
To install Rocket.Chat, simply use the following command:
sudo snap search rocketchat-server
Step 3. Configure Nginx as a Reverse Proxy.
First, install the Nginx web server using the following command below:
sudo apt install nginx
Once the installation is completed, run the commands to enable Nginx to automatically startup when your server starts:
sudo systemctl start nginx
sudo systemctl enable nginx
Next, we create a new Nginx server block for Rocket.Chat access through the proxy:
sudo nano /etc/nginx/conf.d/rocketchat.conf
Add the following lines:
server {
        listen 80;
        server_name your-server-IP-address;

        error_log /var/log/nginx/rocketchat_error.log;

        location / {
            proxy_pass http://127.0.0.1:3000/;
            proxy_http_version 1.1;
            proxy_set_header Upgrade $http_upgrade;
            proxy_set_header Connection "upgrade";
            proxy_set_header Host $http_host;
            proxy_set_header X-Real-IP $remote_addr;
            proxy_set_header X-Forwarded-For $proxy_add_x_forwarded_for;
            proxy_set_header X-Forwarded-Proto http;
            proxy_set_header X-Nginx-Proxy true;
            proxy_redirect off;
        }
    }
Save and close the file then restart the Nginx service to apply the changes:
sudo systemctl restart nginx
Step 4. Setup Let’s Encrypt SSL.
Now we download and setup Let’s Encrypt for SSL certificate:
sudo apt install certbot python3-certbot-nginx
Once done, we restart the Nginx web server service using following command:
nginx -t
sudo systemctl restart nginx
Step 5. Configure Firewall.
Now we set up an Uncomplicated Firewall (UFW) with Rocket.Chat to allow public access on default web ports 3000:
sudo ufw allow OpenSSH
sudo ufw allow in "Nginx Full"
sudo ufw enable
Step 6. Accessing Rocket.Chat Interface.
Once successfully installed, open your web browser and access the Rocket.Chat setup wizard using the URL https://your-server-IP-address:. You will be redirected to the following page:
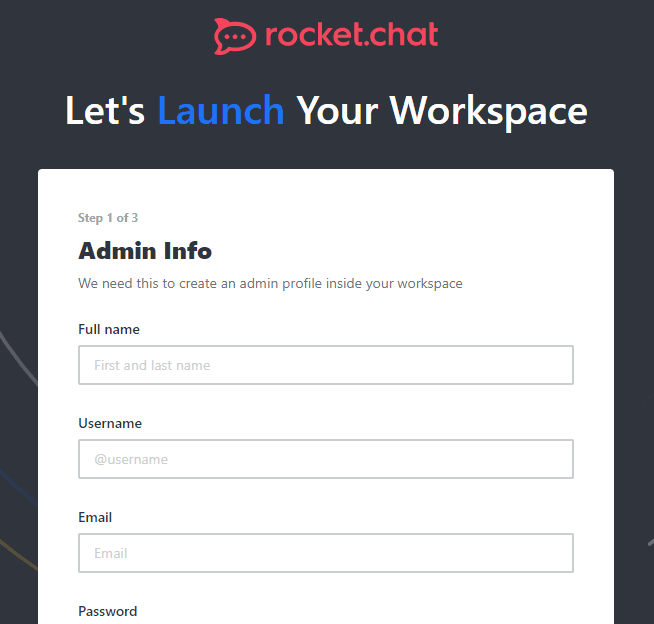
You just need to add the details such as your Full name, the username you want to use, email address, and password to secure your account.
In addition, to get the Administrator backend for managing the Rocket Chat server, in your browser type https://your-server-IP-address/admin.

Congratulations! You have successfully installed Rocket.Chat. Thanks for using this tutorial for installing Rocket.Chat on Ubuntu 22.04 LTS Jammy Jellyfish system. For additional help or useful information, we recommend you check the official Rocket.Chat website.
[su_box title=”VPS Manage Service Offer” style=”bubbles” box_color=”#000000″ radius=”10″]If you don’t have time to do all of this stuff, or if this is not your area of expertise, we offer a service to do “VPS Manage Service Offer”, starting from $10 (Paypal payment). Please contact us to get the best deal![/su_box]