How To Install Sails.js Framework on AlmaLinux 9

In this tutorial, we will show you how to install Sails.js Framework on AlmaLinux 9. For those of you who didn’t know, Sails.js is a Javascript framework that you can use to easily and quickly build customized enterprise-grade for Node.js.Sails.js offers a number of features built on Express.js and Node.js enabling the applications to be fully based on javascript.
This article assumes you have at least basic knowledge of Linux, know how to use the shell, and most importantly, you host your site on your own VPS. The installation is quite simple and assumes you are running in the root account, if not you may need to add ‘sudo‘ to the commands to get root privileges. I will show you the step-by-step installation of the Sails.js Framework on AlmaLinux 9. You can follow the same instructions for CentOS and Rocky Linux.
Prerequisites
- A server running one of the following operating systems: AlmaLinux 9, CentOS, and Rocky Linux 8.
- It’s recommended that you use a fresh OS install to prevent any potential issues.
- SSH access to the server (or just open Terminal if you’re on a desktop).
- A
non-root sudo useror access to theroot user. We recommend acting as anon-root sudo user, however, as you can harm your system if you’re not careful when acting as the root.
Install Sails.js Framework on AlmaLinux 9
Step 1. First, let’s start by ensuring your system is up-to-date.
sudo dnf clean all
sudo dnf update
sudo dnf groupinstall "Development Tools"
sudo dnf install bzip2 bzip2-devel wget curl tar
Step 2. Installing Node.js.
Now install the latest Node.js. 16 versions using the following command:
sudo dnf module install nodejs:16
Once the installation is completed, verify the Node.js version:
node -v
Step 3. Installing Sails.js on AlmaLinux 9.
By default, Sails.js is not available on the AlmaLinux 9 base repository. Now we install the Sails.js using the npm command:
npm -g install sails
Next, create a new project that you can name anything you like:
sudo mkdir -p /var/www/
cd /var/www/
sudo sails new meilanapp
You’ll see a prompt to choose your project template:
Choose a template for your new Sails app:
 1. Web App  ·  Extensible project with auth, login, & password recovery
 2. Empty    ·  An empty Sails app, yours to configure
 (type "?" for help, or <CTRL+C> to cancel)
? 2
Type 2 and hit Enter to finish the installation:
 info: Installing dependencies...
Press CTRL+C to cancel.
(to skip this step in the future, use --fast)
 info: Created a new Sails app `meilanapp`!
Next, navigate and launch the “meilanapp” to test and verify:
cd meilanapp
sudo sails lift
You should get the following output:
info: Starting app...

 info:
 info:                .-..-.
 info:
 info:    Sails              <|    .-..-.
 info:    v1.4.3              |\
 info:                       /|.\
 info:                      / || \
 info:                    ,'  |'  \
 info:                 .-'.-==|/_--'
 info:                 `--'-------'
 info:    __---___--___---___--___---___--___
 info:  ____---___--___---___--___---___--___-__
 info:
 info: Server lifted in `/var/www/meilanapp`
 info: To shut down Sails, press  + C at any time.
 info: Read more at https://sailsjs.com/support.

debug: -------------------------------------------------------
debug: :: Thu May 20 2022 06:46:11 GMT-0400 (Eastern Daylight Time)

debug: Environment : development
debug: Port        : 1337
debug: -------------------------------------------------------
Step 4. Create Sails.js Service.
Now we create a systemd service file to manage your application:
nano /lib/systemd/system/sails.service
Add the following lines:
[Unit]
After=network.target

[Service]
Type=simple
User=root
WorkingDirectory=/opt/ProjectName
ExecStart=/usr/local/bin/sails lift
Restart=on-failure

[Install]
WantedBy=multi-user.target
Save and close the file, then start and enable the service for automatic start on system reboot:
sudo systemctl daemon-reload
sudo systemctl start sails
sudo systemctl enable sails
Step 5. Configure Apache as Reverse Proxy for Sails.
First, install the Apache package with the following command:
sudo apt install apache2
Next, we create Apache virtual host and set up a reverse proxy for the Sails.js app:
nano /etc/httpd/conf.d/sails.conf
Add the following file:
<VirtualHost *:80>
ServerName your-domain.com

ProxyRequests Off
<Proxy *>
Order deny,allow
Allow from all
</Proxy>

ProxyPass / http://your-domain:1337/
ProxyPassReverse / http://your-domain:1337/
<Location />
Order allow,deny
Allow from all
</Location>
</VirtualHost>
Save and close the file, then restart the Apache webserver so that the changes take place:
sudo systemctl restart httpd
Step 6. Configure Firewall.
Allow the firewall to HTTP and HTTPS and reload it with the following commands:
sudo firewall-cmd --permanent --zone=public --add-service=http
sudo firewall-cmd --permanent --zone=public --add-service=https
sudo firewall-cmd --reload
Step 7. Accessing Sails.js Web Interface.
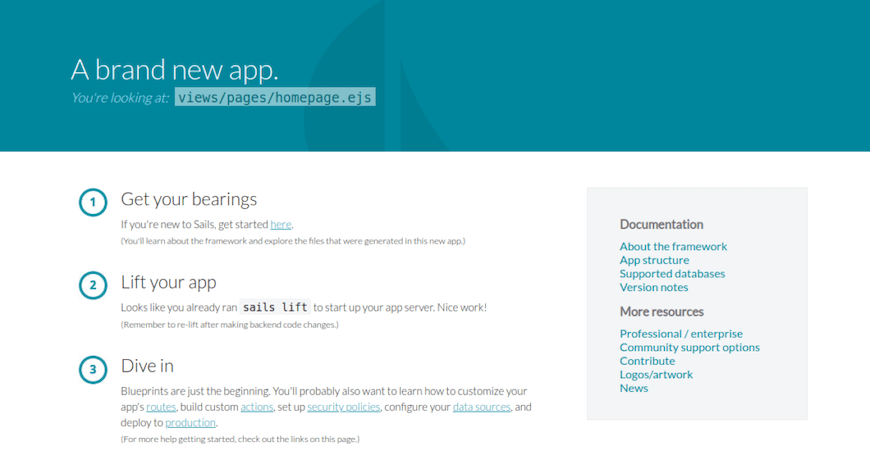
Once successfully installed, open your web browser and access the Sails.js web interface using the URL http://your-domain.com. You should see the Sails.js default page on the following screen:

Congratulations! You have successfully installed Sails.js. Thanks for using this tutorial for installing the Sails.js Framework on your AlmaLinux 9 system. For additional help or useful information, we recommend you check the official Sails.js website.