How To Install Sails.js Framework on Rocky Linux 9

In this tutorial, we will show you how to install Sails.js Framework on Rocky Linux 9. For those of you who didn’t know, Sails.js is a robust Javascript framework that makes it easy to build Node.js applications It is designed to resemble the MVC architecture from frameworks like Ruby on Rails, but with support for the more modern, data-oriented style of web app development. With its robust features and easy-to-use API, Sails.js is the perfect tool for building high-quality Node.js applications.
This article assumes you have at least basic knowledge of Linux, know how to use the shell, and most importantly, you host your site on your own VPS. The installation is quite simple and assumes you are running in the root account, if not you may need to add ‘sudo‘ to the commands to get root privileges. I will show you the step-by-step installation of the Sails.js MVC Framework on Rocky Linux. 9.
Prerequisites
- A server running one of the following operating systems: Rocky Linux 9.
- It’s recommended that you use a fresh OS install to prevent any potential issues.
- SSH access to the server (or just open Terminal if you’re on a desktop).
- A
non-root sudo useror access to theroot user. We recommend acting as anon-root sudo user, however, as you can harm your system if you’re not careful when acting as the root.
Install Sails.js Framework on Rocky Linux 9
Step 1. The first step is to update your system to the latest version of the package list. To do so, run the following commands:
sudo dnf check-update
sudo dnf install dnf-utils curl gcc-c++ make
Step 2. Installing Node.js on Rocky Linux 9.
By default, Node.js is not available on Rocky Linux 9 base repository. Now run the following command below to add the NodeSource repository to your system:
curl -sL https://rpm.nodesource.com/setup_16.x | bash -
Next, install the latest Node.js version with the following command:
sudo dnf install nodejs
Verify the installed Node.js version using the command:
node -v
To verify the NPM version, run the following command:
npm -v
Step 3. Installing Sails.js on Rocky Linux 9.
Now we install the Sails.js using the npm command:
sudo npm -g install sails
After installing Sails.js, you will need to create a directory for the Sails.js application:
mkdir sails
cd sails
sails new idrootapp
You will be asked to select the template for your application:
Choose a template for your new Sails app:
 1. Web App  ·  Extensible project with auth, login, & password recovery
 2. Empty    ·  An empty Sails app, yours to configure
 (type "?" for help, or <CTRL+C> to cancel)
? 1
Type 1 and press the ENTER KEY to proceed and complete the “idrootapp” creation:
info: Installing dependencies...
Press CTRL+C to cancel.
(to skip this step in the future, use --fast)
 info: Created a new Sails app `idrootapp`!
Next, navigate and launch the “idrootapp” to test and verify:
cd idrootapp
sails lift
Output:
info: Starting app...

 info: Initializing project hook... (`api/hooks/custom/`)
 info: Initializing `apianalytics` hook...  (requests to monitored routes will be logged!)
 info: ·• Auto-migrating...  (alter)
 info:    Hold tight, this could take a moment.
 info:  ✓ Auto-migration complete.

debug: Running v0 bootstrap script...  (looks like this is the first time the bootstrap has run on this computer)
 info:
 info:                .-..-.
 info:
 info:    Sails              <|    .-..-.
 info:    v1.5.2              |\
 info:                       /|.\
 info:                      / || \
 info:                    ,'  |'  \
 info:                 .-'.-==|/_--'
 info:                 `--'-------'
 info:    __---___--___---___--___---___--___
 info:  ____---___--___---___--___---___--___-__
 info:
 info: Server lifted in `/root/sails/idrootapp`
 info: To shut down Sails, press  + C at any time.
 info: Read more at https://sailsjs.com/support.

debug: -------------------------------------------------------
debug: :: Mon July 28 2022 19:09:46 GMT+0000 (Coordinated Universal Time)

debug: Environment : development
debug: Port        : 1337
debug: -------------------------------------------------------
Step 4. Create a Systemd Service for Salis.js.
Now we create a systemd service file for Salis.js:
nano /lib/systemd/system/sails.service
Add the following lines:
[Unit]
After=network.target

[Service]
Type=simple
User=root
WorkingDirectory=/var/www/idrootapp
ExecStart=/usr/bin/sails lift
Restart=on-failure

[Install]
WantedBy=multi-user.target
Save and close the file, then reload the systemd daemon to apply the changes:
sudo systemctl daemon-reload
sudo systemctl start sails
sudo systemctl enable sails
Step 5. Setup Nginx as a Reverse Proxy for Sails.js.
First, install Nginx available on Rocky Linux 9:
sudo dnf install nginx
Next, create an Nginx virtual host configuration file using the following command:
nano /etc/nginx/conf.d/sails.conf
Add the following file:
server {
 listen       80;
 server_name  sails.your-domain.com;
   location / {
     proxy_pass        http://localhost:1337/;
     proxy_set_header  Host $host;
     proxy_buffering   off;
   }
 }
Save and close the file, then restart Nginx to apply the changes:
nginx -t
sudo systemctl restart nginx
Step 6. Configure Firewall Rules.
Allow the firewall to HTTP and HTTPS and reload it with the following commands:
sudo firewall-cmd --permanent --zone=public --add-service=http
sudo firewall-cmd --permanent --zone=public --add-service=https
sudo firewall-cmd --reload
Step 7. Accessing Sails.js Web Interface.
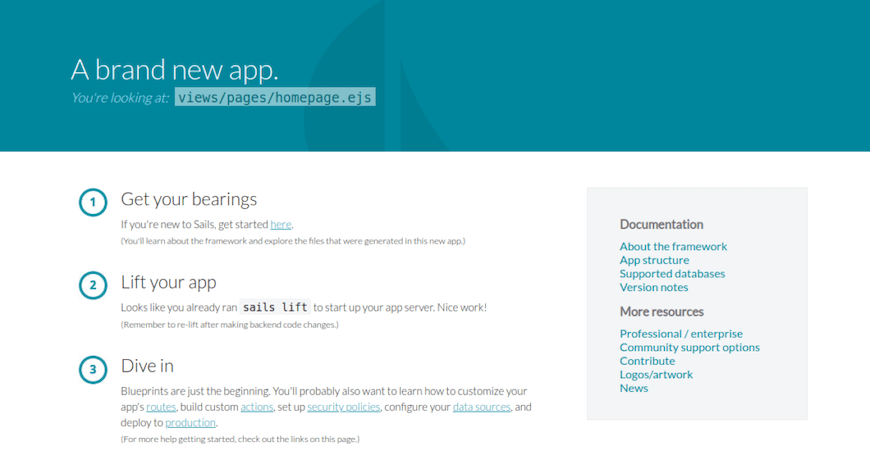
Once successfully installed, open your web browser and access the Sails.js web interface using the URL http://your-domain.com. You should see the Sails.js default page on the following screen:

Congratulations! You have successfully installed Sails.js. Thanks for using this tutorial for installing the Sails.js MVC Framework on your Rocky Linux 9 system. For additional help or useful information, we recommend you check the official Sails.js website.