How To Install Samba on Ubuntu 22.04 LTS

In this tutorial, we will show you how to install Samba on Ubuntu 22.04 LTS. For those of you who didn’t know, Samba runs on a Unix system, it allows Windows to share files and printers on the Unix host, and it also allows Unix users to access resources shared by Windows systems. The software can be used as a controller for the domain or as a normal member.
This article assumes you have at least basic knowledge of Linux, know how to use the shell, and most importantly, you host your site on your own VPS. The installation is quite simple and assumes you are running in the root account, if not you may need to add ‘sudo‘ to the commands to get root privileges. I will show you the step-by-step installation of Samba on Ubuntu 22.04 (Jammy Jellyfish). You can follow the same instructions for Ubuntu 22.04 and any other Debian-based distribution like Linux Mint, Elementary OS, Pop!_OS, and more as well.
Prerequisites
- A server running one of the following operating systems: Ubuntu 22.04, 20.04, and any other Debian-based distribution like Linux Mint.
- It’s recommended that you use a fresh OS install to prevent any potential issues.
- SSH access to the server (or just open Terminal if you’re on a desktop).
- A
non-root sudo useror access to theroot user. We recommend acting as anon-root sudo user, however, as you can harm your system if you’re not careful when acting as the root.
Install Samba on Ubuntu 22.04 LTS Jammy Jellyfish
Step 1. First, make sure that all your system packages are up-to-date by running the following apt commands in the terminal.
sudo apt update
sudo apt upgrade
sudo apt install wget apt-transport-https gnupg2 software-properties-common
Step 2. Installing Samba on Ubuntu 22.04.
By default, Samba is available on Ubuntu 22.04 base repository. Now run the following command below to download the latest version of Samba to your Ubuntu system:
sudo apt install samba smbclient cifs-utils
Now make the service enabled to start automatically with system boot, here is the command:
sudo systemctl enable --now smbd
Step 3. Create a User to the Samba Group.
Create samba share users. So it can access all files and folders shared under it:
sudo usermod -aG sambashare $USER
Set the user password and confirm:
sudo smbpasswd -a $USER
Step 4. Configure Firewall.
Now we set up an Uncomplicated Firewall (UFW) with Samba to allow public access:
sudo ufw allow 'Samba'
sudo firewall-cmd --reload
Step 5. Share Ubuntu Folder using Samba.
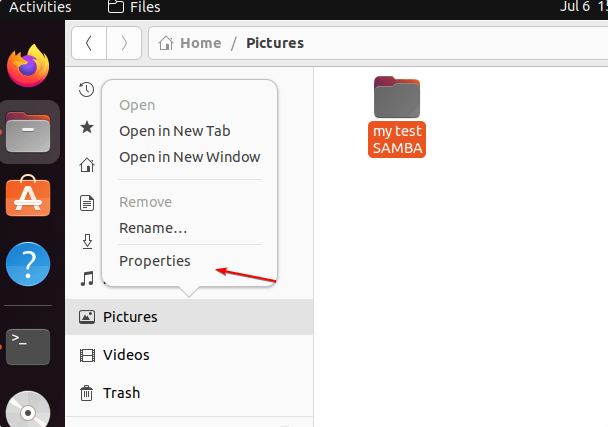
Let’s try to share the Pictures folder or any other that is owned by your current user.

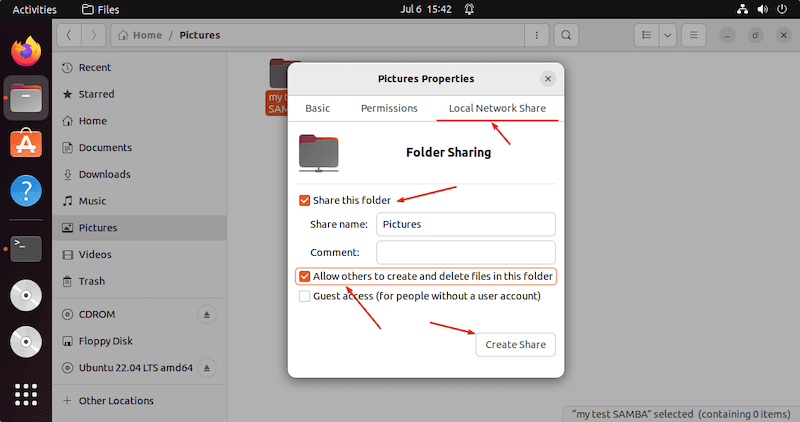
Then, right-click on it and select Properties, and then the Local Network Share tab. If you want the users to create or delete the files from the shared directory then check the box given for “Allow others to create and delete files in this folder“. Whereas, if you want any user to log in and access the shared folder then select the “Guest access” box otherwise don’t. Finally, to create the sharing point, click on the “Create Share” button.

Step 6. Accessing the Shared Folder.
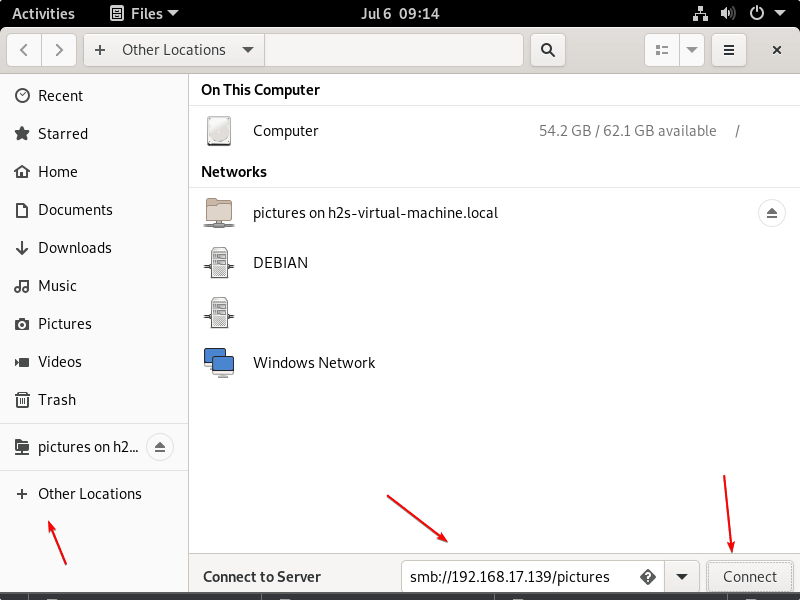
On Debian-based, RHEL-based, and other Linux with Gnome. Now go to File Manager and then click on the Other locations. Next, there go to Connect Server box and type your Ubuntu 22.04 Samba IP address in the following format:
smb://ip-address/shared-folder-name

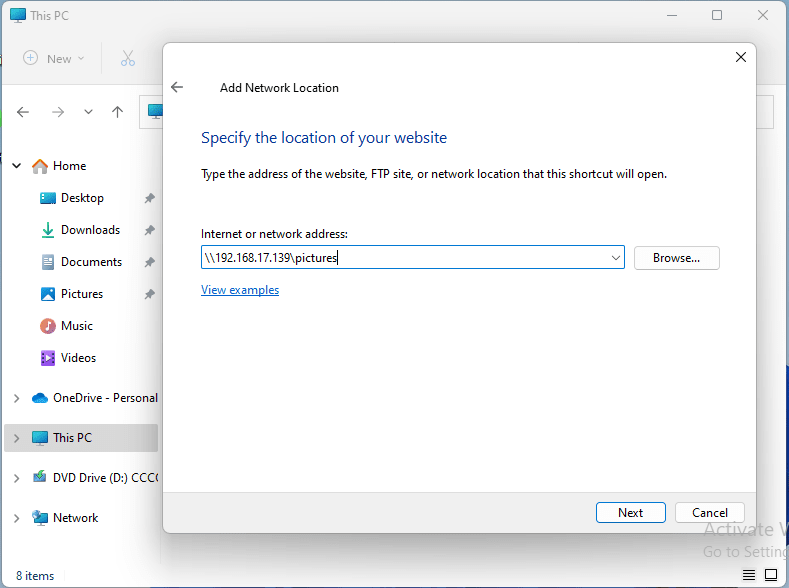
If you are using the Windows system and want to mount the folder shared on Ubuntu 22.04 with the help of SAMBA, then here are the steps to follow. First, go to This PC and right-click somewhere on the blank area to select “Add a network location” from the context menu. Now, enter the Ip-address and shared folder name in the following format:
\\server-ip-address\shared-folder

Congratulations! You have successfully installed Samba. Thanks for using this tutorial for installing Samba on Ubuntu 22.04 LTS Jammy Jellyfish system. For additional help or useful information, we recommend you check the official Samba website.