How To Install Showfoto on Debian 12

In this tutorial, we will show you how to install Showfoto on Debian 12. Showfoto is a powerful, feature-rich, and user-friendly image editor designed for managing and editing digital photos. As a standalone application, it is part of the digiKam project, which offers a comprehensive suite of tools for photographers. Showfoto supports a wide range of image formats, offers non-destructive editing, and provides numerous filters and tools for enhancing and manipulating images.
This article assumes you have at least basic knowledge of Linux, know how to use the shell, and most importantly, you host your site on your own VPS. The installation is quite simple and assumes you are running in the root account, if not you may need to add ‘sudo‘ to the commands to get root privileges. I will show you the step-by-step installation of the Showfoto image editor on a Debian 12 (Bookworm).
Prerequisites
- A server running one of the following operating systems: Debian 12 (Bookworm).
- It’s recommended that you use a fresh OS install to prevent any potential issues.
- SSH access to the server (or just open Terminal if you’re on a desktop).
- You will need an active internet connection to download the Showfoto package.
- A
non-root sudo useror access to theroot user. We recommend acting as anon-root sudo user, however, as you can harm your system if you’re not careful when acting as the root.
Install Showfoto on Debian 12 Bookworm
Step 1. Before installing Showfoto, it is essential to update your Debian system to ensure that you have the latest packages and security updates. This step helps prevent potential conflicts and ensures a smooth installation process. To update your system, open a terminal window and enter the following command:
sudo apt update
sudo apt upgrade
Step 2. Installing Showfoto on Debian 12.
Installing Showfoto on Debian 12 is a straightforward process, thanks to the availability of the software in the official Debian repositories. To install Showfoto, enter the following command in the terminal:
sudo apt install showfoto
This command will automatically download and install Showfoto along with its dependencies. The -y flag is used to automatically confirm the installation, saving you from having to manually approve the process. Once the installation is complete, you will see an output indicating that Showfoto and its dependencies have been successfully installed.
To ensure that Showfoto has been installed correctly, you can check the installed version by running the following command:
showfoto --version
This command will display the version number of Showfoto, confirming that the installation was successful.
Step 3. Launching Showfoto on Debian.
Now that Showfoto is installed, you can launch the application from the command line by entering the following command:
showfoto

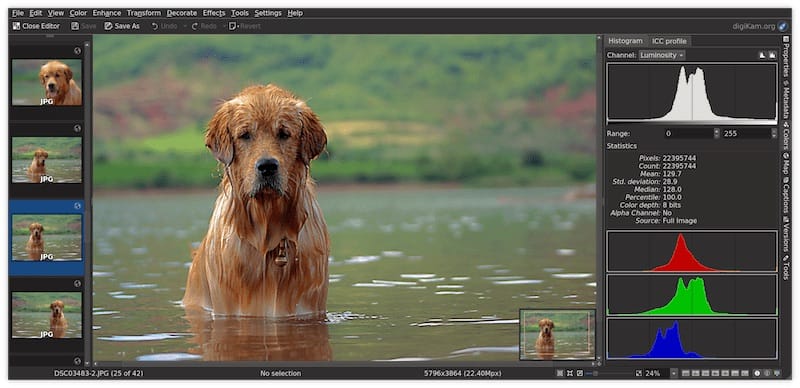
Upon launching Showfoto, you will be greeted with the main interface, which consists of a file browser, a central workspace for editing images, and various toolbars and panels for accessing the application’s features. Take some time to familiarize yourself with the interface and explore the available tools and filters.
If you decide that Showfoto is not the right image editor for your needs or if you encounter issues that cannot be resolved, you may need to uninstall the application. To remove Showfoto from your system, enter the following command in the terminal:
sudo apt autoremove showfoto
sudo apt purge showfoto
Congratulations! You have successfully installed Showfoto. Thanks for using this tutorial to install the latest version of the Showfoto image editor on Debian 12 Bookworm. For additional help or useful information, we recommend you check the official Showfoto website.