How To Install SmartGit on Fedora 41

SmartGit is a powerful Git client designed for developers who prefer a graphical user interface (GUI) for managing their Git repositories. Unlike command-line tools, SmartGit provides an intuitive interface that simplifies version control tasks, making it easier to visualize changes, manage branches, and collaborate with others. This article will guide you through the process of installing SmartGit on Fedora 41, ensuring that you have a smooth experience from start to finish.
Understanding SmartGit
What is SmartGit?
SmartGit is a cross-platform Git client that offers a rich set of features tailored for both beginners and experienced developers. It supports essential Git operations such as commit, push, pull, merge, and rebase, all accessible through a user-friendly interface. Additionally, SmartGit integrates seamlessly with popular platforms like GitHub, Bitbucket, and GitLab, allowing users to manage their repositories without switching between different applications.
Why Use SmartGit?
- User-Friendly Interface: SmartGit’s GUI makes it easy to navigate through repositories and perform complex tasks without needing to memorize command-line syntax.
- Powerful Features: It includes advanced features such as conflict resolution tools, history visualization, and support for SSH and HTTPS protocols.
- Cross-Platform Compatibility: SmartGit works on Windows, macOS, and Linux, ensuring a consistent experience across different operating systems.
System Requirements
Hardware Requirements
Before installing SmartGit on Fedora 41, ensure that your system meets the following hardware specifications:
- Processor: 64-bit processor (Intel or AMD)
- RAM: At least 4 GB (8 GB recommended)
- Disk Space: Minimum of 500 MB free space for installation
Software Requirements
The software requirements for installing SmartGit include:
- Operating System: Fedora 41 or later
- Java Runtime Environment: Java 11 or higher is required to run SmartGit.
Preparing Your Fedora System
Updating Your System
The first step in preparing your Fedora system for SmartGit installation is to ensure that all packages are up to date. Open your terminal and run the following command:
sudo dnf updateThis command updates all installed packages to their latest versions, which can help prevent compatibility issues during the installation process.
Installing Required Dependencies
SmartGit requires certain dependencies to function correctly. You will need to install GTK and the Java Runtime Environment. Use the following command in your terminal:
sudo dnf install gtk3 java-11-openjdkThis command installs the necessary libraries and Java runtime needed for SmartGit to operate smoothly.
Downloading SmartGit
Where to Download
You can download SmartGit directly from the official website. Navigate to the SmartGit download page, where you will find various versions available for different operating systems. Make sure to select the Linux version compatible with your system.
Downloading via Terminal
If you prefer using the terminal for downloading files, you can use either `wget` or `curl`. Here’s how to do it with `wget`:
wget https://www.syntevo.com/smartgit/download/smartgit.tar.gzThis command downloads the latest version of SmartGit in a compressed tar.gz format.
Installing SmartGit
Extracting the Downloaded File
Once the download is complete, you’ll need to extract the contents of the tar.gz file. Use the following command in your terminal:
tar xzf smartgit*.tar.gz -C /opt/This command extracts the files into the /opt directory, which is commonly used for optional software packages in Linux distributions.
Running the Installer Script
Navigating to the directory where you extracted SmartGit allows you to run its installer script. Execute this command:
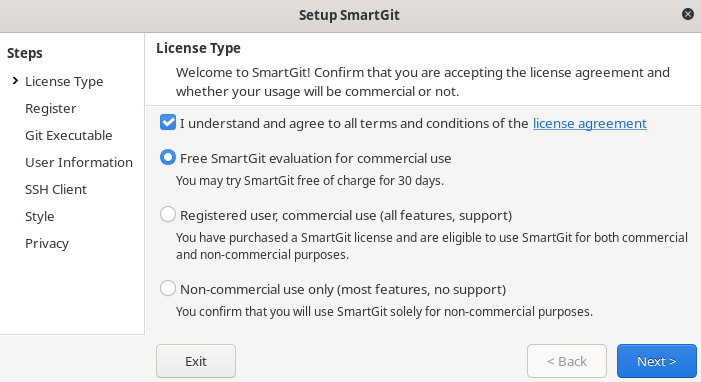
/opt/smartgit/bin/smartgit.shThis launches SmartGit for the first time. Follow any on-screen prompts to complete initial setup configurations.
Creating Menu Items
If you want SmartGit to appear in your application menu for easy access, you can run an additional script provided with the installation. Use this command:
/opt/smartgit/bin/add-menuitem.shThis script creates a menu entry for SmartGit in your desktop environment’s application launcher.
Configuring SmartGit
Initial Setup
The first time you launch SmartGit after installation, you’ll be prompted to configure some initial settings. This includes setting up your Git identity (username and email) which is crucial for committing changes. Enter your details when prompted.

Setting Up Git Credentials
You can also configure your Git credentials directly within SmartGit by navigating to:
- Edit > Preferences > Git > User Information
This section allows you to specify your name and email address associated with your commits. Ensure that these details match those used in your remote repository accounts (e.g., GitHub).
Troubleshooting Common Issues
Installation Errors
If you encounter errors during installation, consider checking the following common issues:
- Error: Missing Dependencies: If prompted about missing libraries or dependencies during installation, ensure you have installed all required packages as mentioned earlier.
- Error: Permission Denied: If you receive permission errors while extracting files or running scripts, try using `sudo` before commands that require administrative privileges.
- Error: Java Not Found: Ensure that Java is correctly installed by running `
java -version` in your terminal. If it’s not found, reinstall Java using `sudo dnf install java-11-openjdk`.
Performance Issues
If you experience performance issues while using SmartGit on Fedora 41, consider these optimization tips:
- Increase Memory Allocation: Adjust memory settings in the configuration file located at `
/opt/smartgit/bin/smartgit.vmoptions`. Add or modify lines such as:-Xmx2048m -Xms512m - Avoid Using Large Repositories: For large repositories with extensive histories or numerous branches, consider using shallow clones or limiting fetched branches.
- Keeps Your System Updated: Regularly update both Fedora and SmartGit to benefit from performance improvements and bug fixes.
Congratulations! You have successfully installed SmartGit. Thanks for using this tutorial for installing SmartGit on your Fedora 41 system. For additional help or useful information, we recommend you check the official SmartGit website.