How To Install Snipe-IT on Fedora 40

Snipe-IT is a powerful, open-source asset management system designed to help organizations track and manage their IT assets efficiently. As businesses grow and technology evolves, keeping track of hardware, software, and licenses becomes increasingly complex. Snipe-IT offers a robust solution to this challenge, providing a user-friendly interface and comprehensive features for asset lifecycle management.
Fedora 40, the latest release of the popular Linux distribution, provides an excellent platform for hosting Snipe-IT. With its cutting-edge features, strong security, and stability, Fedora 40 ensures a reliable environment for your asset management needs. This guide will walk you through the process of installing Snipe-IT on Fedora 40, enabling you to harness the full potential of this powerful asset management tool.
Prerequisites
Before diving into the installation process, ensure that your system meets the following requirements:
- A Fedora 40 server with at least 2GB of RAM and 20GB of disk space
- Root or sudo access to the server
- A stable internet connection for downloading necessary packages
You’ll also need to install the following software and packages:
- Apache or Nginx web server
- PHP 7.4 or higher
- MariaDB or MySQL database server
- Composer (PHP dependency manager)
- Git (version control system)
Ensure that you have the necessary permissions to install software and modify system configurations. It’s recommended to use a non-root user with sudo privileges for enhanced security.
Preparing the Environment
Start by updating your Fedora 40 system to ensure you have the latest security patches and software versions:
sudo dnf update -yNext, install the required dependencies:
sudo dnf install httpd php php-cli php-fpm php-json php-common php-mysql php-zip php-gd php-mbstring php-curl php-xml php-pear php-bcmath php-json mariadb mariadb-server git unzip curl -yConfigure the firewall to allow HTTP and HTTPS traffic:
sudo firewall-cmd --permanent --add-service=http
sudo firewall-cmd --permanent --add-service=https
sudo firewall-cmd --reload
Installing and Configuring the Web Server
For this guide, we’ll use Apache as the web server. Start and enable Apache:
sudo systemctl start httpd
sudo systemctl enable httpd
Configure PHP by editing the php.ini file:
sudo nano /etc/php.iniModify the following settings:
memory_limit = 256M
upload_max_filesize = 100M
max_execution_time = 120
date.timezone = Your/Timezone
Save the file and exit the editor.
Install and set up MariaDB:
sudo systemctl start mariadb
sudo systemctl enable mariadb
sudo mysql_secure_installation
Follow the prompts to set a root password and secure your MariaDB installation.
Installing Snipe-IT
Create a directory for Snipe-IT and clone the repository:
sudo mkdir -p /var/www/html/snipeit
sudo chown -R $USER:$USER /var/www/html/snipeit
cd /var/www/html/snipeit
git clone https://github.com/snipe/snipe-it .
Install Composer and use it to install Snipe-IT’s dependencies:
curl -sS https://getcomposer.org/installer | php
sudo mv composer.phar /usr/local/bin/composer
composer install --no-dev --prefer-source
Create a new MariaDB database and user for Snipe-IT:
mysql -u root -p
CREATE DATABASE snipeit;
GRANT ALL PRIVILEGES ON snipeit.* TO 'snipeit_user'@'localhost' IDENTIFIED BY 'your_password';
FLUSH PRIVILEGES;
EXIT;
Post-Installation Configuration
Copy the example environment file and edit it:
cp .env.example .env
nano .env
Update the following settings in the .env file:
APP_URL=http://your_server_ip
DB_HOST=localhost
DB_DATABASE=snipeit
DB_USERNAME=snipeit_user
DB_PASSWORD=your_password
Generate an application key:
php artisan key:generateSet up the Apache virtual host by creating a new configuration file:
sudo nano /etc/httpd/conf.d/snipeit.confAdd the following content:
<VirtualHost *:80>
    ServerName your_server_ip
    DocumentRoot /var/www/html/snipeit/public
    <Directory /var/www/html/snipeit/public>
        Options Indexes FollowSymLinks MultiViews
        AllowOverride All
        Order allow,deny
        allow from all
    </Directory>
</VirtualHost>
Save the file and restart Apache:
sudo systemctl restart httpdInitializing and Accessing Snipe-IT
Run the database migrations to set up the required tables:
php artisan migrateCreate the admin user:
php artisan admin:createFollow the prompts to set up your admin account.
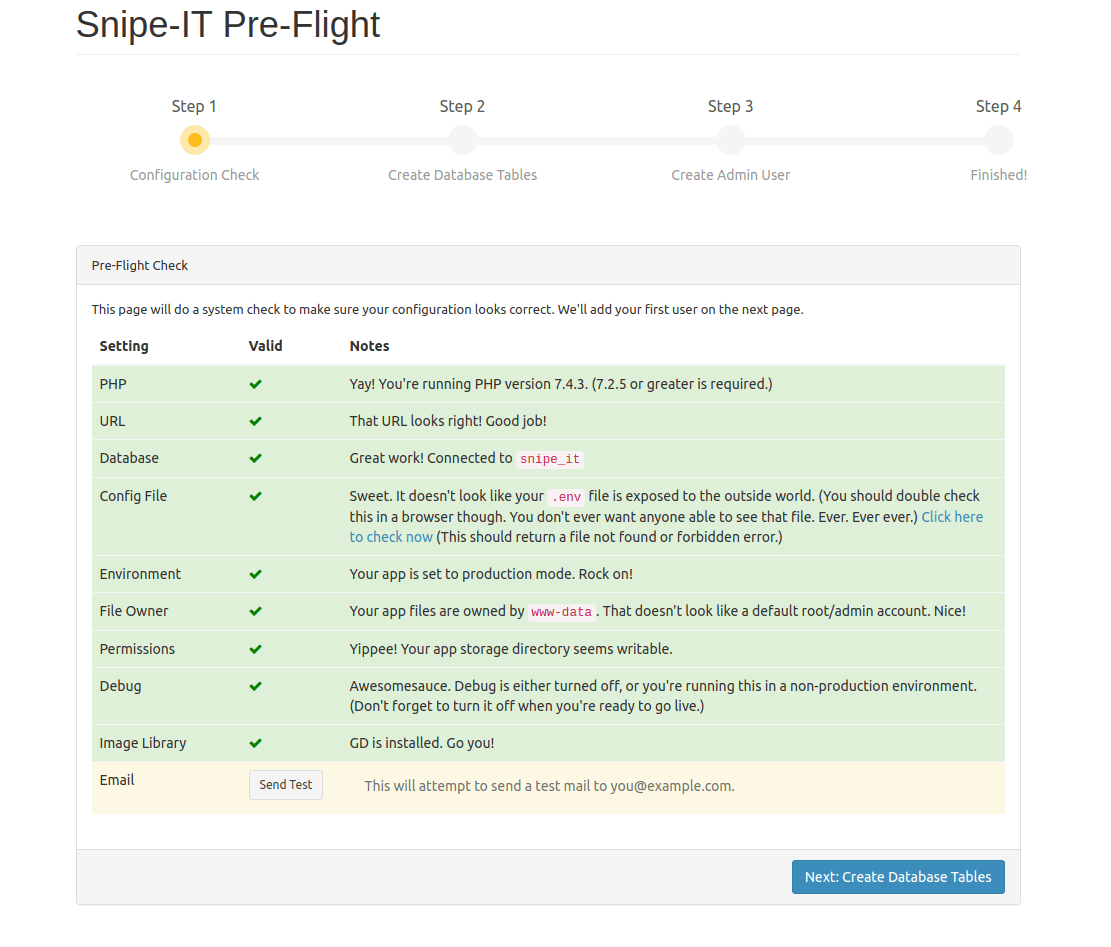
You can now access Snipe-IT by navigating to http://your_server_ip in your web browser. Log in with the admin credentials you just created.

Troubleshooting Common Issues
If you encounter any issues during the installation process, consider the following troubleshooting steps:
Database Connection Problems
- Double-check the database credentials in the
.envfile - Ensure MariaDB is running:
sudo systemctl status mariadb - Verify that the snipeit_user has the correct permissions
Web Server Configuration Issues
- Check Apache error logs:
sudo tail -f /var/log/httpd/error_log - Ensure the virtual host configuration is correct
- Verify that mod_rewrite is enabled:
sudo a2enmod rewrite
Permission-related Errors
- Set correct permissions:
sudo chown -R apache:apache /var/www/html/snipeit - Ensure SELinux is not blocking access:
sudo setenforce 0(temporarily)
Optimizing Snipe-IT Performance
To enhance Snipe-IT’s performance on Fedora 40, consider implementing the following optimizations:
Caching Strategies
- Enable PHP OPcache in php.ini
- Implement Redis for session and cache storage
- Use a content delivery network (CDN) for static assets
Database Optimization Tips
- Regularly optimize tables:
OPTIMIZE TABLE table_name; - Use appropriate indexing for frequently queried columns
- Monitor and adjust MariaDB configuration for better performance
Web Server Tuning
- Enable Apache mod_deflate for compression
- Implement browser caching for static resources
- Adjust Apache’s MPM settings for optimal concurrency
Congratulations! You have successfully installed Snipe-IT. Thanks for using this tutorial for installing the Snipe-IT asset management system on your Fedora 40 system. For additional help or useful information, we recommend you check the official Snipe-IT website.