How To Install Squid Proxy Server on Debian 12

In this tutorial, we will show you how to install Squid Proxy Server on Debian 12. Squid is an open-source proxy server and web cache daemon that intercepts and caches HTTP, HTTPS, FTP, and other protocols to provide improved web performance, reduce bandwidth consumption, and enhance security.
This article assumes you have at least basic knowledge of Linux, know how to use the shell, and most importantly, you host your site on your own VPS. The installation is quite simple and assumes you are running in the root account, if not you may need to add ‘sudo‘ to the commands to get root privileges. I will show you the step-by-step installation of the Squid Proxy Server on a Debian 12 (Bookworm).
Prerequisites
- A server running one of the following operating systems: Debian 12 (Bookworm).
- It’s recommended that you use a fresh OS install to prevent any potential issues.
- SSH access to the server (or just open Terminal if you’re on a desktop).
- An active internet connection. You’ll need an internet connection to download the necessary packages and dependencies for Squid Proxy Server.
- A
non-root sudo useror access to theroot user. We recommend acting as anon-root sudo user, however, as you can harm your system if you’re not careful when acting as the root.
Install Squid Proxy Server on Debian 12 Bookworm
Step 1. Before we install any software, it’s important to make sure your system is up to date by running the following apt commands in the terminal:
sudo apt update
This command will refresh the repository, allowing you to install the latest versions of software packages.
Step 2. Installing Squid Proxy Server on Debian 12.
Before we proceed, it’s crucial to check if the Squid package is available in the Debian 12 repository:
sudo apt search squid
You should see the Squid package listed. If it’s not, make sure your repository configurations are correct.
Now that we’ve confirmed Squid’s availability, let’s install it:
sudo apt install squid
To ensure Squid starts automatically on boot and to start it immediately, use the following commands:
sudo systemctl enable squid
sudo systemctl start squid
Step 3. Configuring Squid Proxy Server.
Squid’s main configuration file is /etc/squid/squid.conf. This file is where you define how Squid behaves. Understanding its structure is crucial:
sudo nano /etc/squid/squid.conf
Access control rules determine who can access your proxy server. Example:
acl localnet src 192.168.0.0/24
http_access allow localnet
Cache settings influence how Squid stores and retrieves cached content. Tweak these according to your needs:
cache_dir ufs /var/spool/squid 100 16 256
You can customize error pages for a better user experience:
error_directory /usr/share/squid/errors/en
Adding authentication enhances security and control:
auth_param basic program /usr/lib/squid/basic_ncsa_auth /etc/squid/passwd
auth_param basic children 5
auth_param basic realm Squid Proxy Server
auth_param basic credentialsttl 2 hours
auth_param basic casesensitive off

acl auth_users proxy_auth REQUIRED
http_access allow auth_users
After configuring Squid, restart the service:
sudo systemctl restart squid
Squid logs provide valuable insights. Check them:
tail -f /var/log/squid/access.log
tail -f /var/log/squid/cache.log
Step 4. Configure Client for the Squid Proxy Server.
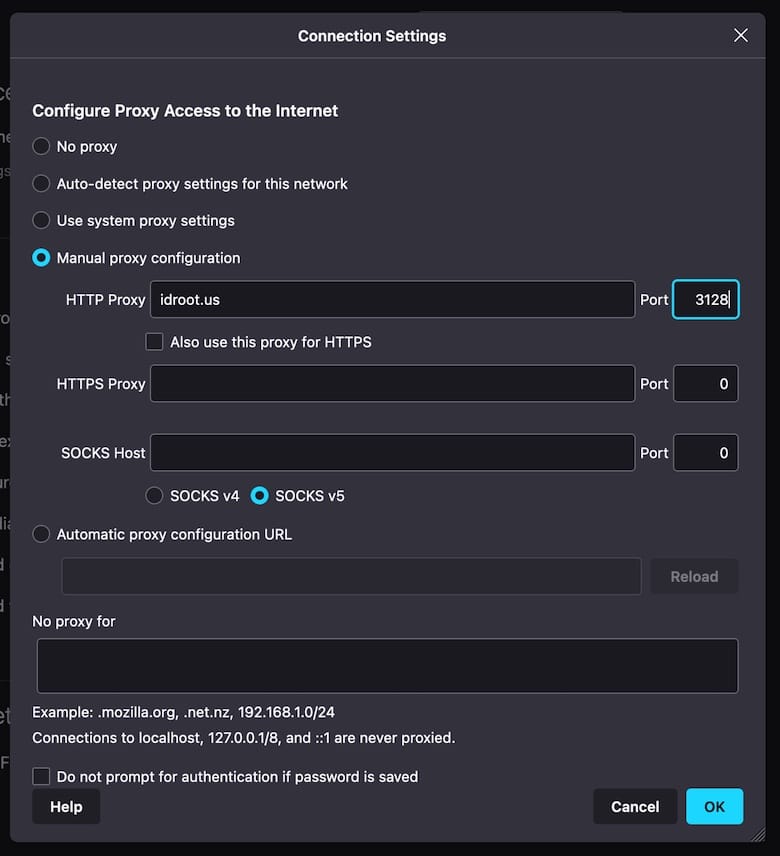
We will test the Squid proxy server by configuring a web browser to use it. Open your web browser and go to the network settings. In Firefox, this can be done by going to Preferences -> Network Settings.
In the Network Settings window, select the “Manual proxy configuration” option and enter the IP address of your Squid proxy server and the port number you configured earlier (8080 in our example).

Congratulations! You have successfully installed Squid Proxy. Thanks for using this tutorial to install the latest version of the Squid Proxy Server on Debian 12 Bookworm. For additional help or useful information, we recommend you check the official Squid website.