How To Install Stable Diffusion on Ubuntu 22.04 LTS

In this tutorial, we will show you how to install Stable Diffusion on Ubuntu 22.04 LTS. Stable Diffusion, a cutting-edge generative artificial intelligence model, has been making waves in the world of digital art and software development. This powerful tool harnesses the power of diffusion technology and latent space to generate unique images, videos, and animations. From artists and photographers enhancing their work to software developers building AI-powered applications, Stable Diffusion’s applications are as diverse as they are impressive.
This article assumes you have at least basic knowledge of Linux, know how to use the shell, and most importantly, you host your site on your own VPS. The installation is quite simple and assumes you are running in the root account, if not you may need to add ‘sudo‘ to the commands to get root privileges. I will show you the step-by-step installation of the Stable Diffusion on Ubuntu 22.04 (Jammy Jellyfish). You can follow the same instructions for Ubuntu 22.04 and any other Debian-based distribution like Linux Mint, Elementary OS, Pop!_OS, and more as well.
Prerequisites
- A server running one of the following operating systems: Ubuntu 22.04 LTS (Long Term Support) or a compatible Linux distribution.
- SSH access to the server (or just open Terminal if you’re on a desktop).
- Basic knowledge of the Linux command-line interface (CLI). This guide assumes you’re comfortable with executing commands in a terminal.
- An active internet connection. You’ll need an internet connection to download the necessary packages and dependencies for Stable Diffusion.
- A
non-root sudo useror access to theroot user. We recommend acting as anon-root sudo user, however, as you can harm your system if you’re not careful when acting as the root.
Install Stable Diffusion on Ubuntu 22.04 LTS Jammy Jellyfish
Step 1. Before we begin, it’s always a good practice to ensure that your system is up-to-date with the latest package versions. Open a terminal and run the following commands:
sudo apt update
sudo apt upgrade
This will update the package lists and upgrade any outdated packages on your system.
Step 2. Installing Required Dependencies.
Next, we’ll install the required dependencies for Stable Diffusion. Run the following command to install Python, pip, Git, and other necessary packages:
sudo apt install python3 python3-pip git curl
Step 3. Installing Stable Diffusion on Ubuntu 22.04.
With your system updated, the next step is to download Stable Diffusion. This is done by cloning the Stable Diffusion repository from GitHub. Enter the following command in the terminal:
git clone https://github.com/AUTOMATIC1111/stable-diffusion-webui.git
This command creates a directory named stable-diffusion-webui in your current directory. This directory contains all the necessary files for Stable Diffusion.
Step 4. Configuring Stable Diffusion.
Now that you have Stable Diffusion on your system, it’s time to configure it. This involves setting up a Python virtual environment and installing the necessary Python packages.
A Python virtual environment is a self-contained directory tree that includes a Python installation for a particular version of Python, plus a number of additional packages. This allows you to manage the Python packages required by Stable Diffusion without affecting other Python projects on your system.
To set up a Python virtual environment, use the following commands:
python3 -m venv env
source env/bin/activate
The first command creates a new virtual environment named env, and the second command activates the virtual environment.
Next, install the necessary Python packages using the following command:
pip install --upgrade diffusers transformers scipy torch
This command installs and upgrades the diffusers, transformers, scipy, and torch packages, which are required by Stable Diffusion.
Step 5. Running Stable Diffusion.
With Stable Diffusion configured, you’re now ready to run the application. Navigate to the stable-diffusion-webui directory in the terminal and run the following command:
python main.py
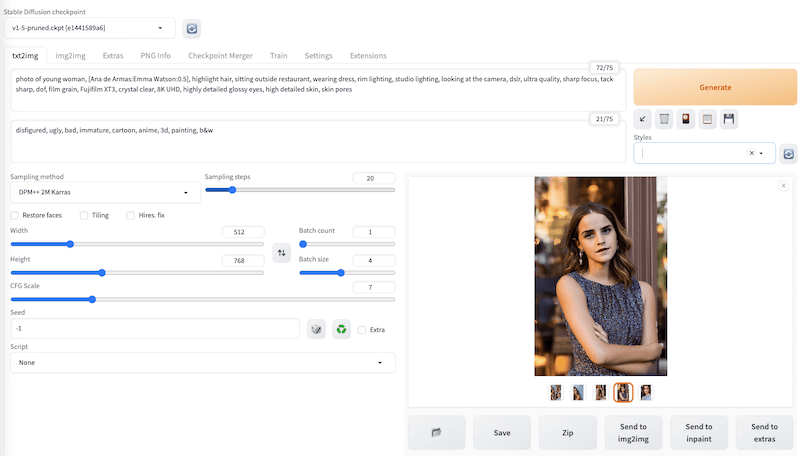
This command starts the Stable Diffusion application and provides you with a URL. Copy and paste this URL into your web browser to access the Stable Diffusion user interface.

Once you’ve accessed the Stable Diffusion user interface, you can start generating images. The quality of the images generated by Stable Diffusion heavily depends on the prompts you provide. A well-crafted prompt can guide the AI model in generating images that closely match the desired outcome. On the other hand, an unclear or vague prompt can lead to unexpected or unsatisfactory outcomes.
Congratulations! You have successfully installed Stable Diffusion. Thanks for using this tutorial for installing Stable Diffusion on the Ubuntu 22.04 LTS Jammy Jellyfish system. For additional help or useful information, we recommend you check the official Stable Diffusion website.