In this tutorial, we will show you how to install Syncthing on Ubuntu 20.04 LTS. For those of you who didn’t know, Syncthing is an open-source continuous file synchronization used to sync files between two or more computers in a network. Syncthing uses peer-to-peer architecture, meaning that each device attached to your Syncthing network retains copies of the files in your shared folders and pushes new content whenever any changes have been made.
This article assumes you have at least basic knowledge of Linux, know how to use the shell, and most importantly, you host your site on your own VPS. The installation is quite simple and assumes you are running in the root account, if not you may need to add ‘sudo‘ to the commands to get root privileges. I will show you the step-by-step installation of the Kitematic Docker GUI tool on Ubuntu 20.04 (Focal Fossa). You can follow the same instructions for Ubuntu 18.04, 16.04, and any other Debian-based distribution like Linux Mint.
Prerequisites
- A server running one of the following operating systems: Ubuntu 20.04, 18.04, 16.04, and any other Debian-based distribution like Linux Mint.
- It’s recommended that you use a fresh OS install to prevent any potential issues.
- A
non-root sudo useror access to theroot user. We recommend acting as anon-root sudo user, however, as you can harm your system if you’re not careful when acting as the root.
Install Syncthing on Ubuntu 20.04 LTS Focal Fossa
Step 1. First, make sure that all your system packages are up-to-date by running the following apt commands in the terminal.
sudo apt update
sudo apt upgrade
sudo apt install curl apt-transport-https
Step 2. Installing Syncthing on Ubuntu 20.04.
Syncthing is included in the default Ubuntu repository. Now we download and import the GPG key for the repository with the following command:
curl -s https://syncthing.net/release-key.txt | sudo apt-key add -
echo "deb https://apt.syncthing.net/ syncthing stable" | sudo tee /etc/apt/sources.list.d/syncthing.list
Once is done, update the repository and install the Syncthing service with the following command below:
sudo apt update
sudo apt install syncthing
You can verify the installed version using the following command:
syncthing --version
Step 3. Create Systemd Service.
The official Syncthing deb package ships with the needed systemd service file. Now enable Syncthing to auto-start at boot time by running the below command. Replace your-username with your actual username:
sudo systemctl enable syncthing@your-username.service
The above command will create a symbolic link that points to the syncthing@.service file. Now we can start the Syncthing service with the following command:
sudo systemctl start syncthing@your-username.service
Step 4. Configure Firewall.
Syncthing uses port 22000 to communicate with peers. If your computer or server enabled the UFW firewall, then you need to allow port 22000 with the following command below:
sudo ufw allow 22000/tcp
Step 5. Accessing Syncthing Web Interface.
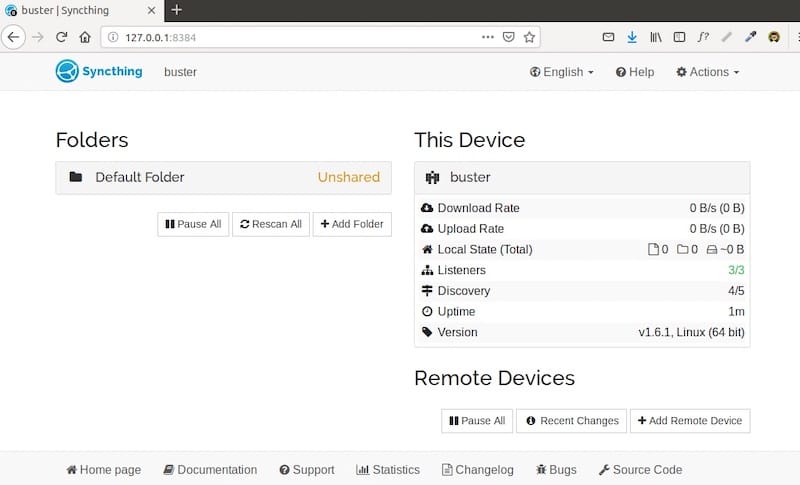
Once completely successful installed, open your web browser and access the Syncthing web UI using the URL http://your-ip-address:8384. You will be redirected to the Syncthing web interface as shown below:

Step 6. Installing Syncthing on other OS.
Go to the Syncthing download page and install Syncthing on other operating systems like Windows, macOS, BSD, Android. Currently, there’s is no official client for iOS. You can use the third-party app MobiusSync.
Congratulations! You have successfully installed Syncthing. Thanks for using this tutorial for installing the Syncthing in Ubuntu 20.04 LTS Focal Fossa system. For additional help or useful information, we recommend you check the official Syncthing website.