![]()
In this tutorial, we will show you how to install TeamSpeak on Debian 11. For those of you who didn’t know, TeamSpeak is the number one choice VoIP communication system for online gaming. It is lightweight and fast and offers you more control since you can host it on your server. In parallel to online games, you can use the current TeamSpeak to communicate with friends via speech and text.
This article assumes you have at least basic knowledge of Linux, know how to use the shell, and most importantly, you host your site on your own VPS. The installation is quite simple and assumes you are running in the root account, if not you may need to add ‘sudo‘ to the commands to get root privileges. I will show you the step-by-step installation of the TeamSpeak server on a Debian 11 (Bullseye).
Prerequisites
- A server running one of the following operating systems: Debian 10 or Debian 11.
- It’s recommended that you use a fresh OS install to prevent any potential issues.
- SSH access to the server (or just open Terminal if you’re on a desktop).
- A
non-root sudo useror access to theroot user. We recommend acting as anon-root sudo user, however, as you can harm your system if you’re not careful when acting as the root.
Install TeamSpeak on Debian 11 Bullseye
Step 1. Before we install any software, it’s important to make sure your system is up to date by running the following apt commands in the terminal:
sudo apt update
sudo apt upgrade
Step 2. Installing the Required Packages.
Before installing TeamSpeak for your Debian, you need to make sure you have installed the required dependency packages:
sudo apt install nano ufw software-properties-common dirmngr apt-transport-https gnupg2 ca-certificates lsb-release debian-archive-keyring wget
Step 3. Installing TeamSpeak on Debian 11.
By default, TeamSpeak is not available on Debian 11 base repository. So, now run the following command below to the latest version of the TeamSpeak server from the official page:
wget https://files.teamspeak-services.com/releases/server/3.13.6/teamspeak3-server_linux_amd64-3.13.6.tar.bz2
Next, extract the downloaded file:
tar -xf ./teamspeak3-server_linux_amd64-3.13.6.tar.bz2
After that, create a TeamSpeak user and directory:
sudo adduser ts3 --home /opt/teamspeak --shell /bin/bash --disabled-password
sudo mv teamspeak3-server_linux_amd64/* /opt/teamspeak/
sudo chown -R ts3:ts3 /opt/teamspeak
Now run the TeamSpeak server to create a privilege key for the first time:
sudo -u -i ts3
Once done, create a blank license file called ts3server_license_accepted. It should be placed in the same folder as your executable file of Teamspeak:
touch .ts3server_license_accepted
Next, run the following command to start the server:
./ts3server_startscript.sh start
Output:
------------------------------------------------------------------
I M P O R T A N T
------------------------------------------------------------------
Server Query Admin Account created
loginname= "serveradmin", password= "BtXe46Cb"
apikey= "GODETYVPM61p_-TdrsBqEL_8ZxKzBMWKOkUk6_e"
------------------------------------------------------------------
------------------------------------------------------------------
I M P O R T A N T
------------------------------------------------------------------
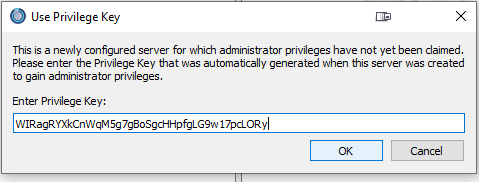
ServerAdmin privilege key created, please use it to gain
serveradmin rights for your virtualserver. please
also check the doc/privilegekey_guide.txt for details.
token=WIRagRYXkCnWqM5g7gMEILANAfgLG9w17pcLORy
------------------------------------------------------------------
Finally, log out as the TeamSpeak user:
exit
Step 4. Creating TeamSpeak Service Daemon.
First, we create the file /lib/systemd/system/ts3server.service :
sudo nano /lib/systemd/system/ts3server.service
Add the following file:
[Unit]
Description=TeamSpeak3 Server
Wants=network-online.target
After=syslog.target network.target local-fs.target

[Service]
WorkingDirectory=/opt/teamspeak
User=ts3
Group=ts3
Type=forking
ExecStart=/opt/teamspeak/ts3server_startscript.sh start license_accepted=1
ExecStop=/opt/teamspeak/ts3server_startscript.sh stop
ExecReload=/opt/teamspeak/ts3server_startscript.sh restart
Restart=always
RestartSec=15

[Install]
WantedBy=multi-user.target
Save and close the file, then enable and start the TeamSpeak service:
sudo systemctl daemon-reload
sudo systemctl enable ts3server --now
Step 5. Installing The TeamSpeak Client.
Once successfully installed, you can download and install the Windows or Linux TeamSpeak 3 Client from the official page. Next, launch the client and enter the IP address to your TeamSpeak server:
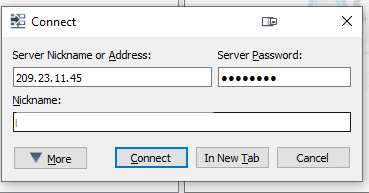
Click on connect, then provide the server token and paste it.
Congratulations! You have successfully installed TeamSpeak. Thanks for using this tutorial for installing the latest version of the TeamSpeak server on Debian 11 Bullseye. For additional help or useful information, we recommend you check the official TeamSpeak website.
[su_box title=”VPS Manage Service Offer” style=”bubbles” box_color=”#000000″ radius=”10″]If you don’t have time to do all of this stuff, or if this is not your area of expertise, we offer a service to do “VPS Manage Service Offer”, starting from $10 (Paypal payment). Please contact us to get the best deal![/su_box]