How To Install TeamViewer on AlmaLinux 9

In today’s interconnected world, remote access to computers has become an essential tool for both personal and professional use. TeamViewer stands out as one of the most popular remote desktop applications, offering a seamless way to connect to and control computers from afar. For users of AlmaLinux 9, a robust and increasingly popular Linux distribution, installing TeamViewer can greatly enhance productivity and support capabilities. This guide will walk you through the process of installing TeamViewer on AlmaLinux 9, ensuring you can harness the power of remote access on your system.
What is TeamViewer?
TeamViewer is a versatile remote access and support software that allows users to connect to computers and mobile devices from anywhere in the world. It’s not just a simple screen-sharing tool; TeamViewer offers a comprehensive suite of features that make it indispensable for IT professionals, remote workers, and anyone needing to access their computer from a distance.
Key features of TeamViewer include:
- Remote control of computers and mobile devices
- File transfer between connected devices
- Cross-platform support (Windows, macOS, Linux, iOS, Android)
- End-to-end encryption for secure connections
- Multi-monitor support
- Wake-on-LAN functionality
- Remote printing capabilities
These features make TeamViewer an excellent choice for various scenarios, such as:
- Providing remote IT support to clients or colleagues
- Accessing your work computer from home or while traveling
- Collaborating on projects with team members in different locations
- Offering remote training or presentations
- Managing servers and network devices remotely
Prerequisites for Installing TeamViewer on AlmaLinux 9
Before diving into the installation process, it’s crucial to ensure that your AlmaLinux 9 system meets the necessary requirements and is properly prepared. Here’s what you need to have in place:
System Requirements
- A 64-bit version of AlmaLinux 9 (TeamViewer no longer supports 32-bit systems)
- At least 2GB of RAM (4GB or more recommended for optimal performance)
- Sufficient disk space (approximately 200MB for the TeamViewer application)
- A stable internet connection
Administrative Access
You’ll need administrative (sudo) privileges on your AlmaLinux 9 system to install TeamViewer. This is because the installation process requires system-wide changes that only an administrator can perform.
Up-to-Date System
It’s always a good practice to ensure your system is up-to-date before installing new software. Run the following commands in the terminal to update your AlmaLinux 9 system:
sudo dnf update
sudo dnf upgrade
These commands will fetch the latest package information and upgrade all installed packages to their latest versions, ensuring compatibility and security.
Step 1: Downloading TeamViewer
The first step in installing TeamViewer on AlmaLinux 9 is to download the correct package from the official TeamViewer website. Follow these steps to ensure you get the right version:
- Open your web browser and navigate to the official TeamViewer download page.
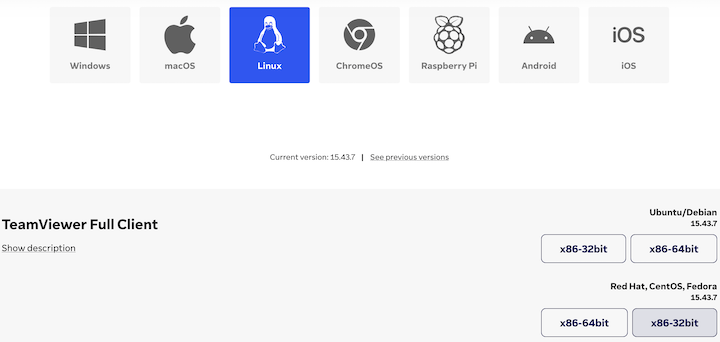
- Look for the section titled “RPM Package for Red Hat, CentOS, Fedora, SUSE” (AlmaLinux is compatible with Red Hat packages)
- Click on the download button for the 64-bit version
- The file should be named something like “teamviewer_15.x.yyy_amd64.rpm” (where x and yyy represent the version numbers)

Once the download is complete, it’s a good idea to verify the integrity of the downloaded file. TeamViewer provides checksums for this purpose. Here’s how to verify the checksum:
- On the TeamViewer download page, find the checksum information for the RPM package
- Open a terminal and navigate to the directory where you downloaded the TeamViewer package
- Run the following command, replacing [FILENAME] with the actual filename of your downloaded package:
sha256sum [FILENAME]- Compare the output of this command with the checksum provided on the TeamViewer website. They should match exactly.
If the checksums match, you can be confident that the file has been downloaded correctly and hasn’t been tampered with. This step is crucial for ensuring the security and integrity of the software you’re about to install.
Step 2: Installing TeamViewer using RPM
Now that you have downloaded the TeamViewer RPM package, it’s time to install it on your AlmaLinux 9 system. The RPM (Red Hat Package Manager) format is compatible with AlmaLinux, making the installation process straightforward. Follow these steps to install TeamViewer:
- Open a terminal window on your AlmaLinux 9 system
- Navigate to the directory where you downloaded the TeamViewer RPM package. If it’s in your Downloads folder, you can use this command:
cd ~/Downloads- Use the following command to install TeamViewer:
sudo dnf install ./teamviewer*.rpmThis command tells dnf (the package manager for AlmaLinux) to install the TeamViewer RPM package. The asterisk (*) is a wildcard that matches any version number, so you don’t need to type the exact filename.
- The system will prompt you to confirm the installation and may ask for your sudo password. Enter ‘y’ to proceed and provide your password if asked.
- DNF will resolve and install any necessary dependencies automatically. This process may take a few minutes, depending on your system and internet speed.
During the installation, you might encounter some messages or prompts:
- GPG key import: You may be asked to import the TeamViewer GPG key. This key is used to verify the authenticity of the package. It’s safe to accept this prompt.
- Dependency resolution: If any dependencies are missing, DNF will list them and ask for confirmation to install them. Review the list and confirm if you’re comfortable with the additional packages.
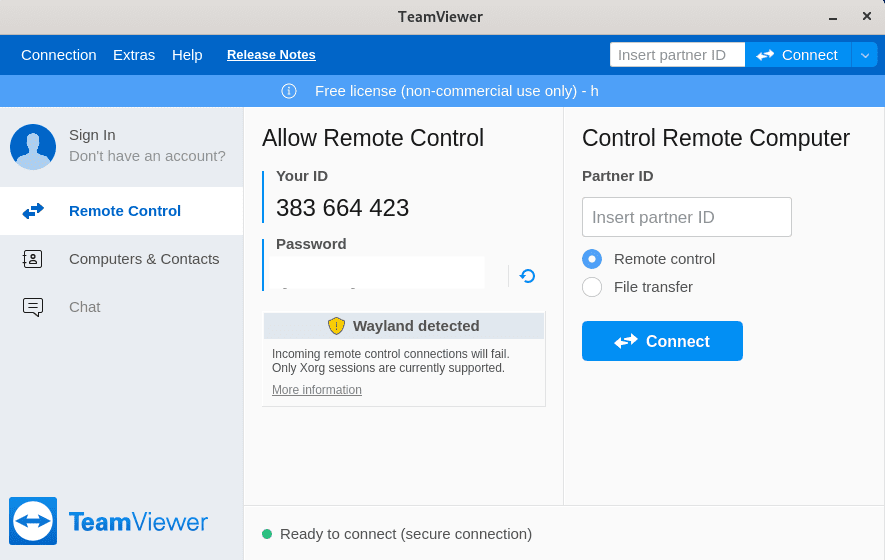
Once the installation is complete, you should see a message indicating that TeamViewer has been successfully installed on your AlmaLinux 9 system.
Step 3: Setting Up TeamViewer
After successfully installing TeamViewer on your AlmaLinux 9 system, the next step is to set it up for use. This process involves launching the application, configuring initial settings, and ensuring it’s ready for remote connections. Here’s a detailed guide on how to set up TeamViewer:
Launching TeamViewer
- Open the Applications menu on your AlmaLinux 9 desktop
- Look for TeamViewer in the list of installed applications. You might find it under a category like “Internet” or “Network”
- Click on the TeamViewer icon to launch the application
Alternatively, you can launch TeamViewer from the terminal by typing:
teamviewer
Initial Configuration
When you launch TeamViewer for the first time, you’ll be greeted with a setup wizard that guides you through the initial configuration:
- License Agreement: Read and accept the TeamViewer license agreement
- Account Creation: You’ll be prompted to create a TeamViewer account or sign in if you already have one. While it’s not mandatory for basic use, having an account allows you to manage your devices and connections more effectively
- Usage Type: Choose how you plan to use TeamViewer (personal or business use)
- Basic Setup: Configure your display name and set a password for unattended access (if desired)
Configuring Security Settings
Security is paramount when it comes to remote access tools. Take some time to configure TeamViewer’s security settings:
- Random Password: By default, TeamViewer generates a random password for each session. This is a secure option for most users
- Personal Password: If you need consistent access, you can set a personal password. Go to “Extras” > “Options” > “Security” to configure this
- Two-Factor Authentication: For an extra layer of security, enable two-factor authentication in your TeamViewer account settings
- Access Control: In the “Options” menu, you can define who can access your computer (e.g., full access, confirm all, deny incoming connections)
Configuring Network Settings
If you’re behind a firewall or using a proxy server, you may need to adjust TeamViewer’s network settings:
- Go to “Extras” > “Options” > “Network”
- Choose the appropriate connection quality setting
- If necessary, configure proxy settings
With these steps completed, TeamViewer should be fully set up and ready to use on your AlmaLinux 9 system. You can now connect to other devices or allow others to connect to your computer, depending on your needs.
Congratulations! You have successfully installed TeamViewer. Thanks for using this tutorial for installing TeamViewer remote desktop access on your AlmaLinux 8 system. For additional help or useful information, we recommend you check the official TeamViewer website.