How To Install TeamViewer on Linux Mint 22

In today’s interconnected world, remote access software has become an essential tool for both personal and professional use. TeamViewer stands out as one of the most popular and versatile remote desktop applications available. For Linux Mint 22 users, installing TeamViewer opens up a world of possibilities for remote support, collaboration, and file sharing. This comprehensive guide will walk you through the process of installing TeamViewer on Linux Mint 22, ensuring you can harness the power of remote access on your open-source operating system.
What is TeamViewer?
TeamViewer is a powerful remote access and control software that allows users to connect to computers and mobile devices from anywhere in the world. It provides a secure platform for remote support, online meetings, and file transfers. For Linux Mint 22 users, TeamViewer offers a range of features tailored to the Linux environment, including:
- Cross-platform compatibility
- End-to-end encryption
- File transfer capabilities
- Remote printing
- Multi-monitor support
By installing TeamViewer on Linux Mint 22, you gain access to a robust tool that can streamline your remote work processes, enhance collaboration with team members, and provide efficient technical support to clients or family members.
System Requirements
Before proceeding with the installation, ensure that your Linux Mint 22 system meets the following requirements:
- A 64-bit processor (x86_64)
- At least 2GB of RAM (4GB recommended)
- 100MB of free disk space
- A stable internet connection
- Linux Mint 22 (MATE, Cinnamon, or Xfce edition)
It’s also important to note that TeamViewer requires certain dependencies, which are typically handled automatically during the installation process.
Preparation Steps
To ensure a smooth installation process, follow these preparation steps:
- Update Linux Mint 22:
sudo apt update && sudo apt upgrade -y - Check for conflicting software:Ensure that no other remote access software is running or configured to start automatically.
- Back up important data:While installing TeamViewer is generally safe, it’s always a good practice to back up critical data before making system changes.
Installation Methods
There are three primary methods to install TeamViewer on Linux Mint 22:
- Using the Software Manager
- Downloading and installing manually
- Using the command line
Each method has its advantages, and we’ll explore them in detail to help you choose the most suitable option for your needs.
Method 1: Installing TeamViewer via Software Manager
The Software Manager is the easiest way to install TeamViewer on Linux Mint 22. Follow these steps:
- Open the Software Manager from the application menu or by pressing the Super key and typing “Software Manager”.
- In the search bar, type “TeamViewer” and press Enter.
- Look for the official TeamViewer package in the search results.
- Click on the TeamViewer entry to open its details page.
- Click the “Install” button to begin the installation process.
- Enter your system password when prompted to authorize the installation.
- Wait for the installation to complete. The Software Manager will handle all necessary dependencies.
Once the installation is finished, you can launch TeamViewer from the application menu or by searching for it using the Super key.
Method 2: Downloading and Installing TeamViewer Manually
For users who prefer more control over the installation process or if the Software Manager method doesn’t work, manual installation is an excellent alternative:

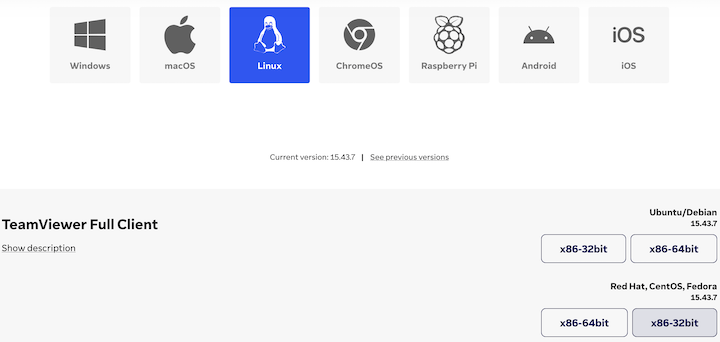
- Open your web browser and navigate to the official TeamViewer website.
- Click on the “Download” button in the top menu.
- Select “Linux” as your operating system.
- Choose the appropriate package for Linux Mint 22 (usually the 64-bit .deb package).
- Once the download is complete, open your file manager and navigate to the Downloads folder.
- Right-click on the downloaded .deb file and select “Open with GDebi Package Installer” if available. If not, you can use the terminal method:
sudo dpkg -i teamviewer_amd64.deb sudo apt install -f - Follow the on-screen prompts to complete the installation.
If you encounter any issues during the manual installation, try running the following command to resolve dependencies:
sudo apt --fix-broken installMethod 3: Using the Command Line
For advanced users or those who prefer working with the terminal, installing TeamViewer via command line offers the most control:
- Open the terminal (Ctrl+Alt+T).
- Add the TeamViewer repository to your system:
wget -O- https://download.teamviewer.com/download/linux/signature/TeamViewer2017.asc | sudo apt-key add- echo "deb http://linux.teamviewer.com/deb stable main" | sudo tee /etc/apt/sources.list.d/teamviewer.list - Update the package lists:
sudo apt update - Install TeamViewer:
sudo apt install teamviewer - Verify the installation:
teamviewer --version
This method ensures you have the latest version of TeamViewer directly from the official repository.
Configuring TeamViewer on Linux Mint 22
After successfully installing TeamViewer, it’s time to configure the application:
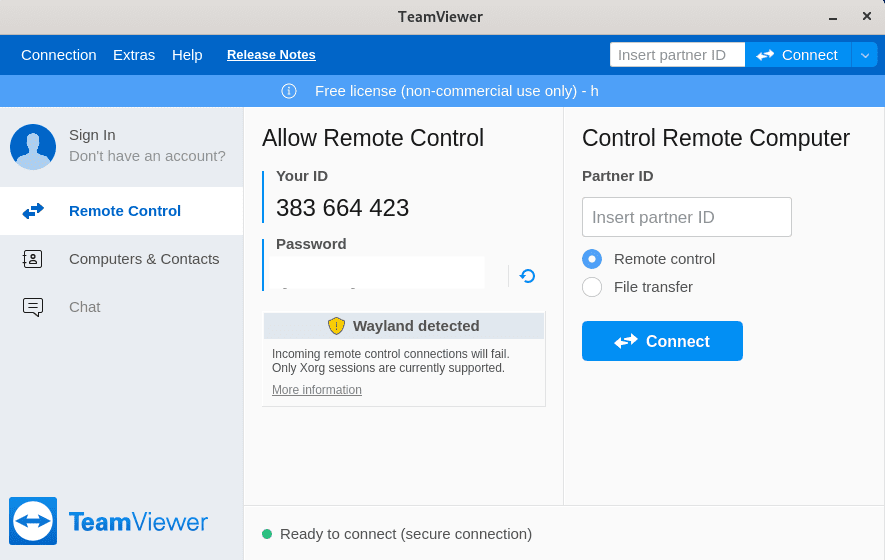
- Launch TeamViewer from the application menu or terminal.
- On first run, you’ll be prompted to accept the license agreement.
- Choose whether you want to use TeamViewer for personal or commercial use.
- Create a TeamViewer account or sign in if you already have one. This step is optional but recommended for accessing additional features.
- Configure security settings:
- Set a strong password for unattended access.
- Enable two-factor authentication for added security.
- Configure the whitelist to control which devices can access your computer.
Using TeamViewer on Linux Mint 22
Now that TeamViewer is installed and configured, you can start using its features:
- To connect to a remote device:
- Enter the partner ID in the “Partner ID” field.
- Choose the connection type (Remote Control, File Transfer, or VPN).
- Click “Connect” and enter the password when prompted.
- To allow remote access to your Linux Mint 22 system:
- Provide your ID and password to the person who needs to connect.
- Ensure TeamViewer is running and your computer is online.
Explore additional features like file transfer, remote printing, and chat functionality to maximize your TeamViewer experience on Linux Mint 22.

Troubleshooting Common Issues
While TeamViewer generally works well on Linux Mint 22, you may encounter some issues. Here are solutions to common problems:
- Connection problems:
- Check your internet connection and firewall settings.
- Verify that both devices are using the latest TeamViewer version.
- Try restarting the TeamViewer daemon:
sudo teamviewer --daemon restart
- Performance issues:
- Adjust the quality settings in TeamViewer preferences.
- Close unnecessary applications to free up system resources.
- Consider upgrading your hardware if problems persist.
- Security concerns:
- Regularly update TeamViewer to the latest version.
- Use strong, unique passwords for your TeamViewer account and unattended access.
- Enable two-factor authentication for an extra layer of security.
Updating TeamViewer
Keeping TeamViewer up-to-date is crucial for security and performance. To update TeamViewer on Linux Mint 22:
- For automatic updates, ensure the TeamViewer repository is added to your system (as described in the command-line installation method).
- Regular system updates will include TeamViewer updates:
sudo apt update && sudo apt upgrade -y - For manual updates, you can use the TeamViewer interface:
- Go to Help > Check for new version
- Follow the prompts to install any available updates
Uninstalling TeamViewer
If you need to remove TeamViewer from your Linux Mint 22 system, follow these steps:
- Open the terminal and run:
sudo apt remove teamviewer - To remove all configuration files and dependencies:
sudo apt purge teamviewer sudo apt autoremove - Remove the TeamViewer repository:
sudo rm /etc/apt/sources.list.d/teamviewer.list
Congratulations! You have successfully installed TeamViewer. Thanks for using this tutorial for installing the latest version of TeamViewer remote desktop on the Linux Mint 22 system. For additional help or useful information, we recommend you check the official TeamViewer website.