How To Install Timeshift on Fedora 41

In the world of Linux, ensuring the safety of your data and system configuration is paramount. One effective way to achieve this is by using Timeshift, a powerful tool designed for creating and managing system snapshots. This article will guide you through the process of installing Timeshift on Fedora 41, configuring it for optimal use, and troubleshooting common issues. By the end, you will have a solid understanding of how to leverage Timeshift for your system backup needs.
Understanding Timeshift
What is Timeshift?
Timeshift is a system restore utility that allows users to create snapshots of their Linux systems. These snapshots can be used to restore the system to a previous state in case of failure or unwanted changes. Think of it as a safety net for your operating system, similar to Windows System Restore or macOS Time Machine.
Key Features of Timeshift
- Incremental Backups: Only changes made since the last snapshot are saved, which saves disk space and time.
- System Restore Capabilities: Easily revert your system to a previous state with just a few clicks.
- Scheduled Snapshots: Automate the backup process by scheduling regular snapshots.
- User Exclusion Settings: Customize which files and directories to exclude from backups.
Prerequisites for Installation
System Requirements
Before installing Timeshift on Fedora 41, ensure that your system meets the following requirements:
- A supported version of Fedora (preferably 41 or higher).
- Sufficient disk space for storing snapshots.
- The DNF package manager installed (default in Fedora).
Backup Important Data
While Timeshift is designed to protect your system, it is always wise to back up critical data before making significant changes. Consider using external storage or cloud services for this purpose.
Installing Timeshift on Fedora 41
Step 1: Open Terminal
The first step in installing Timeshift is to open the terminal. You can do this by searching for “Terminal” in your applications menu or by pressing Ctrl + Alt + T.
Step 2: Install Timeshift via DNF
Once you have the terminal open, you can install Timeshift using the DNF package manager. Enter the following command:
sudo dnf install timeshiftThis command will download and install Timeshift along with any required dependencies. You may be prompted to enter your password and confirm the installation.
Step 3: Adding RPM Fusion Repository (if necessary)
If you encounter issues finding Timeshift in the default repositories, you may need to add the RPM Fusion repository. This repository contains additional software packages that are not included in Fedora’s official repositories.
To add RPM Fusion, run the following commands:
sudo dnf install https://download1.rpmfusion.org/free/fedora/rpmfusion-free-release-$(rpm -E %fedora).noarch.rpm
sudo dnf install https://download1.rpmfusion.org/nonfree/fedora/rpmfusion-nonfree-release-$(rpm -E %fedora).noarch.rpm
After adding the repository, repeat Step 2 to install Timeshift again.
Step 4: Verify Installation
To ensure that Timeshift has been installed correctly, you can check its version by running:
timeshift --versionIf installed successfully, this command will display the version number of Timeshift.
Configuring Timeshift
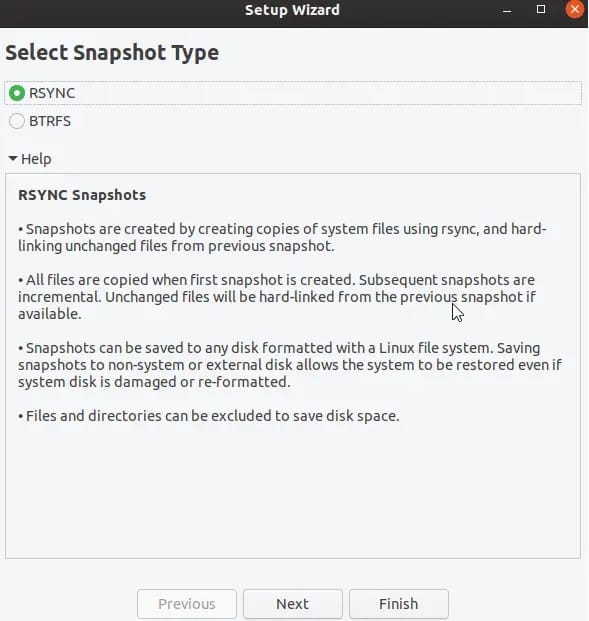
Choosing Snapshot Type: RSYNC vs BTRFS
Upon launching Timeshift for the first time, you will be prompted to choose between two snapshot types: RSYNC and BTRFS. The choice depends on your filesystem:
- RSYNC: Suitable for most users; it creates snapshots by copying files incrementally.
- BTRFS: If your system uses a BTRFS filesystem, this method allows for more efficient snapshot management.

Setting Up Snapshots
The initial configuration involves setting up where and how often you want to take snapshots. Open Timeshift from your applications menu or by running timeshift in the terminal. Follow these steps:
- Select your preferred snapshot type (RSYNC or BTRFS).
- Select the device where snapshots will be stored (usually your primary drive).
- You can customize settings such as snapshot retention policy (how many snapshots to keep).
Scheduling Snapshots
You can automate snapshot creation by setting a schedule. In the configuration window, navigate to the “Schedule” tab and select how often you want snapshots taken (daily, weekly, monthly). This ensures that your system is regularly backed up without manual intervention.
Using Timeshift
Create a Snapshot
Create a manual snapshot whenever you make significant changes to your system or before installing new software. To do this:
- Open Timeshift.
- Select “Create” from the main interface.
- A confirmation dialog will appear; click “Create” again to start the process.
The progress will be displayed in real-time. Once completed, you’ll see a notification confirming that the snapshot has been created successfully.
Restoring from a Snapshot
If you need to restore your system from a previous snapshot due to issues like software failure or accidental deletions, follow these instructions:
- Open Timeshift.
- Select “Restore” from the main interface.
- A list of available snapshots will appear; choose one based on date and time.
- Select “Next” and confirm that you want to proceed with restoration.
This process may take some time depending on how many files need to be restored. Once complete, reboot your system for changes to take effect.
Managing Snapshots
You can view all existing snapshots in Timeshift’s main interface. To manage them:
- Select a snapshot from the list and click “Delete” if you wish to remove it.
- You can also create new snapshots or restore older ones from this interface.
Troubleshooting Common Issues
Installation Problems
If you encounter errors during installation, consider checking your internet connection or ensuring that DNF is functioning correctly. You can also try clearing DNF’s cache with:
sudo dnf clean allIf installation issues persist, consult Fedora’s forums or documentation for additional support related to package management.
Restoration Issues
If restoration fails or does not complete successfully, verify that you are selecting an appropriate snapshot and that there are no file system errors. Running a filesystem check may help resolve underlying issues:
sudofsck -f /dev/sdaX # Replace sdaX with your actual partition identifier
Congratulations! You have successfully installed Timeshift. Thanks for using this tutorial for installing the Timeshift backup and restore utility on Fedora 41 system. For additional or useful information, we recommend you check the official Timeshift website.