In this tutorial, we will show you how to install and configure Tor Browser on your CentOS 7. For those of you who didn’t know, Tor is free software and an open network that helps you defend against traffic analysis, a form of network surveillance that threatens personal freedom and privacy, confidential business activities and relationships, and state security. Tor protects you by bouncing your communications around a distributed network of relays run by volunteers all around the world. it prevents somebody watching your Internet connection from learning what sites you visit, and it prevents the sites you visit from learning your physical location.
This article assumes you have at least basic knowledge of Linux, know how to use the shell, and most importantly, you host your site on your own VPS. The installation is quite simple and assumes you are running in the root account, if not you may need to add ‘sudo‘ to the commands to get root privileges. I will show you the step-by-step installation of Tor Browser on a CentOS 7 server.
Prerequisites
- A server running one of the following operating systems: CentOS 7.
- It’s recommended that you use a fresh OS install to prevent any potential issues.
- SSH access to the server (or just open Terminal if you’re on a desktop).
- A
non-root sudo useror access to theroot user. We recommend acting as anon-root sudo user, however, as you can harm your system if you’re not careful when acting as the root.
Tor Browser features
- Cross-Platform Availability. i.e., this application is available for Linux, Windows as well as Mac.
- Complex Data encryption before it is sent over the Internet.
- Automatic data decryption at the client-side.
- It is a combination of the Firefox Browser + Tor Project.
- Provides anonymity to servers and websites.
- Makes it possible to visit locked websites.
- Performs tasks without revealing the IP of Source.
- Capable of routing data to/from hidden services and applications behind the firewall.
- Portable – Run a preconfigured web browser directly from the USB storage device. No need to install it locally.
- Available for architectures x86 and x86_64.
- Easy to set FTP with Tor using configuration as “socks4a” proxy on “localhost” port “9050”
- Tor is capable of handling thousands of relays and millions of users.
Install Tor Browser on CentOS 7
Step 1. First, you need to enable the EPEL repository on your system.
## RHEL/CentOS 7 64-Bit ##
# wget http://dl.fedoraproject.org/pub/epel/7/x86_64/e/epel-release-7-8.noarch.rpm
# rpm -ivh epel-release-7-8.noarch.rpm
Step 2. Installing Tor Browser.
To install Tor Browser run the following command from the command line:
yum install tor
To start tor browser in your system, use the following command from a non-root account. Before starting TOR make sure your system time is correct:
systemctl start tor
Step 3. Configuring Your Firefox browser.
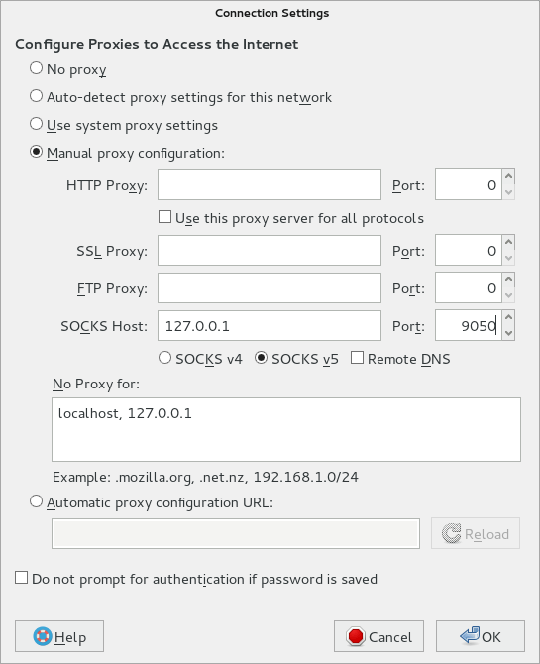
It is highly recommended to use the Tor browser bundle, but if you want to use firefox with tor, once you have started the service, open firefox settings >> Preferences >> advanced >> network >> settings and select manual proxy configuration.

Congratulations! You have successfully installed the Tor Browser. Thanks for using this tutorial for installing Tor Browser on your CentOS 7 system. For additional help or useful information, we recommend you to check the official Tor Browser website.