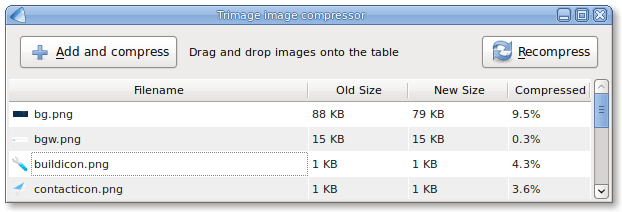
In this tutorial, we will show you how to install Trimage on Ubuntu 20.04 LTS. Trimage is an open-source image optimizer focused on reducing the file size of images without compromising quality. It supports multiple formats, including PNG, JPEG, and GIF. By utilizing various optimization tools such as optipng, advpng, pngcrush, and jpegoptim, Trimage streamlines the process of image compression. One of its key features is the removal of unnecessary metadata, such as EXIF data, which can significantly reduce file size while maintaining the visual integrity of images.
Why Use Trimage?
The benefits of using Trimage for image optimization are numerous:
- Efficiency: Trimage provides a straightforward interface that allows users to compress multiple images simultaneously.
- Quality Preservation: It employs lossless compression techniques, ensuring that the quality of your images remains intact.
- Storage Savings: By significantly reducing file sizes, Trimage helps save disk space and improves loading times for websites.
- User-Friendly Interface: Both novice and experienced users can navigate the application with ease.
When compared to other image compression tools, Trimage stands out due to its comprehensive feature set and ease of use. Whether you are a web developer looking to optimize images for your site or a graphic designer managing large files, Trimage is an invaluable tool.
Prerequisites for Installation
Before installing Trimage on Ubuntu, ensure that your system meets the following prerequisites:
- Ubuntu Version: Ensure you are running a supported version of Ubuntu (preferably the latest LTS version).
- Dependencies: Trimage requires Python and PyQt libraries. These are typically included in modern Ubuntu installations.
- System Update: It’s advisable to have an updated system to avoid compatibility issues during installation.
Installing Trimage via the Ubuntu Software Center
The Ubuntu Software Center offers a graphical interface for installing applications. Here’s how to install Trimage using this method:
- Open the Ubuntu Software Center: Click on the icon in your dock or search for it in your applications menu.
- Search for Trimage: In the search bar at the top right corner, type “Trimage” and press Enter.
- Select Trimage: Click on the Trimage application from the search results to view its details.
- Install Trimage: Click on the “Install” button. You may be prompted to enter your password to authenticate the installation.
- Confirmation: Once installed, you will see an “Installed” label indicating that Trimage is ready to use.
This method is straightforward and ideal for users who prefer graphical interfaces over command-line operations.
Installing Trimage via Command Line
If you prefer using the terminal or need to install Trimage on a headless server, follow these steps:
- Open Terminal: Press
Ctrl + Alt + Tto launch the terminal window. - Update Package Lists: Before installing any new software, it’s essential to update your package lists. Run:
sudo apt-get update - Install Trimage: Execute the following command to install Trimage:
sudo apt-get install trimage - Verify Installation: After installation, confirm that it was successful by checking the version:
trimage --version
This method allows for quick installation and is particularly useful for advanced users familiar with command-line interfaces.
Removing Trimage from Your System
If you need to uninstall Trimage at any point, you can do so easily through both GUI and command-line methods:
- GUI Method: Open the Ubuntu Software Center, search for “Trimage,” and click “Remove.”
- Command Line Method: Open Terminal and run:
sudo apt-get remove trimage
This will remove Trimage from your system along with any associated files. It’s always good practice to clean up unused applications periodically.
How to Use Trimage for Image Compression
The real power of Trimage lies in its functionality. Here’s how to use it effectively once installed:
- Lauch Trimage: You can find it in your applications menu or start it from the terminal by typing:
trimage - User Interface Overview: Upon launching, you’ll see a clean interface where you can drag and drop images or use the “Add” button to select files manually.
- Add Images for Compression: Select multiple images if needed; this allows batch processing.
– Drag-and-drop functionality makes it easy.
– Alternatively, click “Add” and browse through your files. - Select Compression Options: By default, Trimage will apply optimal settings. However, advanced users can adjust settings based on their needs.
– Ensure that options like removing metadata are checked. - Begins Compression Process: Click on “Apply” or “Compress” to start compressing your selected images.
– The progress will be displayed in real-time.
– Once completed, compressed images will be saved in their original location with modified file sizes. - Tips for Optimization: Regularly check your images post-compression. Test different settings if you’re not satisfied with results initially.
– Consider compressing images before uploading them online or using them in projects.
– For best results, maintain a backup of original files before compression.

Troubleshooting Common Installation Issues
If you encounter problems during installation or usage of Trimage, here are some common issues and their solutions:
- Error: Missing Dependencies: If you receive an error stating missing dependencies during installation:
– Run:sudo apt-get install -f– This command fixes broken dependencies automatically.
- Error: Authentication Issues: If prompted for a password but it doesn’t work:
– Ensure you are using an account with sudo privileges.
– Double-check Caps Lock status when entering your password. - Error: Application Won’t Launch: If Trimage fails to open after installation:
– Reinstall by running:sudo apt-get remove trimage && sudo apt-get install trimage - Lack of Performance Improvement: If image sizes aren’t reducing significantly:
– Check if original images are already optimized.
– Experiment with different formats; some formats compress better than others.
Congratulations! You have successfully installed Trimage. Thanks for using this tutorial for installing the Trimage on Ubuntu 20.04 LTS Focal Fossa system. For additional help or useful information, we recommend you check the official Trimage website.