How To Install UNetbootin on Fedora 41

Fedora 41 represents the forefront of open-source innovation, offering users a robust and secure operating system. As more individuals and organizations adopt Fedora, the need for efficient installation methods grows. UNetbootin, short for “Universal Netboot Installer,” is a cross-platform utility that simplifies the creation of bootable USB drives. This tool is particularly valuable for Fedora users who prefer a lightweight and flexible approach to system installation and live environments.
In this comprehensive guide, we’ll explore the step-by-step process of installing UNetbootin on Fedora 41. We’ll cover everything from system requirements to troubleshooting common issues, ensuring you have all the information needed to successfully utilize this powerful tool.
Prerequisites
Before diving into the installation process, it’s crucial to ensure your system meets the necessary requirements and that you have the right tools at your disposal.
System Requirements
To install and run UNetbootin on Fedora 41, you’ll need:
- A computer running Fedora 41 (ensure your system is up to date)
- Administrative or root privileges to execute system-level commands
- A USB drive with sufficient storage capacity (we recommend at least 8 GB for most Linux distributions)
Required Tools
Make sure you have access to:
- A terminal emulator (Fedora’s default GNOME Terminal works perfectly)
- A stable internet connection for downloading packages and dependencies
ISO File Preparation
Before proceeding with UNetbootin installation, download the Fedora 41 ISO file from the official Fedora website. It’s crucial to use a verified ISO to ensure a successful and secure installation process. Always check the SHA256 checksum of the downloaded ISO to verify its integrity.
Step 1: Understanding UNetbootin
UNetbootin is a powerful, cross-platform tool designed to create bootable USB drives from ISO files. Its popularity stems from its simplicity and graphical user interface, making it accessible to users of all experience levels.
Advantages of UNetbootin
Compared to other tools like Fedora Media Writer or the command-line `dd` utility, UNetbootin offers several benefits:
- User-friendly GUI that simplifies the process of creating bootable media
- Ability to preserve existing data on USB drives in some cases, allowing for multi-boot setups
- Cross-platform compatibility, making it useful for users who work with multiple operating systems
Limitations
While UNetbootin is versatile, it’s important to note some limitations when used with Fedora:
- Potential issues with UEFI boot compatibility, which may require additional configuration
- Less integration with Fedora-specific features compared to tools like Fedora Media Writer
Understanding these aspects will help you make an informed decision about using UNetbootin for your Fedora 41 installation needs.
Step 2: Installing Dependencies on Fedora 41
Before installing UNetbootin, we need to ensure that all necessary dependencies are in place. This step is crucial for the smooth operation of UNetbootin on your Fedora 41 system.
Updating the System
First, let’s update your Fedora 41 system to ensure all packages are current:
sudo dnf updateThis command updates the package repositories and installs any available updates for your system.
Installing Required Libraries
UNetbootin relies on several libraries to function correctly. We’ll install these using the DNF package manager:
sudo dnf install p7zip p7zip-plugins wgetThis command installs:
- p7zip and p7zip-plugins: For handling compressed files
wget: A utility for retrieving files using HTTP, HTTPS, and FTP protocols
Optional Dependencies
In some cases, you might encounter errors related to missing libraries when running UNetbootin. If this occurs, you may need to install additional packages:
sudo dnf install qt5-qtbase libglib2.0-0These packages provide additional Qt and GLib libraries that UNetbootin might require on some systems.
Step 3: Downloading and Installing UNetbootin
With the dependencies in place, we can now proceed to download and install UNetbootin on your Fedora 41 system.
Downloading the Binary
UNetbootin is not available in the standard Fedora repositories, so we’ll download it directly from the official source:
wget https://github.com/unetbootin/unetbootin/releases/download/702/unetbootin-linux64-702.binThis command downloads the latest stable version of UNetbootin for 64-bit Linux systems. Be sure to check the UNetbootin GitHub page for the most recent version number and adjust the command accordingly.
Making the File Executable
After downloading, we need to make the binary executable:
chmod +x unetbootin-linux64-702.binThis command grants execute permissions to the UNetbootin binary.
Running UNetbootin
Now, you can run UNetbootin with root privileges:
sudo ./unetbootin-linux64-702.binThis command launches the UNetbootin application with the necessary permissions to create bootable USB drives.
Troubleshooting Installation Issues
If you encounter any errors during the installation process, consider the following:
- Ensure all dependencies are correctly installed
- Verify that you have sufficient permissions to execute the binary
- Check for any conflicting applications that might be using required libraries
Step 4: Creating a Bootable USB Drive with UNetbootin
With UNetbootin successfully installed, let’s walk through the process of creating a bootable USB drive for Fedora 41.
Launching UNetbootin
Open UNetbootin by running the command:
sudo ./unetbootin-linux64-702.binThe UNetbootin interface should appear, presenting you with various options for creating bootable media.
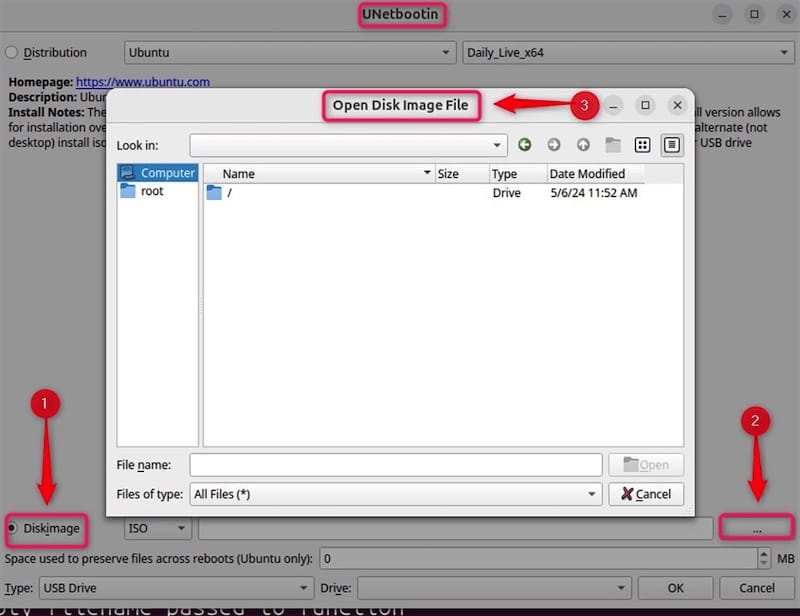
Selecting the ISO File
In the UNetbootin interface:
- Choose the “Diskimage” option
- Click the “…” button to browse and select your downloaded Fedora 41 ISO file

Configuring USB Drive Settings
- Insert your USB drive into the computer
- In UNetbootin, select your USB drive from the “Type” dropdown menu at the bottom of the window
- Ensure the drive is formatted as FAT32 for maximum compatibility
Note: Be absolutely certain you’ve selected the correct drive, as this process will overwrite existing data.
Initiating the Process
Once you’ve confirmed all settings:
- Click the “OK” button to begin creating the bootable USB drive
- UNetbootin will display a progress bar as it copies files and sets up the boot loader
Verifying Bootable Media
After UNetbootin completes the process:
- Safely eject the USB drive
- Reinsert it and check its contents to ensure files were copied correctly
- Look for a file named “unetbootin” on the drive, which indicates a successful creation
Step 5: Booting and Installing Fedora Using the USB Drive
With your bootable USB drive prepared, you’re ready to install Fedora 41 on your target system.
Accessing Boot Options
- Restart your computer and enter the BIOS/UEFI settings (usually by pressing F2, F12, or Del during startup)
- Navigate to the boot order settings
- Move the USB drive to the top of the boot order
- Save changes and exit the BIOS/UEFI settings
Booting from USB Drive
- Your computer should now boot from the USB drive
- You may see a UNetbootin boot menu; select “Default” or wait for it to auto-boot
- The Fedora live environment should load, presenting you with options to try or install Fedora
Starting Fedora Installation
Once in the Fedora live environment:
- Choose your preferred language
- Click “Install to Hard Drive” to begin the installation process
- Follow the on-screen instructions for disk partitioning, user account creation, and other setup options
- Complete the installation and restart your computer
Troubleshooting Common Issues
Even with careful preparation, you might encounter some issues. Here are solutions to common problems:
UNetbootin Fails to Launch
If UNetbootin doesn’t start:
- Verify all dependencies are installed correctly
- Ensure you’re running the command with sudo privileges
- Check system logs for any error messages
USB Drive Not Recognized in UNetbootin
If your USB drive doesn’t appear in UNetbootin:
- Try reformatting the drive using GNOME Disk Utility
- Use the command line to format:
sudo mkfs.vfat -F 32 /dev/sdX(replace X with the correct letter for your drive) - Ensure the drive is not mounted before formatting
Boot Errors After Creating USB Media
If you encounter boot errors:
- Check UEFI/BIOS settings and try enabling legacy boot mode
- Disable Secure Boot in UEFI settings
- Recreate the bootable USB using Fedora Media Writer as an alternative
Congratulations! You have successfully installed UNetbootin. Thanks for using this tutorial for installing UNetbootin on the Fedora 41 system. For additional help or useful information, we recommend you check the official UNetbootin website.