How To Install UNetbootin on openSUSE

In this tutorial, we will show you how to install UNetbootin on openSUSE. UNetbootin, short for Universal Netboot Installer, is a versatile tool that allows users to create bootable USB drives for various Linux distributions without the need for burning CDs. This article will guide you through the process of installing UNetbootin on openSUSE, one of the popular Linux distributions known for its stability and user-friendly interface.
Understanding UNetbootin and Its Importance
UNetbootin serves as a bridge between ISO files and bootable USB drives, making it an essential tool for Linux enthusiasts and system administrators. Its primary functions include:
- Creating live USB drives from ISO images
- Downloading and installing various Linux distributions directly
- Providing a user-friendly graphical interface for the process
For openSUSE users, UNetbootin offers a convenient way to create bootable media for system recovery, testing new distributions, or installing openSUSE on other machines.
Prerequisites for Installing UNetbootin on openSUSE
Before we dive into the installation process, ensure that your system meets the following requirements:
System Requirements
- A computer running openSUSE (Leap 15.1 or later recommended)
- At least 50 MB of free disk space for UNetbootin installation
- An active internet connection for downloading packages
- Root or sudo privileges on your openSUSE system
USB Drive Requirements
- A USB drive with at least 4 GB capacity (8 GB or larger recommended)
- The USB drive should be formatted as FAT32
It’s crucial to back up any important data on your USB drive before using it with UNetbootin, as the process will overwrite existing data.
Installation Methods for UNetbootin on openSUSE
There are several methods to install UNetbootin on openSUSE. We’ll explore three primary approaches, each with its own advantages and potential use cases.
Method 1: Installing UNetbootin from openSUSE Repositories
This method is the most straightforward and recommended for most users. It ensures that you get a version of UNetbootin that’s compatible with your openSUSE system.
- Open a terminal window on your openSUSE system.
- Update your system’s package list by running:
sudo zypper refresh - Install UNetbootin using the following command:
sudo zypper install unetbootin - Wait for the installation to complete. Zypper will handle all necessary dependencies.
If you encounter any issues with repository access, you may need to add the appropriate repository. For openSUSE Leap 15.1, you can use:
sudo zypper addrepo https://download.opensuse.org/repositories/openSUSE:Leap:15.1/standard/openSUSE:Leap:15.1.repo
sudo zypper refresh
sudo zypper install unetbootin
Adjust the repository URL for your specific openSUSE version if necessary.
Method 2: Installing UNetbootin Using the Standalone Binary
For users who prefer the latest version or need a specific release, installing UNetbootin from the standalone binary is an excellent option.
- Visit the official UNetbootin GitHub releases page.
- Download the latest Linux binary file (e.g., unetbootin-linux64-702.bin)
- Open a terminal and navigate to the directory containing the downloaded file
- Make the binary executable with the following command:
chmod +x unetbootin-linux64-702.bin - Run UNetbootin with root privileges:
sudo ./unetbootin-linux64-702.bin
This method allows you to run UNetbootin without installing it system-wide, which can be useful for testing or temporary use.
Method 3: Building UNetbootin from Source
Advanced users or those requiring custom modifications may opt to build UNetbootin from source. This process involves compiling the application on your system.
- Install the necessary development tools:
sudo zypper install git gcc-c++ qt5-devel - Clone the UNetbootin repository:
git clone https://github.com/unetbootin/unetbootin.git - Navigate to the cloned directory:
cd unetbootin - Compile UNetbootin:
qmake make - Run the compiled UNetbootin:
sudo ./unetbootin
Building from source provides the most up-to-date version and allows for customization, but requires more technical knowledge.
Using UNetbootin on openSUSE
Once UNetbootin is installed, you can start creating bootable USB drives. Here’s a step-by-step guide to using UNetbootin effectively:
Launching UNetbootin
- Open a terminal window
- Run UNetbootin with root privileges:
sudo unetbootin
Interface Overview
The UNetbootin interface is straightforward, consisting of several key elements:
- Distribution selection dropdown
- Version selection dropdown
- Type selection (USB Drive or Hard Disk)
- Drive selection dropdown
- Space used to preserve files across reboots slider
Creating a Bootable USB Drive
- Insert your USB drive into the computer
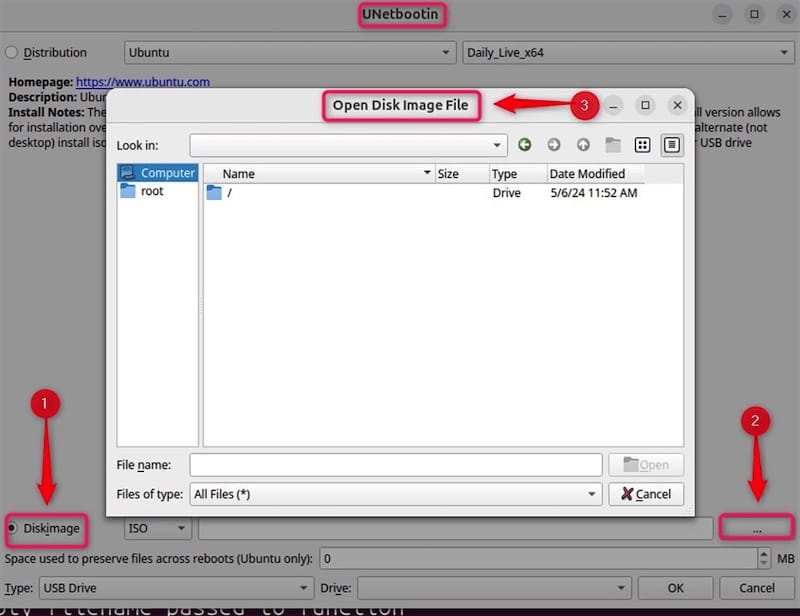
- In UNetbootin, select “Diskimage” and click the ellipsis (…) button to choose your ISO file
- Ensure “USB Drive” is selected as the Type
- Choose your USB drive from the Drive dropdown
- Adjust the space for file preservation if needed
- Click “OK” to begin the process
UNetbootin will extract the ISO contents to your USB drive and make it bootable. This process may take several minutes depending on the size of the ISO and the speed of your USB drive.

Distribution Selection Options
UNetbootin offers two primary methods for creating bootable media:
- Distribution download: Select a distribution from the dropdown menu, and UNetbootin will download and install it automatically.
- Custom ISO: Use the “Diskimage” option to select a pre-downloaded ISO file.
For openSUSE users, it’s often best to download the official ISO from the openSUSE website and use the “Diskimage” option for the most up-to-date version.
Troubleshooting Common Issues
While UNetbootin is generally reliable, users may encounter some issues. Here are solutions to common problems:
USB Drive Not Detected
If UNetbootin doesn’t detect your USB drive:
- Ensure the drive is properly connected and recognized by the system
- Format the drive as FAT32 using GParted or the openSUSE Partitioner
- Try running UNetbootin with the following command:
sudo unetbootin installtype=USB targetdrive=/dev/sdXReplace
/dev/sdXwith your USB drive’s device name (e.g.,/dev/sdb1)
Permission Denied Errors
If you encounter “Permission denied” errors:
- Ensure you’re running UNetbootin with sudo privileges
- Check that the USB drive isn’t mounted; if it is, unmount it before running UNetbootin
Bootable USB Creation Fails
If the process fails to create a bootable USB:
- Verify the integrity of your ISO file
- Try using a different USB port or USB drive
- Ensure your USB drive has enough free space
Congratulations! You have successfully installed UNetbootin. Thanks for using this tutorial for installing UNetbootin on the openSUSE system. For additional help or useful information, we recommend you check the official UNetbootin website.