How To Install Uptime Kuma on Fedora 41

In this tutorial, we will show you how to install Uptime Kuma on Fedora 41. Uptime Kuma, an open-source monitoring tool, has emerged as a popular solution for tracking the performance and accessibility of various online resources. This guide will walk you through the process of installing Uptime Kuma on Fedora 41, providing you with a powerful monitoring solution to keep your digital assets in check.
What is Uptime Kuma?
Uptime Kuma is a self-hosted monitoring tool designed to track the availability and response times of websites, APIs, and other network services. Its user-friendly interface and extensive feature set make it an attractive option for both individuals and organizations seeking a reliable monitoring solution.
Key features of Uptime Kuma include:
- Real-time monitoring of websites and services
- Customizable notification systems
- Status page creation for public viewing
- Support for various protocols (HTTP(S), TCP, Ping, DNS, etc.)
- Multi-language support
Compared to other monitoring tools, Uptime Kuma stands out for its simplicity, flexibility, and active community support. Its open-source nature allows for continuous improvements and customizations to suit specific needs.
Prerequisites
Before diving into the installation process, ensure that your Fedora 41 system meets the following requirements:
- A Fedora 41 installation with root or sudo access
- Minimum 1GB RAM and 1 CPU core (2GB RAM and 2 cores recommended for better performance)
- At least 5GB of free disk space
- An active internet connection
Additionally, you’ll need to have the following software packages installed:
- Node.js (version 14 or later)
- npm (Node Package Manager)
- Git
Preparing the Fedora 41 Environment
To ensure a smooth installation process, let’s start by updating your Fedora 41 system and installing the necessary dependencies.
1. Update the System
Open a terminal and run the following command to update your system:
sudo dnf update -y2. Install Dependencies
Install Node.js, npm, and Git using the following commands:
sudo dnf install nodejs npm git -yVerify the installations by checking their versions:
node --version
npm --version
git --version
3. Configure Firewall Settings
Uptime Kuma uses port 3001 by default. To allow incoming traffic on this port, run:
sudo firewall-cmd --add-port=3001/tcp --permanent
sudo firewall-cmd --reload
Installation Methods
There are two primary methods to install Uptime Kuma on Fedora 41:
- Docker Installation
- Manual Installation
We’ll cover both methods to give you the flexibility to choose the one that best suits your needs.
Method 1: Docker Installation
Using Docker provides an easy and isolated way to run Uptime Kuma. Here’s how to proceed:
1. Install Docker
First, install Docker on your Fedora 41 system:
sudo dnf install docker -y
sudo systemctl start docker
sudo systemctl enable docker
2. Pull the Uptime Kuma Docker Image
Pull the latest Uptime Kuma image from Docker Hub:
sudo docker pull louislam/uptime-kuma:13. Run the Uptime Kuma Container
Create and run the Uptime Kuma container with the following command:
sudo docker run -d --restart=always -p 3001:3001 -v uptime-kuma:/app/data --name uptime-kuma louislam/uptime-kuma:1This command does the following:
-d: Runs the container in detached mode--restart=always: Ensures the container restarts automatically-p 3001:3001: Maps port 3001 on the host to port 3001 in the container-v uptime-kuma:/app/data: Creates a volume for persistent storage--name uptime-kuma: Assigns a name to the container
4. Verify the Installation
Check if the container is running:
sudo docker psYou should see the Uptime Kuma container listed in the output.
Method 2: Manual Installation
If you prefer more control over the installation process, you can manually install Uptime Kuma:
1. Clone the Uptime Kuma Repository
Choose a suitable directory and clone the Uptime Kuma repository:
cd /opt
sudo git clone https://github.com/louislam/uptime-kuma.git
cd uptime-kuma
2. Install Dependencies
Install the required Node.js dependencies:
sudo npm install3. Build the Application
Compile the Uptime Kuma application:
sudo npm run build4. Set Up a Systemd Service
Create a systemd service file for automatic startup:
sudo nano /etc/systemd/system/uptime-kuma.serviceAdd the following content to the file:
[Unit]
Description=Uptime Kuma
After=network.target

[Service]
Type=simple
User=root
WorkingDirectory=/opt/uptime-kuma
ExecStart=/usr/bin/npm run start
Restart=on-failure

[Install]
WantedBy=multi-user.target
Save and close the file, then enable and start the service:
sudo systemctl enable uptime-kuma
sudo systemctl start uptime-kuma
Accessing and Configuring Uptime Kuma
After installation, you can access the Uptime Kuma web interface:
- Open a web browser and navigate to
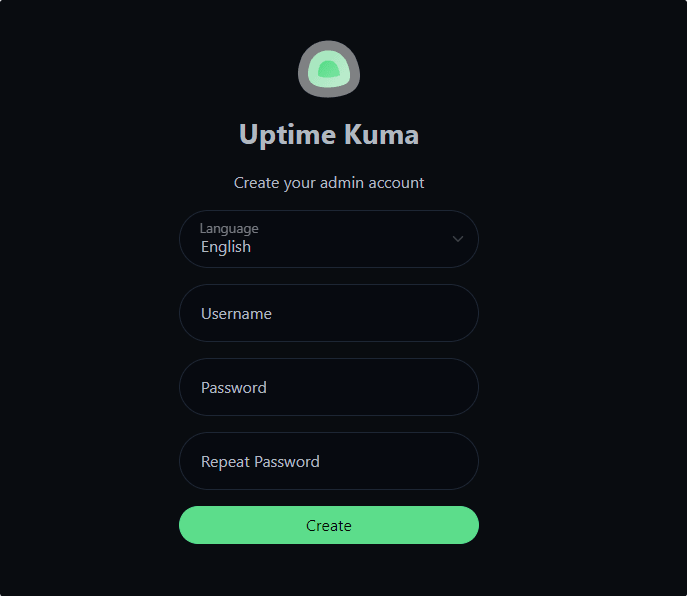
http://your_server_ip:3001 - You’ll be prompted to create an admin account on the first run
- Set up a strong password for your admin account

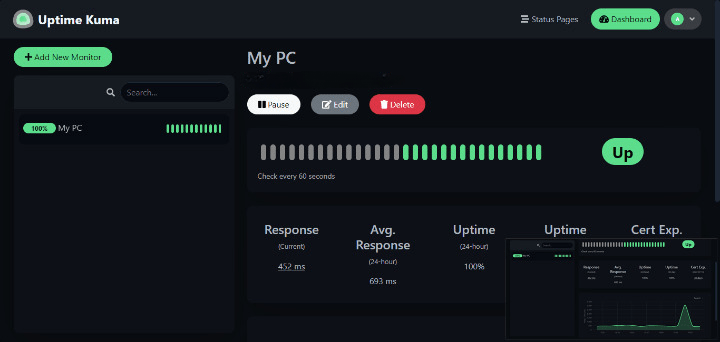
Once logged in, you can start configuring your monitoring setup:
- Add monitors for websites and services
- Set up notification methods (email, Telegram, Discord, etc.)
- Create status pages for public viewing

Setting Up Monitoring
To begin monitoring your services:
1. Adding Monitors
- Click on “Add New Monitor” in the dashboard
- Choose the monitor type (HTTP(S), Ping, TCP, etc.)
- Enter the URL or IP address of the service to monitor
- Set the check interval and timeout
- Configure any additional options specific to the monitor type
- Save the monitor
2. Configuring Notifications
- Go to the “Settings” page
- Select “Notification” from the sidebar
- Choose your preferred notification method(s)
- Enter the required details (e.g., email address, API tokens)
- Test the notification to ensure it’s working correctly
3. Setting Up Status Pages
- Navigate to the “Status Pages” section
- Click “Add New Status Page”
- Configure the page settings (title, description, theme)
- Add the monitors you want to display on the status page
- Save and publish the status page
Advanced Configuration
To further customize your Uptime Kuma installation:
Customizing Appearance
Uptime Kuma allows you to customize the look and feel of your dashboard and status pages. Explore the “Appearance” settings to adjust colors, logos, and themes to match your brand.
Implementing SSL/TLS
For enhanced security, consider setting up SSL/TLS for your Uptime Kuma instance. You can use a reverse proxy like Nginx or Apache with Let’s Encrypt certificates to secure the connection.
Integrating with Reverse Proxies
If you’re running multiple services on your server, you may want to use a reverse proxy. Here’s a basic Nginx configuration for Uptime Kuma:
server {
    listen 80;
    server_name uptime.yourdomain.com;

    location / {
        proxy_pass http://localhost:3001;
        proxy_set_header Host $host;
        proxy_set_header X-Real-IP $remote_addr;
        proxy_set_header X-Forwarded-For $proxy_add_x_forwarded_for;
        proxy_set_header X-Forwarded-Proto $scheme;
    }
}
Troubleshooting Common Issues
If you encounter problems during or after installation, consider these common issues and their solutions:
Port Conflicts
If port 3001 is already in use, you can change the port in the Docker run command or update the systemd service file for manual installations.
Database Connection Problems
Ensure that the data directory has the correct permissions. For manual installations, check that the user running the Uptime Kuma service has write access to the data directory.
Update Issues
If you face problems after updating Uptime Kuma, try clearing your browser cache or performing a hard refresh (Ctrl+F5) of the web interface.
Maintaining and Updating Uptime Kuma
To keep your Uptime Kuma installation secure and up-to-date:
Regular System Updates
Regularly update your Fedora 41 system:
sudo dnf update -yBacking Up Uptime Kuma Data
For Docker installations, back up the volume:
sudo docker run --rm -v uptime-kuma:/data -v /path/to/backup:/backup alpine tar -czf /backup/uptime-kuma-backup.tar.gz -C /data ./For manual installations, back up the data directory:
sudo tar -czf /path/to/backup/uptime-kuma-backup.tar.gz -C /opt/uptime-kuma/data ./Upgrading to Newer Versions
For Docker installations:
sudo docker pull louislam/uptime-kuma:1
sudo docker stop uptime-kuma
sudo docker rm uptime-kuma
sudo docker run -d --restart=always -p 3001:3001 -v uptime-kuma:/app/data --name uptime-kuma louislam/uptime-kuma:1
For manual installations:
cd /opt/uptime-kuma
sudo git pull
sudo npm install
sudo npm run build
sudo systemctl restart uptime-kuma
Security Considerations
To enhance the security of your Uptime Kuma installation:
- Use strong, unique passwords for your admin account
- Implement two-factor authentication if available
- Regularly update Uptime Kuma and all system packages
- Use a firewall to restrict access to the Uptime Kuma port
- Consider setting up a VPN for remote access to your monitoring instance
Congratulations! You have successfully installed Uptime Kuma. Thanks for using this tutorial to install the latest version of the Uptime Kuma monitoring tool on Fedora 41. For additional help or useful information, we recommend you check the official Uptime Kuma website.