How To Install Virtualmin on AlmaLinux 9

Virtualmin is a powerful web hosting control panel that simplifies the management of virtual servers. It allows users to manage multiple domains, databases, and email accounts from a single interface. When paired with AlmaLinux 9, a robust and stable Linux distribution, Virtualmin becomes an excellent choice for both beginners and experienced system administrators. This article provides a comprehensive step-by-step guide to installing Virtualmin on AlmaLinux 9, ensuring that you have all the tools necessary for effective server management.
Understanding Virtualmin
Virtualmin is an open-source web hosting control panel that integrates seamlessly with Webmin. It provides a user-friendly interface for managing virtual hosts, making it easier to handle multiple domains from one server. Key features include:
- Domain Management: Easily create and manage multiple domains.
- Database Management: Supports various database systems like MySQL and PostgreSQL.
- Email Management: Simplifies the setup of email accounts and aliases.
- Security Features: Built-in tools for SSL certificate management and firewall configurations.
Virtualmin comes in two versions: the free GPL edition and the paid Professional edition. The GPL version is suitable for most users, while the Professional version offers additional features like enhanced support and advanced functionality.
Prerequisites for Installation
Before installing Virtualmin on AlmaLinux 9, ensure that your system meets the following prerequisites:
- System Requirements: A minimum of 1 GB RAM (2 GB or more recommended), at least 20 GB of disk space, and a modern CPU.
- Software Requirements: Ensure that you have an SSH client installed on your local machine to connect to your server.
- Root Access: You must have root access to install software packages.
- Fully Qualified Domain Name (FQDN): It’s advisable to set up an FQDN for your server (e.g., server.example.com).
Step-by-Step Installation Guide
Step 1: Preparing Your System
Begin by updating your system packages to ensure you have the latest security patches and software updates. Open your terminal and execute the following command:
sudo dnf update -yNext, install any necessary tools like `wget`, which will be used to download the installation script. Run:
sudo dnf install wget -yStep 2: Downloading the Installation Script
The installation process for Virtualmin can be streamlined using an automated script provided by the developers. To download this script, use the following command:
wget https://raw.githubusercontent.com/virtualmin/virtualmin-install/master/virtualmin-install.shStep 3: Running the Installation Script
After downloading the script, you need to make it executable. Use this command:
chmod +x virtualmin-install.shNow you can run the installation script with root privileges. Execute:
sudo ./virtualmin-install.shThe script will begin by verifying your system’s configuration. It will check for necessary dependencies and prompt you if anything is missing. Follow any on-screen instructions carefully. The installation process typically includes several phases:
- Verification: Checks system compatibility.
- Setup: Configures required settings.
- Installation: Installs Virtualmin components.
- Configuration: Applies initial configurations based on your inputs.
Step 4: Firewall Configuration
Once installation is complete, you’ll need to configure your firewall to allow access to the Webmin interface. By default, Webmin runs on port 10000. To open this port, execute:
sudo firewall-cmd --add-port=10000/tcp --permanent
sudo firewall-cmd --reload
Step 5: Accessing Virtualmin
With everything set up, you can now access the Virtualmin interface through your web browser. Navigate to:
https://YOUR_SERVER_IP:10000Replace `YOUR_SERVER_IP` with your server’s actual IP address or FQDN. You will be prompted to log in using your root credentials.

Step 6: Post-Installation Configuration
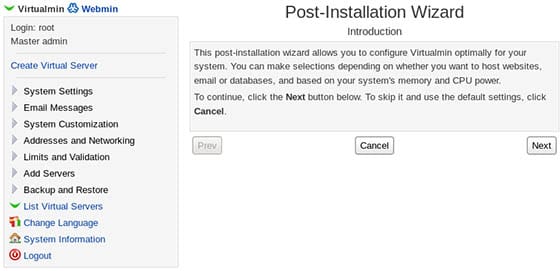
After logging in for the first time, Virtualmin will guide you through a post-installation wizard that helps configure essential settings. Key configurations include:
- Email Server Setup: Configure SMTP settings if you plan to send emails from your server.
- Selecting a Database: Choose between MySQL or MariaDB based on your project needs.
- User Management: Set up user accounts with appropriate permissions for managing domains.
- Securitization: Enable ClamAV virus scanning for added security against malware.
Troubleshooting Common Issues
If you encounter issues during installation or configuration, consider these common problems and their solutions:
-
- Error: Script fails due to missing dependencies: Ensure all required packages are installed by running `sudo dnf install` followed by any missing package names indicated in error messages.
- Error: Unable to access Webmin interface: Double-check that port 10000 is open in your firewall settings and that no other services are using this port.
- Error: Database connection issues: Verify database credentials and ensure that the database service (MySQL/MariaDB) is running with `sudo systemctl status mariadb` or `sudo systemctl status mysql`.
- Error: SSL certificate warnings: Consider obtaining a valid SSL certificate from Let’s Encrypt or another provider to avoid browser warnings when accessing Webmin over HTTPS.
Congratulations! You have successfully installed Virtualmin. Thanks for using this tutorial for installing the Virtualmin web hosting control panel on your AlmaLinux 9 system. For additional help or useful information, we recommend you check the official Virtualmin website.