How To Install Visual Studio Code on Ubuntu 22.04 LTS

In this tutorial, we will show you how to install Visual Studio Code on Ubuntu 22.04 LTS. For those of you who didn’t know, Developed by Microsoft, Visual Studio Code is a powerful, open-source code editor that supports a wide range of programming languages and file formats. It offers a sleek and intuitive interface, making it easy for developers to write, debug, and manage their code. VS Code is highly customizable, allowing users to personalize their experience with a variety of themes, extensions, and settings.
One of the standout features of Visual Studio Code is its integrated terminal, which enables developers to run commands and scripts directly within the editor. It also includes built-in debugging tools and seamless integration with version control systems like Git. Despite its extensive functionality, VS Code remains lightweight and fast, providing a smooth coding experience without the overhead of a full-fledged IDE.
This article assumes you have at least basic knowledge of Linux, know how to use the shell, and most importantly, you host your site on your own VPS. The installation is quite simple and assumes you are running in the root account, if not you may need to add ‘sudo‘ to the commands to get root privileges. I will show you the step-by-step installation of the Visual Studio Code on Ubuntu 22.04 (Jammy Jellyfish). You can follow the same instructions for Ubuntu 22.04 and any other Debian-based distribution like Linux Mint.
Prerequisites
- A server running one of the following operating systems: Ubuntu 22.04, 20.04, and any other Debian-based distribution like Linux Mint.
- It’s recommended that you use a fresh OS install to prevent any potential issues.
- SSH access to the server (or just open Terminal if you’re on a desktop).
- A stable internet connection is crucial for downloading and installing packages.
- A
non-root sudo useror access to theroot user. We recommend acting as anon-root sudo user, however, as you can harm your system if you’re not careful when acting as the root.
Install Visual Studio Code on Ubuntu 22.04 LTS Jammy Jellyfish
Step 1. First, make sure that all your system packages are up-to-date by running the following apt commands in the terminal.
sudo apt update
sudo apt upgrade
sudo apt install curl apt-transport-https
Step 2. Installing Visual Studio Code on Ubuntu 22.04.
- Install Microsoft Teams from APT repositories.
By default, the Visual Studio Code is not available on Ubuntu 22.04 base repository. Now run the following command below to add the Visual Studio Code repository to your Ubuntu system:
echo "deb [arch=amd64 signed-by=/usr/share/keyrings/ms-vscode-keyring.gpg] https://packages.microsoft.com/repos/vscode stable main" | sudo tee /etc/apt/sources.list.d/vscode.list
Next, import the GPG key:
curl -sSL https://packages.microsoft.com/keys/microsoft.asc | sudo gpg --dearmor -o /usr/share/keyrings/ms-vscode-keyring.gpg
Next, update the Ubuntu repository and install the latest version of Visual Studio Code. using the below command:
sudo apt update
sudo apt install code
- Install Visual Studio Code using Deb Binary.
Now we download .deb file installer from the official website of Microsoft Visual Studio Code:
wget -O vscode.deb 'https://code.visualstudio.com/sha/download?build=stable&os=linux-deb-x64'
After the file is downloaded, install it using the following command below:
sudo apt install ./vscode.deb
Step 3. Accessing Visual Studio Code on Ubuntu 22.04.
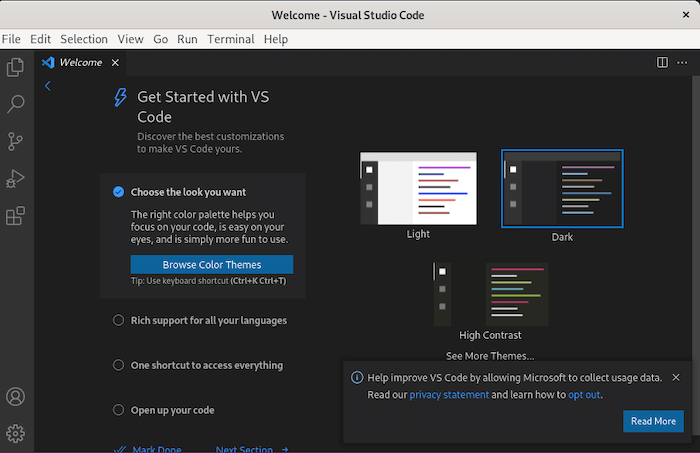
Once successfully installed on your Ubuntu system, run the following path on your desktop to open the path: Activities -> Show Applications -> Visual Studio Code or launching it through the terminal with the command shown below:
code

Congratulations! You have successfully installed VS Code. Thanks for using this tutorial for installing the Visual Studio Code on Ubuntu 22.04 LTS Jammy Jellyfish system. For additional help or useful information, we recommend you check the official VS Code website.