In this tutorial, we will show you how to install VNC Server on CentOS 8. For those of you who didn’t know, Virtual Network Computing (VNC) is a graphical desktop sharing system that allows you to use your keyboard and mouse to remotely control another computer. VNC servers are not installed by default and need to be installed manually.
This article assumes you have at least basic knowledge of Linux, know how to use the shell, and most importantly, you host your site on your own VPS. The installation is quite simple and assumes you are running in the root account, if not you may need to add ‘sudo‘ to the commands to get root privileges. I will show you the step-by-step installation of VNC on a CentOS 8 server.
Prerequisites
- A server running one of the following operating systems: CentOS 8.
- It’s recommended that you use a fresh OS install to prevent any potential issues.
- SSH access to the server (or just open Terminal if you’re on a desktop).
- A
non-root sudo useror access to theroot user. We recommend acting as anon-root sudo user, however, as you can harm your system if you’re not careful when acting as the root.
Install VNC Server on CentOS 8
Step 1. First, let’s start by ensuring your system is up-to-date.
sudo dnf update
Step 2. Installing Desktop Environment.
Run the following command to install the Gnome desktop environment;
sudo dnf groupinstall "Server with GUI"
Step 3. Installing VNC Server on CentOS 8.
We will install the TigerVNC server, It is available in the default CentOS repositories, to install it type:
sudo dnf install tigervnc-server
Once installed, run the vncserver command to create the initial configuration and set up the password:
vncserver
Before continuing with the next step, first stop the VNC instance using the vncserver command with a -kill option and the server number as an argument:
vncserver -kill :1
Step 4. Configuring VNC Server.
The next step is to configure TigerVNC to use Gnome. The VNC server uses the ~/.vnc/xstartup file to launch applications when creating a new desktop:
nano ~/.vnc/xstartup
Edit it as follows:
#!/bin/sh
[ -x /etc/vnc/xstartup ] && exec /etc/vnc/xstartup
[ -r $HOME/.Xresources ] && xrdb $HOME/.Xresources
vncconfig -iconic &
dbus-launch --exit-with-session gnome-session &
Step 5. Creating a Systemd unit file.
Now will create a Systemd unit file:
mkdir -p ~/.config/systemd/user
Next, copy the default vncserver unit file:
cp /usr/lib/systemd/user/vncserver@.service ~/.config/systemd/user/
Notify systemd that a new user unit file exist:
systemctl --user daemon-reload
systemctl --user enable vncserver@:1.service --now
loginctl enable-linger
systemctl --user status vncserver@:1.service
Step 6. Accessing to VNC server.
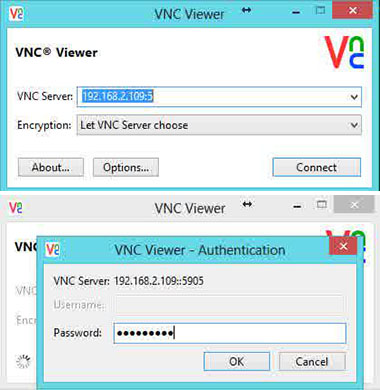
Now you can able to connect the VNC server using IP and Port ( Example: 192.168.2.109:5 ) and you will be asked to enter the password, enter the password that you have created earlier.


If you run Linux, macOS, or any other Unix-based operating system on your machine, you can easily create a tunnel using the following ssh command:
ssh -L 5901:127.0.0.1:5901 -N -f -l username remote_your_server_ip
Congratulations! You have successfully installed VNC Server. Thanks for using this tutorial for installing VNC on CentOS 8 system. For additional help or useful information, we recommend you check the official VNC website.