In this tutorial, we will show you how to install VNC Server on Ubuntu 20.04 LTS. In today’s fast-paced digital world, the ability to remotely access and control your Ubuntu desktop can be a game-changer. Whether you need to manage a headless server or provide remote support to a colleague, Virtual Network Computing (VNC) offers a seamless solution. VNC allows you to securely connect to your Ubuntu machine from anywhere, using a variety of devices.
This article assumes you have at least basic knowledge of Linux, know how to use the shell, and most importantly, you host your site on your own VPS. The installation is quite simple and assumes you are running in the root account, if not you may need to add ‘sudo‘ to the commands to get root privileges. I will show you the step-by-step installation of the VNC Server on Ubuntu 20.04 (Focal Fossa). You can follow the same instructions for Ubuntu 18.04, 16.04, and any other Debian-based distribution like Linux Mint.
Prerequisites
- A server running one of the following operating systems: Ubuntu 20.04, 18.04, and any other Debian-based distribution like Linux Mint or elementary OS.
- It’s recommended that you use a fresh OS install to prevent any potential issues.
- An active internet connection.
- A
non-root sudo useror access to theroot user. We recommend acting as anon-root sudo user, however, as you can harm your system if you’re not careful when acting as the root.
Install VNC Server on Ubuntu 20.04 LTS Focal Fossa
Step 1. First, make sure that all your system packages are up-to-date by running the following apt commands in the terminal.
sudo apt update
sudo apt upgrade
Step 2. Create a VNC user on your server.
Now we create the new user and set its server password with the following commands:
sudo useradd -m -s /bin/bash idroot
sudo passwd idroot
Then, add your new user to the sudo group to grant root privileges:
sudo usermod -a -G sudo idroot
Next, log in as your new user and use its root privileges to begin working with the VNC server:
sudo su - idroot
Step 3. Installing VNC Server on Ubuntu 20.04.
Ubuntu server editions do not come with a desktop environment pre-installed. Since VNC requires a desktop to function, we’ll need to install one first. The lightweight and user-friendly Xfce desktop environment is a great option. To install Xfce and its utilities, run the following command:
sudo apt install tightvncserver XFCE4 XFCE4-goodies
Once that installation is completed, run the vncserver the command to set a VNC access password, create the initial configuration files, and start a VNC server instance:
vncserver
You’ll be prompted to enter and verify a password to access your machine remotely:
You will require a password to access your desktops.

Password:
Warning: password truncated to the length of 8.
Verify:
Would you like to enter a view-only password (y/n)? y
Password:
Warning: password truncated to the length of 8.
Verify:
xauth:  file /home/idroot/.Xauthority does not exist
xauth: (argv):1:  bad display name "lucky-puffin-86:1" in "add" command
xauth:  file /home/idroot/.Xauthority does not exist

New 'X' desktop is meilana-maria-86:1
127.0.0.1 localhost

Creating default startup script /home/idroot/.vnc/xstartup
Starting applications specified in /home/idroot/.vnc/xstartup
Log file is /home/idroot/.vnc/meilana-maria-86:1.log
Step 4. Configure the VNC.
We now need to edit the xstartup file. Before doing so, kill the VNC service:
vncserver -kill :1
Next, create a backup of its default startup script file:
mv ~/.vnc/xstartup ~/.vnc/xstartup.bak
Now edit xstartup the file:
nano ~/.vnc/xstartup
Add the following 3 lines of text to your new file:
#!/bin/bash
xrdb $HOME/.Xresources
startxfce4 &
Make the xstartup file executable:
sudo chmod +x ~/.vnc/xstartup
And finally, start vncserver again:
vncserver
Step 5. Create a VNC server system startup script.
One more time, let’s stop the VNC server so we can change the configuration files:
vncserver -kill :1
Now create a new unit file for VNC. A unit file encodes information about a service:
sudo nano /etc/systemd/system/vncserver@.service
Paste in the following, replacing idroot it with your own user name. You can also change 1280x800 to your desired resolution:
[Unit]
Description=Start TightVNC server at startup
After=syslog.target network.target

[Service]
Type=forking
User=idroot
Group=idroot
WorkingDirectory=/home/idroot

PIDFile=/home/idroot/.vnc/%H:%i.pid
ExecStartPre=-/usr/bin/vncserver -kill :%i > /dev/null 2>&1
ExecStart=/usr/bin/vncserver -depth 24 -geometry 1280x800 :%i
ExecStop=/usr/bin/vncserver -kill :%i

[Install]
WantedBy=multi-user.target
Next, reload Systemd for the changes to take effect:
sudo systemctl daemon-reload
sudo systemctl enable vncserver@1.service
sudo systemctl start vncserver@1
Step 6. Connecting to VNC server.
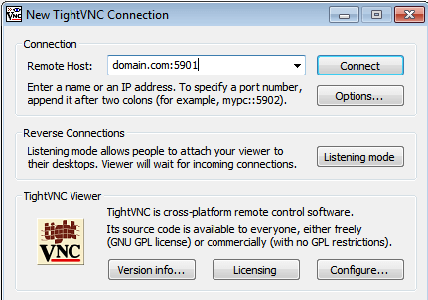
To access the remote desktop on the VNC server from the Windows system, you must have a VNC viewer installed on your system. There are various VNC viewers available to use. Download anyone and install it on your system, for example:

To access the remote desktop on the VNC server from Linux, you can open up a new window or tab in Terminal, for example). Replace server-ip-address with the IP address of your Server:
ssh -L 5901:127.0.0.1:5901 -N -f -l idroot server-ip-adress
Congratulations! You have successfully installed VNC. Thanks for using this tutorial for installing the VNC (Virtual Network Computing) server on your Ubuntu 20.04 LTS Focal Fossa system. For additional help or useful information, we recommend you check the official VNC website.