How To Install Vtiger CRM on Ubuntu 22.04 LTS

In this tutorial, we will show you how to install Vtiger CRM on Ubuntu 22.04 LTS. Customer relationship management (CRM) systems are essential tools for businesses of all sizes. Vtiger CRM stands out as a versatile, open-source CRM solution that can help you streamline your operations, enhance communication, and ultimately boost your bottom line.
This article assumes you have at least basic knowledge of Linux, know how to use the shell, and most importantly, you host your site on your own VPS. The installation is quite simple and assumes you are running in the root account, if not you may need to add ‘sudo‘ to the commands to get root privileges. I will show you the step-by-step installation of the Vtiger CRM on Ubuntu 22.04. You can follow the same instructions for Ubuntu 22.04 and any other Debian-based distribution like Linux Mint, Elementary OS, Pop!_OS, and more as well.
Prerequisites
- A server running one of the following operating systems: Ubuntu 22.04, 20.04, and any other Debian-based distribution like Linux Mint.
- It’s recommended that you use a fresh OS install to prevent any potential issues.
- SSH access to the server (or just open Terminal if you’re on a desktop).
- An active internet connection. You’ll need an internet connection to download the necessary packages and dependencies for Vtiger CRM.
- A
non-root sudo useror access to theroot user. We recommend acting as anon-root sudo user, however, as you can harm your system if you’re not careful when acting as the root.
Install Vtiger CRM on Ubuntu 22.04 LTS Jammy Jellyfish
Step 1. First, make sure that all your system packages are up-to-date by running the following apt commands in the terminal.
sudo apt update
sudo apt upgrade
Step 2. Installing Nginx.
Nginx is a high-performance web server that will serve as the backbone of our CRM installation. Install it with:
sudo apt install nginx
Step 3. Installing MariaDB.
MariaDB is the database management system that Vtiger CRM will use. Install it with:
sudo apt install mariadb-server
During the installation process, you will be prompted to set a root password. Make it strong and memorable.
Now that we have MariaDB installed, let’s configure it for Vtiger CRM. Run the following command to secure your MariaDB installation:
sudo mysql_secure_installation
You’ll be prompted to set a root password, remove anonymous users, disallow root login remotely, and remove the test database. Follow the prompts to complete this process.
Next, we need to create a database that Vtiger CRM will use. Replace vtigerdb with your preferred database name:
MariaDB [(none)]> CREATE DATABASE vtigerdb;
MariaDB [(none)]> CREATE USER 'vtigercrmusr'@'localhost' IDENTIFIED BY 'your-strong-password';
MariaDB [(none)]> GRANT ALL PRIVILEGES ON vtigerdb.* TO 'vtigercrmusr'@'localhost';
MariaDB [(none)]> FLUSH PRIVILEGES; MariaDB [(none)]> EXIT
Step 4. Installing PHP and Required Extensions.
Vtiger CRM relies on PHP, so let’s install PHP along with the necessary extensions:
sudo apt install php-fpm php-mysql php-json php-zip php-gd php-mbstring php-curl php-xml php-bcmath php-json php-zip php-intl php-xmlrpc php-gd
Step 5. Installing Vtiger CRM on Ubuntu 22.04.
With the prerequisites and database configuration complete, it’s time to get Vtiger CRM up and running. Head over to the official Vtiger CRM website and download the latest release. You can use the wget command to do this directly on your server:
wget https://sourceforge.net/projects/vtigercrm/files/vtiger%20CRM%208.0.0/Core%20Product/vtigercrm8.0.0.tar.gz/download -O vtiger.tar.gz
Extract the downloaded archive:
tar -zxvf vtiger-crm-8.0.0.tar.gz
Move the extracted files to the Nginx document root:
sudo mv vtigercrm /var/www/html/
Adjust permissions to ensure Nginx can serve the files correctly:
sudo chown -R www-data:www-data /var/www/html/vtigercrm
Step 6. Create a Virtual Host Configuration for Nginx.
Now, let’s create a new Nginx server block (virtual host) for Vtiger CRM. Create a new configuration file:
sudo nano /etc/nginx/sites-available/vtiger
And add the following configuration (replace your_domain with your actual domain):
server {
    listen 80;
    server_name your_domain.com www.your_domain.com;

    root /var/www/html/vtigercrm;
    index index.php index.html index.htm;

    location / {
        try_files $uri $uri/ /index.php?$args;
    }

    location ~ \.php$ {
        include snippets/fastcgi-php.conf;
        fastcgi_pass unix:/var/run/php/php7.4-fpm.sock;
    }

    location ~ /\.ht {
        deny all;
    }
}
Save the file, then enable the newly created site:
sudo ln -s /etc/nginx/sites-available/vtiger /etc/nginx/sites-enabled/
Test the Nginx configuration:
sudo nginx -t
If the test is successful, restart Nginx:
sudo systemctl restart nginx
Step 7. Setting up SSL with Let’s Encrypt.
Security is paramount when dealing with CRM systems. Let’s encrypt your Vtiger CRM installation with SSL.
sudo apt install certbot python3-certbot-nginx
Run Certbot to request an SSL certificate for your domain:
sudo certbot --nginx -d your_domain.com -d www.your_domain.com
To ensure your SSL certificate stays up-to-date, set up a cron job for automatic renewal. Certbot already configures this for you, but you can verify it by running:
sudo crontab -e
You should see a line that resembles:
0 */12 * * * root test -x /usr/bin/certbot -a \! -d /run/systemd/system && perl -e 'sleep int(rand(3600))' && certbot -q renew
Step 8. Step 7. Accessing CRM Web Interface.
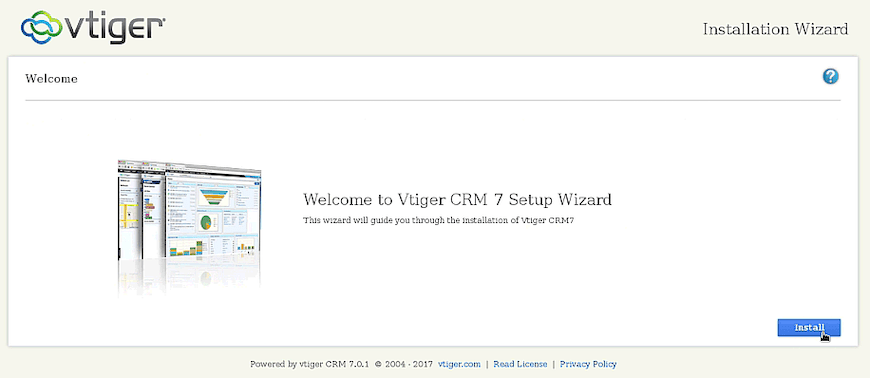
Open your web browser and navigate to http://your_domain. You should see the following page:

Congratulations! You have successfully installed Vtiger CRM. Thanks for using this tutorial for installing the Vtiger CRM on the Ubuntu system. For additional help or useful information, we recommend you check the official Vtiger website.