How To Install WebERP on Ubuntu 24.04 LTS

WebERP is a powerful open-source accounting and business management system designed for small to medium-sized enterprises. It provides a comprehensive suite of features to manage finances, inventory, and customer relationships, making it an excellent choice for businesses looking to streamline their operations. This guide will walk you through the step-by-step process of installing WebERP on Ubuntu 24.04, ensuring you have a fully functional system in no time.
Prerequisites
Before diving into the installation process, it’s essential to ensure that your server meets the necessary requirements. Below are the prerequisites you need to consider:
System Requirements
- Minimum Hardware Specifications: At least 1 GB of RAM and a dual-core CPU are recommended for optimal performance.
- Operating System: A fresh installation of Ubuntu 24.04 is ideal to avoid conflicts with existing software.
Software Requirements
- LAMP Stack: WebERP requires the LAMP stack (Linux, Apache, MySQL/MariaDB, PHP) to function correctly.
- PHP Modules: Additional PHP modules such as php-curl, php-gd, and php-mbstring are necessary for full functionality.
User Permissions
You should perform the installation using a non-root user with sudo privileges. This practice enhances security and minimizes risks associated with running commands as the root user.
Step 1: Update Your System
The first step in preparing your Ubuntu server for WebERP is to update the package list and upgrade any existing packages. This ensures that you have the latest security patches and software versions.
sudo apt update
sudo apt upgrade
Running these commands will help avoid compatibility issues during the installation process.
Step 2: Install LAMP Stack
The next step is to install the LAMP stack, which is crucial for running WebERP effectively.
Installing Apache
Apache is a widely used web server that will host your WebERP application. To install Apache, run the following command:
sudo apt install apache2After installation, check if Apache is running by accessing http://localhost in your web browser. You should see the default Apache welcome page.
Installing MySQL/MariaDB
The next component of the LAMP stack is MySQL or MariaDB, which serves as the database management system for WebERP. You can install MariaDB with this command:
sudo apt install mariadb-serverOnce installed, secure your MariaDB installation by running:
sudo mysql_secure_installationThis command will prompt you to set a root password and configure other security settings. Follow the prompts carefully to enhance your database security.
Creating a Database for WebERP
You need to create a dedicated database for WebERP. Log into MariaDB using:
sudo mysql -u root -pCreate a new database and user with appropriate permissions by executing the following commands:
CREATE DATABASE weberpdb;
CREATE USER 'weberpuser'@'localhost' IDENTIFIED BY 'your_secure_password';
GRANT ALL PRIVILEGES ON weberpdb.* TO 'weberpuser'@'localhost';
FLUSH PRIVILEGES;
EXIT;
Installing PHP and Required Extensions
The final component of the LAMP stack is PHP. Install PHP along with necessary extensions using this command:
sudo apt install php libapache2-mod-php php-mysql php-curl php-gd php-mbstring unzipThis command installs PHP and its required modules that enhance WebERP’s functionality.
Step 3: Configure MySQL/MariaDB
You’ve already created a database and user in the previous step. However, it’s essential to ensure that these configurations are correct before proceeding.
- User Privileges: Ensure that the user has all necessary privileges on the created database.
- Password Security: Use a strong password for your database user to prevent unauthorized access.
- Error Checking: After creating users and databases, always check for errors in your SQL commands.
Step 4: Download and Install WebERP
The next step is downloading WebERP from its official repository and setting it up on your server.
Downloading WebERP
You can download WebERP directly to your web server using wget. Navigate to the web directory and execute:
cd /var/www/html
wget https://sourceforge.net/projects/web-erp/files/webERP_4.15.2.zip
Unzipping the Package
After downloading, unzip the package using:
sudo unzip webERP_4.15.2.zip
sudo mv webERP_4.15.2 weberp
Setting Permissions
You need to set appropriate permissions for the WebERP directory so that Apache can access it:
sudo chown -R www-data:www-data /var/www/html/weberp
sudo chmod -R 755 /var/www/html/weberp
Step 5: Configure Apache for WebERP
The next step involves configuring Apache to serve your WebERP application correctly.
Create a Virtual Host Configuration File
Create a new configuration file for WebERP in Apache’s sites-available directory:
sudo nano /etc/apache2/sites-available/weberp.confAdd the following configuration details to this file:
<VirtualHost *:80>
    ServerAdmin admin@example.com
    DocumentRoot /var/www/html/weberp/
    ServerName yourdomain.com

    <Directory /var/www/html/weberp/>
        Options FollowSymLinks
        AllowOverride All
        Require all granted
    </Directory>

    ErrorLog ${APACHE_LOG_DIR}/weberp_error.log
    CustomLog ${APACHE_LOG_DIR}/weberp_access.log combined
</VirtualHost>
Enable the Site Configuration and Restart Apache
You need to enable this new site configuration and restart Apache for changes to take effect:
sudo a2ensite weberp.conf
sudo systemctl restart apache2
Step 6: Complete the WebERP Installation
Your server is now configured to host WebERP. The final step is completing the installation through the web interface.
Accessing the Installation Wizard
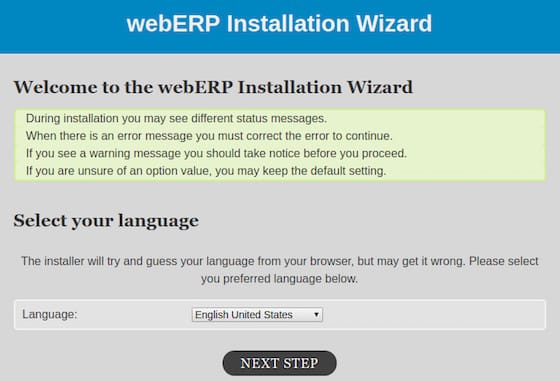
http://yourdomain.com/weberp/This will launch the WebERP installation wizard where you will be guided through several setup steps.

Congratulations! You have successfully installed WebERP. Thanks for using this tutorial for installing WebERP on the Ubuntu 24.04 LTS system. For additional help or useful information, we recommend you check the official WebERP website.