In this tutorial, we will show you how to install WinSCP on Ubuntu 20.04 LTS. For those of you who didn’t know, WinSCP is a popular Windows application that provides a user-friendly graphical interface for securely transferring files between a local computer and a remote server using SFTP, SCP, and FTP protocols. While WinSCP is designed for Windows, it can also be installed and used on Ubuntu 20.04 with the help of Wine, a compatibility layer that allows running Windows applications on Linux.
This article assumes you have at least basic knowledge of Linux, know how to use the shell, and most importantly, you host your site on your own VPS. The installation is quite simple and assumes you are running in the root account, if not you may need to add ‘sudo‘ to the commands to get root privileges. I will show you the step-by-step installation of the WinSCP on Ubuntu 20.04 (Focal Fossa). You can follow the same instructions for Ubuntu 18.04, 16.04, and any other Debian-based distribution like Linux Mint.
Prerequisites
- A server running one of the following operating systems: Ubuntu 20.04, 18.04, and any other Debian-based distribution like Linux Mint.
- It’s recommended that you use a fresh OS install to prevent any potential issues
- An active internet connection. You’ll need an internet connection to download the necessary packages and dependencies.
- A
non-root sudo useror access to theroot user. We recommend acting as anon-root sudo user, however, you can harm your system if you’re not careful when acting as the root.
Install WinSCP on Ubuntu 20.04 LTS Focal Fossa
Step 1. To begin, open a terminal window and update your Ubuntu system packages to the latest versions using the following commands:
sudo apt update
sudo apt upgrade
Step 2. Installing Wine.
Now we run the command below to install Wine on the Ubuntu system:
sudo dpkg --add-architecture i386
Then, download the Wine package repository and add the repository key:
wget -qO - https://dl.winehq.org/wine-builds/winehq.key | sudo apt-key add -
sudo apt-add-repository 'deb https://dl.winehq.org/wine-builds/ubuntu/ focal main'
Now that the repository is added, run the commands to install it:
sudo apt update
sudo apt install --install-recommends winehq-stable
For additional resources on installing Wine, read the post below:
Step 3. Installing WinSCP on Ubuntu 20.04.
Now we download the WinSCP package from its download site. Next, open your terminal browse to the Downloads folder, and execute the installer:
cd ~/Downloads
wine WinSCP-*-Setup.exe
Then, choose Install for all users (recommended) and continue:

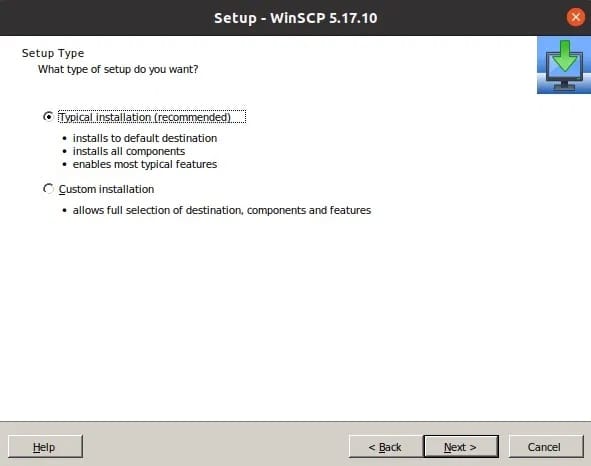
Select the Recommended typical install that will automatically configure the destination folder to setup WinSCP and all other components:

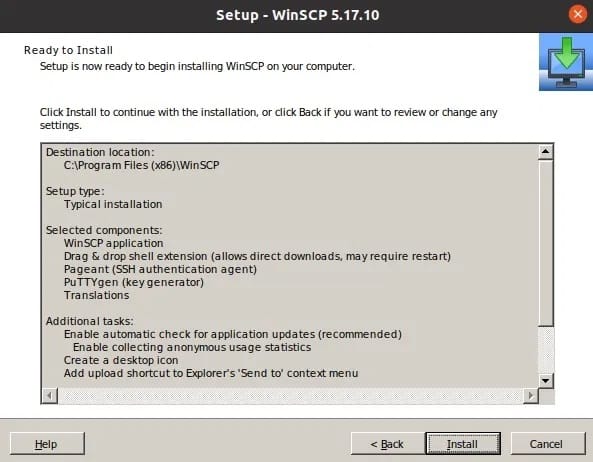
At last steps, click on the Install button to complete the installation process as shown below:

Step 4. Accessing WinSCP on Ubuntu.
Once the installation is completed. Go to All Applications and search for “WinSCP” on Ubuntu Linux. As you find it, simply double-click on it to run.
Congratulations! You have successfully installed WinSCP. Thanks for using this tutorial for installing the WinSCP on the Ubuntu 20.04 LTS Focal Fossa system. For additional help or useful information, we recommend you check the official WinSCP website.