How To Install WoeUSB on AlmaLinux 9

WoeUSB is a versatile open-source tool that enables you to create bootable Windows USB installation media from Linux systems. It supports a wide range of Windows versions, including Windows 7, 8.1, and 10, and offers compatibility with both legacy and UEFI boot modes. In this comprehensive guide, we will walk you through the step-by-step process of installing WoeUSB on AlmaLinux 9, a robust and enterprise-grade Linux distribution.
Understanding WoeUSB
Before diving into the installation process, let’s take a moment to understand what WoeUSB is and how it differs from its predecessor, WoeUSB-ng. WoeUSB is a user-friendly tool that simplifies the creation of bootable Windows USB drives on Linux systems. It offers the following key features:
- Support for Legacy PC/UEFI booting
- Compatibility with FAT32 and NTFS filesystems
- Ability to use physical installation discs or disk images as the source
WoeUSB stands out from other bootable USB creation tools due to its ease of use and reliability. It eliminates the need for complex command-line operations, making the process accessible to users of all skill levels.
Prerequisites for Installing WoeUSB on AlmaLinux 9
Before proceeding with the installation of WoeUSB on AlmaLinux 9, ensure that your system meets the following prerequisites:
- A running instance of AlmaLinux 9
- Administrative privileges (sudo access)
- Internet connectivity
- A Windows ISO file
- A USB drive with at least 8GB of storage capacity
Step-by-Step Guide to Installing WoeUSB on AlmaLinux 9
Installing Dependencies
To begin the installation process, open a terminal and run the following commands to update your system and install the necessary dependencies:
sudo dnf update
sudo dnf install git p7zip p7zip-plugins python3-pip python3-devel gcc libglvnd-devel
Downloading WoeUSB-ng
Next, download the latest version of WoeUSB-ng from the official GitHub repository using the following command:
git clone https://github.com/WoeUSB/WoeUSB-ng.gitOnce the download is complete, navigate to the WoeUSB-ng directory:
cd WoeUSB-ngInstalling WoeUSB-ng
Now, install WoeUSB-ng using pip, the Python package installer, by running the following command:
sudo pip3 install .After the installation is complete, verify that WoeUSB-ng is properly installed by running:
woeusb --versionConfiguring WoeUSB-ng
WoeUSB-ng requires minimal configuration out of the box. However, you can customize its behavior by modifying the configuration file located at ~/.config/woeusb/woeusb.conf. Open the file using your preferred text editor:
nano ~/.config/woeusb/woeusb.confMake any necessary changes and save the file. The configuration options are well-documented within the file itself.
Creating a Bootable Windows USB using WoeUSB
With WoeUSB-ng installed and configured, you are now ready to create a bootable Windows USB drive. WoeUSB offers both a graphical user interface (GUI) and a command-line interface (CLI) for this purpose.
Graphical Method
To use the WoeUSB GUI, follow these steps:
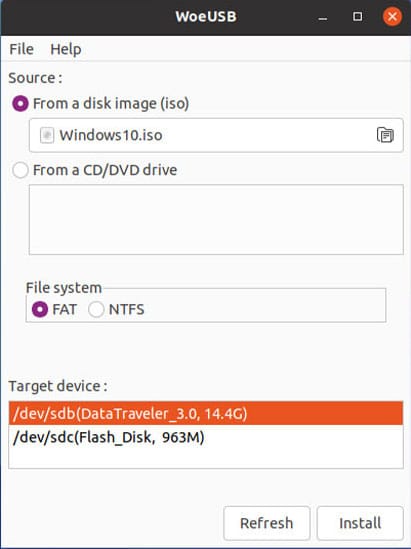
- Launch the WoeUSB GUI from your application menu or by running
woeusbguiin the terminal. - Click on the “Select” button next to “From a disk image (iso)” and choose your Windows ISO file.
- Insert your USB drive and click on the “Refresh” button in the “Target device” section.
- Select your USB drive from the list of available devices.
- Click on the “Install” button to start the bootable USB creation process.
Wait patiently while WoeUSB formats the USB drive and copies the necessary files. Once the process is complete, you will see a success message.

Command-Line Method
For advanced users who prefer the command-line interface, WoeUSB-ng provides the woeusb command. To create a bootable Windows USB using the CLI, use the following syntax:
sudo woeusb --device /path/to/windows.iso /dev/sdXReplace /path/to/windows.iso with the actual path to your Windows ISO file and /dev/sdX with the device name of your USB drive (e.g., /dev/sdb).
WoeUSB will prompt you for confirmation before proceeding. Type “y” and press Enter to start the process.
Troubleshooting and Common Issues
While WoeUSB is generally reliable, you may encounter some common issues during the installation or usage process. Here are a few troubleshooting tips:
- Permission denied errors: Ensure that you have administrative privileges (sudo access) when running WoeUSB commands.
- “Target device is currently busy” error: This error occurs when the USB drive is mounted or in use by another application. Unmount the drive and close any applications accessing it before retrying.
- Bootable USB not recognized: If your computer fails to recognize the bootable USB, try formatting the drive using the FAT32 filesystem and recreating the bootable media.
Congratulations! You have successfully installed WoeUSB. Thanks for using this tutorial for installing WoeUSB on your AlmaLinux 9 system. For additional help or useful information, we recommend you check the official WoeUSB website.