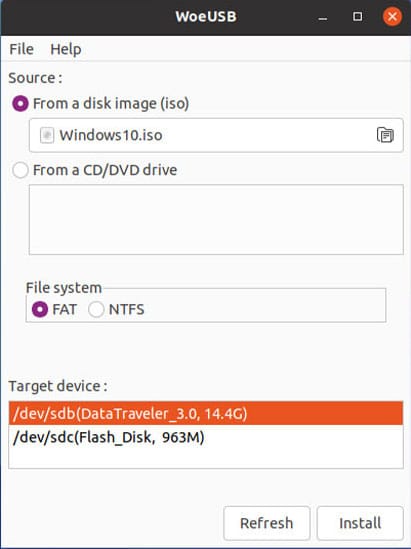
How To Install WoeUSB on Fedora 41

Creating bootable USB drives for Windows installations from a Linux environment can be a daunting task. However, with the right tools, this process becomes straightforward and efficient. One such tool is WoeUSB, a powerful utility designed to facilitate the creation of Windows installation media from ISO files. This article will guide you through the steps to install WoeUSB on Fedora 41, ensuring you have everything you need to successfully create a bootable USB drive.
Understanding WoeUSB
What is WoeUSB?
WoeUSB is an open-source tool that allows users to create bootable USB drives for Windows operating systems directly from Linux. It supports both UEFI and Legacy BIOS modes, making it versatile for various hardware configurations. With WoeUSB, users can easily convert Windows ISO files into bootable USB drives without needing a Windows environment.
Why Use WoeUSB on Fedora?
Using WoeUSB on Fedora offers several advantages:
- User-Friendly Interface: WoeUSB provides both a graphical user interface (GUI) and command-line interface (CLI), catering to different user preferences.
- Reliability: It is known for its stability and effectiveness in creating bootable USB drives.
- Compatibility: Works seamlessly with various Windows versions, including Windows 10 and Windows 11.
Prerequisites for Installation
System Requirements
Before installing WoeUSB, ensure that your system meets the following requirements:
- Operating System: Fedora 41 or later.
- Hardware: A minimum of 2 GB RAM and sufficient disk space for the ISO file and installation packages.
Preparing Your Environment
To ensure a smooth installation process, follow these preparatory steps:
-
- Update Your System: Open a terminal and run the following command to update your Fedora system:
sudo dnf update- Check Internet Connection: Ensure that you have a stable internet connection to download necessary packages.
Installing WoeUSB on Fedora 41
Step-by-Step Installation Process
Check Availability in Repositories
The first step in installing WoeUSB is to check if it is available in the default Fedora repositories. Open your terminal and execute the following command:
sudo dnf search woeusbThis command will search for the WoeUSB package. If it appears in the results, you can proceed with the installation.
Installing WoeUSB
If WoeUSB is available in your repositories, install it using the following command:
sudo dnf install woeusbThis command will download and install WoeUSB along with any required dependencies. Pay attention to any prompts during the installation process to ensure all components are installed correctly.
Verifying Installation
After installation, it’s essential to verify that WoeUSB has been installed correctly. Run the following command:
woeusb -vIf installed successfully, this command will display the version of WoeUSB installed on your system.
Using WoeUSB to Create a Bootable USB Drive
Preparing the USB Drive
Formatting the USB Drive
The next step is to prepare your USB drive for use with WoeUSB. This involves formatting it to ensure compatibility with Windows installations. Depending on your needs, you may choose either FAT32 or NTFS as the file system. Here’s how to format your USB drive:
-
- Select Your USB Drive: First, identify your USB drive by running:
lsblk-
- Create a Backup: Ensure that you back up any important data from your USB drive as formatting will erase all contents.
- Format Command:
- If using NTFS (recommended for larger files):
sudo mkfs.ntfs /dev/sdX-
-
- If using FAT32 (for compatibility with older systems):
-
sudo mkfs.vfat /dev/sdX(Replace `/dev/sdX` with your actual device identifier.)

Creating a Bootable USB with WoeUSB
Basic Command Structure
The command structure for creating a bootable USB drive with WoeUSB is straightforward. The basic syntax is as follows:
woeusb --device /path/to/windows.iso /dev/sdXExample Usage
An example of using this command might look like this:
woeusb --device ~/Downloads/windows10.iso /dev/sdbThis command tells WoeUSB to take the ISO file located in your Downloads folder and write it to the USB drive identified as `/dev/sdb`. Make sure to replace paths and device identifiers according to your setup.
Troubleshooting Common Issues
Common Errors During Installation or Usage
- Error: Package Not Found: If you receive an error stating that the package cannot be found during installation, ensure that your repositories are up-to-date by running `
sudo dnf update` again. - Error: Device Not Recognized: If your USB drive does not appear when attempting to create a bootable drive, check if it is properly connected and recognized by running `
lsblk` again. - Error: Permission Denied: This can occur if you do not have sufficient permissions. Always use `sudo` when executing commands that require administrative privileges.
Resolving Device In Use Errors
If you encounter an error indicating that the device is in use when trying to format or write to it, unmounting the device may resolve this issue. Use the following command to unmount:
sudo umount /dev/sdXVerifying Bootability of USB Drive
A final step after creating your bootable USB is verifying its bootability. You can do this by rebooting your computer and entering the BIOS/UEFI settings. From there, set your USB drive as the primary boot device. If everything was done correctly, you should see the Windows installation screen upon booting from the USB drive.
Congratulations! You have successfully installed WoeUSB. Thanks for using this tutorial for installing the WoeUSB on your Fedora 41 system. For additional help or useful information, we recommend you check the official WoeUSB website.