How To Install WordPress with LAMP on openSUSE

In this tutorial, we will show you how to install WordPress with LAMP on openSUSE. WordPress, the world’s most popular content management system, powers over a third of all websites. Combining it with the robust LAMP stack (Linux, Apache, MariaDB, PHP) on openSUSE creates a powerful and flexible web hosting environment. This comprehensive guide will walk you through the process of installing WordPress with LAMP, specifically using Apache, MariaDB, and PHP 8.3 on openSUSE.
Prerequisites
Before diving into the installation process, ensure you have the following:
- An openSUSE Leap or Tumbleweed system with root or sudo access
- A registered domain name (if you plan to make your site publicly accessible)
- Basic familiarity with the Linux command line
It’s also crucial to have your system up-to-date. Run the following command to update your openSUSE system:
sudo zypper updateStep 1: Install Apache Web Server
Apache is a reliable and widely-used web server that will host your WordPress site. To install Apache on openSUSE, follow these steps:
- Open a terminal and run the following command:
sudo zypper install apache2 - Once installed, start the Apache service and enable it to run at boot:
sudo systemctl start apache2 sudo systemctl enable apache2 - Verify that Apache is running:
sudo systemctl status apache2
To test your Apache installation, open a web browser and navigate to http://localhost or http://your_server_ip. You should see the default Apache welcome page.
Step 2: Install MariaDB
MariaDB is a powerful, open-source database management system that WordPress uses to store and manage site content. Here’s how to install and configure MariaDB:
- Install MariaDB using zypper:
sudo zypper install mariadb mariadb-client - Start the MariaDB service and enable it to run at boot:
sudo systemctl start mysql sudo systemctl enable mysql - Secure your MariaDB installation:
sudo mysql_secure_installationFollow the prompts to set a root password and remove insecure default settings.
After securing MariaDB, create a database and user for WordPress:
sudo mysql -u root -p
CREATE DATABASE wordpress;
CREATE USER 'wpuser'@'localhost' IDENTIFIED BY 'your_password';
GRANT ALL PRIVILEGES ON wordpress.* TO 'wpuser'@'localhost';
FLUSH PRIVILEGES;
EXIT;
Replace ‘your_password‘ with a strong, unique password.
Step 3: Install PHP 8.3
PHP is the scripting language that WordPress is built on. openSUSE Leap might not have PHP 8.3 in its default repositories, so we’ll need to add a repository:
- Add the PHP repository:
sudo zypper addrepo https://download.opensuse.org/repositories/devel:/languages:/php/openSUSE_Leap_15.4/ php - Refresh the repository:
sudo zypper refresh - Install PHP 8.3 and necessary extensions:
sudo zypper install php8 php8-mysql apache2-mod_php8 php8-gd php8-mbstring php8-xml php8-curl php8-zip - Enable the PHP module for Apache:
sudo a2enmod php8
sudo systemctl restart apache2
To verify your PHP installation, create a PHP info file:
echo '' | sudo tee /srv/www/htdocs/info.phpNavigate to http://your_server_ip/info.php in your web browser. If you see a page with PHP information, the installation was successful.
Step 4: Download and Configure WordPress
Now that we have our LAMP stack set up, let’s download and configure WordPress:
- Download the latest version of WordPress:
cd /tmp wget https://wordpress.org/latest.tar.gz - Extract the archive:
tar xzvf latest.tar.gz - Move WordPress files to the Apache document root:
sudo mv wordpress/* /srv/www/htdocs/ - Set proper permissions:
sudo chown -R wwwrun:www /srv/www/htdocs
sudo chmod -R 755 /srv/www/htdocs
Next, configure WordPress to use the database we created earlier:
- Copy the sample configuration file:
sudo cp /srv/www/htdocs/wp-config-sample.php /srv/www/htdocs/wp-config.php - Edit the configuration file:
sudo nano /srv/www/htdocs/wp-config.php - Update the database details:
define('DB_NAME', 'wordpress');
define('DB_USER', 'wpuser');
define('DB_PASSWORD', 'your_password');
define('DB_HOST', 'localhost');
Step 5: Configure Apache for WordPress
To ensure Apache works correctly with WordPress, we need to make a few adjustments:
- Create a new virtual host configuration:
sudo nano /etc/apache2/vhosts.d/wordpress.conf - Add the following content (replace example.com with your domain):
<VirtualHost *:80> ServerName example.com DocumentRoot /srv/www/htdocs <Directory /srv/www/htdocs> Options FollowSymLinks AllowOverride All Require all granted </Directory> ErrorLog /var/log/apache2/wordpress_error.log CustomLog /var/log/apache2/wordpress_access.log combined </VirtualHost> - Enable the rewrite module:
sudo a2enmod rewrite - Restart Apache to apply changes:
sudo systemctl restart apache2
Step 6: Complete WordPress Installation
With all the backend configuration complete, it’s time to finish the WordPress installation through the web interface:
- Open a web browser and navigate to your domain or server IP.
- Select your preferred language and click “Continue”.
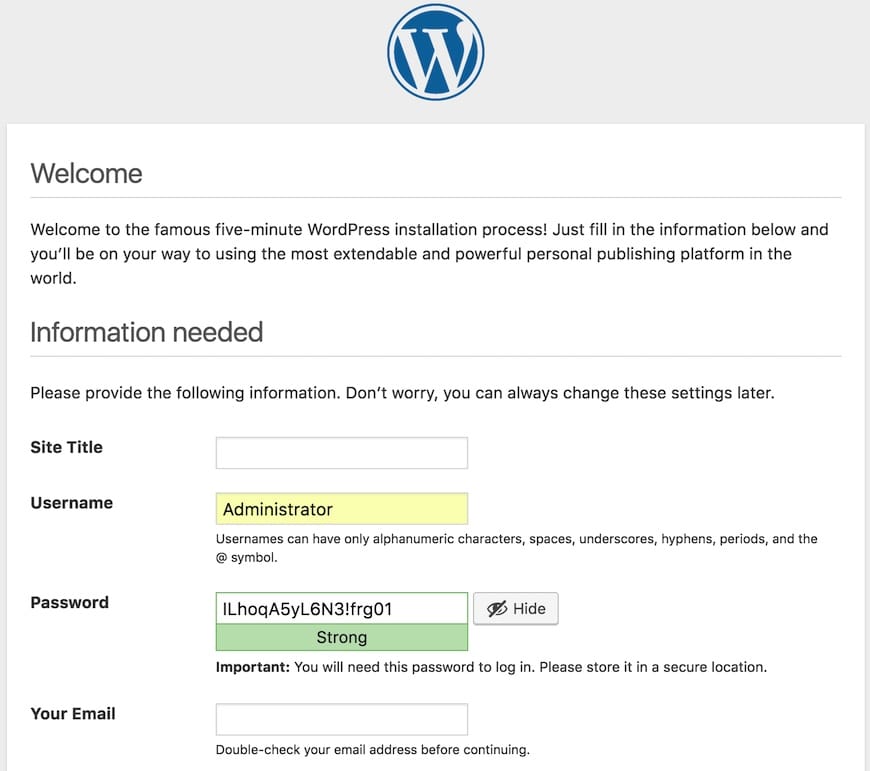
- On the next page, fill in the site information:
- Site Title
- Username (avoid using ‘admin’ for security reasons)
- Password (use a strong, unique password)
- Your Email
- Click “Install WordPress” to complete the setup.
After installation, you can log in to your new WordPress site using the credentials you just created.

Security and Optimization Tips
To ensure your WordPress installation remains secure and performs optimally, consider implementing these additional measures:
Security Enhancements
- Install and configure a WordPress security plugin like Wordfence or Sucuri.
- Enable two-factor authentication for admin accounts.
- Regularly update WordPress core, themes, and plugins.
- Use strong, unique passwords for all user accounts.
- Limit login attempts to prevent brute-force attacks.
Performance Optimization
- Install a caching plugin like W3 Total Cache or WP Super Cache.
- Enable Gzip compression in Apache to reduce file transfer sizes.
- Optimize images before uploading them to your site.
- Use a content delivery network (CDN) for static assets.
- Regularly clean up your database to remove unnecessary data.
Troubleshooting Common Issues
If you encounter problems during or after installation, try these troubleshooting steps:
- Check Apache error logs:
sudo tail -f /var/log/apache2/error.log - Verify PHP is working: Create a phpinfo file as described earlier.
- Test database connectivity: Use a tool like phpMyAdmin or the MySQL command line client.
- Ensure proper file permissions: WordPress files should be owned by the web server user (www run on openSUSE).
- Enable WordPress debug mode: Add
define('WP_DEBUG', true);towp-config.phpfor detailed error messages.
Congratulations! You have successfully installed WordPress. Thanks for using this tutorial to install the latest version of WordPress on openSUSE. For additional help or useful information, we recommend you check the official WordPress website.