How To Install XFCE Desktop on Fedora 39

In this tutorial, we will show you how to install XFCE Desktop on Fedora 39. XFCE is a lightweight, stable, and highly customizable desktop environment that provides a user-friendly experience for Linux users. If you’re looking for an alternative to the default GNOME desktop on Fedora 39, installing XFCE is an excellent choice. XFCE offers a clean and efficient interface, low resource usage, and a wide range of customization options, making it perfect for users who prefer a more traditional desktop layout or those with older hardware.
This article assumes you have at least basic knowledge of Linux, know how to use the shell, and most importantly, you host your site on your own VPS. The installation is quite simple and assumes you are running in the root account, if not you may need to add ‘sudo‘ to the commands to get root privileges. I will show you the step-by-step installation of the XFCE desktop environment on a Fedora 39.
Prerequisites
Before diving into the installation process, let’s ensure that you have everything you need:
- A server running one of the following operating systems: Fedora 39.
- It’s recommended that you use a fresh OS install to prevent any potential issues.
- You will need access to the terminal to execute commands. Fedora 39 provides the Terminal application for this purpose. It can be found in your Applications menu.
- A network connection or internet access to download the XFCE package.
- A
non-root sudo useror access to theroot user. We recommend acting as anon-root sudo user, however, as you can harm your system if you’re not careful when acting as the root.
Install XFCE Desktop on Fedora 39
Step 1. It’s crucial to update your Fedora 39 system before installing any new packages to ensure that you have the latest security patches, bug fixes, and compatibility updates. Updating your system helps prevent potential issues during the installation process and ensures a smooth experience overall. To update your Fedora 39 system, open the terminal and run the following command:
sudo dnf clean all
sudo dnf update
Step 2. Installing XFCE Desktop on Fedora 39.
Now that your Fedora 39 system is up to date, it’s time to install the XFCE desktop environment. Fedora provides a convenient package group that includes all the necessary components for a complete XFCE experience.
To install the XFCE desktop environment, open the terminal and run the following command:
sudo dnf install @xfce-desktop-environment
During the installation process, you may be prompted to confirm the installation of additional dependencies. Press “y” and hit Enter to proceed with the installation. The installation process may take several minutes, depending on your internet connection speed and the number of packages to be installed.
In addition to the core XFCE components, you can also install additional XFCE packages and goodies to enhance your desktop experience. Some popular packages include:
xfce4-goodies: A collection of additional plugins and utilities for the XFCE desktopxfce4-panel-profiles: A set of pre-configured panel layouts for XFCExfce4-whiskermenu-plugin: An alternative application menu for XFCE, similar to the Windows Start menu
To install these additional packages, simply append them to the installation command, like so:
sudo dnf install @xfce-desktop-environment xfce4-goodies xfce4-panel-profiles xfce4-whiskermenu-plugin
Step 3. Configure Display Manager.
A display manager is responsible for managing user sessions and providing a graphical login screen. Fedora 39 uses GDM (GNOME Display Manager) by default, but you can choose to use a different display manager, such as LightDM, which is a lightweight and customizable alternative. To install LightDM and its GTK greeter, open the terminal and run the following command:
sudo dnf install lightdm lightdm-gtk
After the installation is complete, you need to enable the LightDM service to ensure that it starts automatically on system boot. To do this, run:
sudo systemctl enable lightdm
With the XFCE desktop environment installed and the display manager configured, it’s time to reboot your system and start using XFCE on Fedora 39. To reboot your system, open the terminal and run:
sudo reboot
Step 4. Accessing XFCE Desktop environment on Fedora.
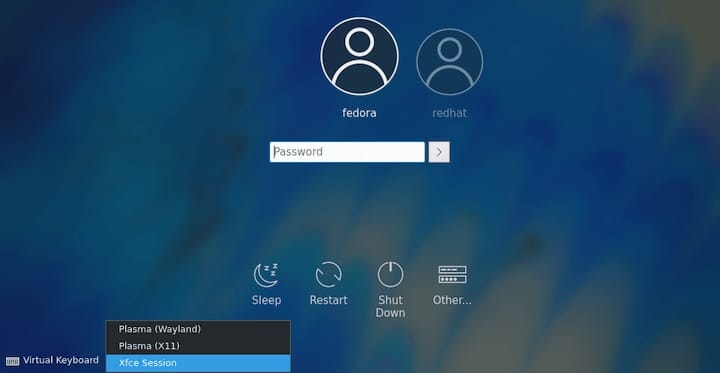
Once your system has rebooted, you’ll be greeted by the LightDM login screen (or the login screen of your chosen display manager). Click on your username and select the “XFCE” session from the list of available desktop environments. Enter your password and click “Log In” to start your XFCE session.

The first time you log in to XFCE, you may be presented with a welcome screen and a configuration wizard. The wizard will guide you through some basic settings, such as your preferred panel layout and window manager style. You can choose to follow the wizard’s recommendations or skip it and configure your desktop manually later.
Congratulations! You have successfully installed XFCE Desktop. Thanks for using this tutorial for installing the XFCE desktop environment on your Fedora 39 system. For additional or useful information, we recommend you check the official XFCE Desktop website.