In this tutorial, we will show you how to install XRDP on CentOS 8. For those of you who didn’t know, XRDP (Remote Desktop Protocol) is an open-source implementation of the Microsoft Remote Desktop Protocol (RDP) for Linux systems. It allows users to establish remote desktop sessions with their Linux machines, providing a graphical user interface (GUI) that closely resembles the local desktop experience. XRDP is particularly valuable for CentOS 8 users, as it enables seamless remote access to their systems, facilitating efficient administration, collaboration, and remote work scenarios.
Compared to other remote desktop protocols like VNC (Virtual Network Computing) or NoMachine, XRDP offers several advantages. It provides enhanced security features, such as support for SSL/TLS encryption, and offers better performance and responsiveness, especially over high-latency or low-bandwidth connections. Additionally, XRDP integrates seamlessly with various desktop environments, ensuring a consistent and familiar user experience across different platforms.
This article assumes you have at least basic knowledge of Linux, know how to use the shell, and most importantly, you host your site on your own VPS. The installation is quite simple and assumes you are running in the root account, if not you may need to add ‘sudo‘ to the commands to get root privileges. I will show you through the step-by-step installation of XRDP (Remote Desktop) on a CentOS 8.
Prerequisites
- A server running one of the following operating systems: CentOS 8.
- It’s recommended that you use a fresh OS install to prevent any potential issues.
- Basic familiarity with the command line interface.
- A stable internet connection.
- A
non-root sudo useror access to theroot user. We recommend acting as anon-root sudo user, however, as you can harm your system if you’re not careful when acting as the root.
Install XRDP on CentOS 8
Step 1. Keeping your CentOS 8 system up-to-date is crucial for security and stability. Run the following command to update your system:
sudo dnf clean all
sudo dnf install epel-release
sudo dnf update
Step 2. Installing EPEL Repository.
The Extra Packages for Enterprise Linux (EPEL) repository provides access to additional software packages that are not included in the default CentOS repositories. Install EPEL by running:
sudo dnf install epel-release
With your system updated and the EPEL repository enabled, you’re now ready to proceed with the installation of XRDP on your CentOS 8 system.
Step 3. Installing Desktop Environment.
XRDP requires a desktop environment to function properly. While you can choose from various desktop environments, we’ll use the popular GNOME desktop environment in this guide. Install GNOME by running the following command:
sudo dnf groupinstall "Server with GUI"
This command will download and install the GNOME desktop environment along with its dependencies. Depending on your internet connection and system specifications, this process may take some time to complete.
Step 4. Installing Xrdp on CentOS 8.
With the desktop environment in place, you can now proceed to install XRDP itself. Run the following command to install the XRDP package:
sudo dnf install xrdp
Once the installation is complete enable and start the XRDP service:
sudo systemctl enable xrdp --now
sudo systemctl start xrdp
To verify that XRDP is running correctly, check its status using:
sudo systemctl status xrdp
You should see output indicating that the XRDP service is active and running.
Step 5. Configure Xrdp.
The configuration files are located in the /etc/xrdp directory. The main configuration file is named xrdp.ini . This file is divided into sections and allows you to set global configuration settings such as security and listening addresses and create different xrdp login sessions.
Restart xrdp to load the new configuration:
sudo systemctl restart xrdp
Step 6. Configure Firewall.
To allow remote connections to your CentOS 8 system, you need to configure the firewall to open the necessary ports. By default, XRDP uses port 3389 for remote connections.
sudo firewall-cmd --permanent --add-port=3389/tcp
sudo firewall-cmd --reload
These commands add a permanent rule to allow TCP traffic on port 3389 and reload the firewall to apply the changes.
Step 7. Connecting to the XRDP server.
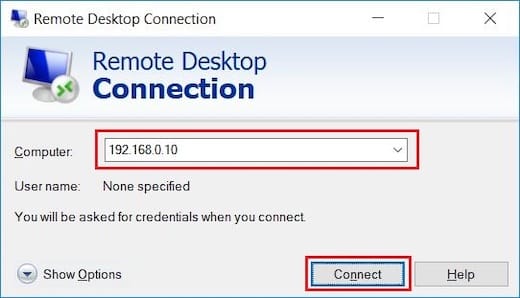
Windows, by default, uses the remote desktop client. Type “remote” in the Windows search bar and click on “Remote Desktop Connection”. This will open up the RDP client. In the “Computer” field, type the remote server IP address and click “Connect”.

Congratulations! You have successfully installed XRDP. Thanks for using this tutorial for installing the XRDP (Remote Desktop) in the CentOS 8 system. For additional help or useful information, we recommend you check the official XRDP website.