How To Install Zeek Network Security Monitor on Ubuntu 22.04 LTS

In this tutorial, we will show you how to install Zeek Network Security Monitor on Ubuntu 22.04 LTS. For those of you who didn’t know, Zeek, formerly known as Bro, is a free and open-source software network security monitor. It is designed for high-performance network analysis and security monitoring, providing a platform for network traffic analysis and security monitoring. Zeek provides a flexible scripting language and a set of analysis tools that allow network administrators and security professionals to monitor and analyze network traffic in real-time, detect and respond to security threats, and gather forensic evidence for incident response and investigations.
This article assumes you have at least basic knowledge of Linux, know how to use the shell, and most importantly, you host your site on your own VPS. The installation is quite simple and assumes you are running in the root account, if not you may need to add ‘sudo‘ to the commands to get root privileges. I will show you the step-by-step installation of the Zeek Network Security Monitor on Ubuntu 22.04 (Jammy Jellyfish). You can follow the same instructions for Ubuntu 22.04 and any other Debian-based distribution like Linux Mint, Elementary OS, Pop!_OS, and more as well.
Prerequisites
- A server running one of the following operating systems: Ubuntu 22.04, 20.04, and any other Debian-based distribution like Linux Mint.
- It’s recommended that you use a fresh OS install to prevent any potential issues.
- An active internet connection. You’ll need an internet connection to download the necessary packages and dependencies for Zeek Network Security Monitor.
- SSH access to the server (or just open Terminal if you’re on a desktop).
- A
non-root sudo useror access to theroot user. We recommend acting as anon-root sudo user, however, as you can harm your system if you’re not careful when acting as the root.
Install Zeek Network Security Monitor on Ubuntu 22.04 LTS Jammy Jellyfish
Step 1. First, make sure that all your system packages are up-to-date by running the following apt commands in the terminal.
sudo apt update
sudo apt upgrade
sudo apt install wget apt-transport-https gnupg2 software-properties-common
Step 2. Installing Zeek Network Security Monitor on Ubuntu 22.04.
By default, Zeek is not available on Ubuntu 22.04 base repository. Now run the following command below to add the Zeek repository to your Ubuntu system:
echo 'deb http://download.opensuse.org/repositories/security:/zeek/xUbuntu_22.04/ /' | tee /etc/apt/sources.list.d/security:zeek.list
Next, import the GPG key with the following command:
curl -fsSL https://download.opensuse.org/repositories/security:zeek/xUbuntu_22.04/Release.key | gpg --dearmor | tee /etc/apt/trusted.gpg.d/security_zeek.gpg
After the added Zeek repository, we will be able to start installation using the following command in the terminal:
sudo apt update
sudo apt install zeek
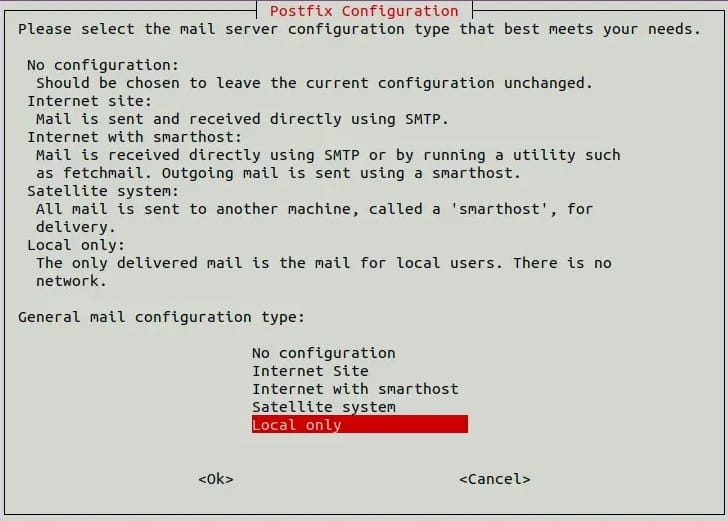
During the installation, you will be asked to select your mail server, select local only and press the Enter key. You will be asked to provide your mail server hostname.

After that, you will need to add the Zeek installation path to your system variable:
echo "export PATH=$PATH:/opt/zeek/bin" >> ~/.bashrc
Next, activate the system variable with the following command:
source ~/.bashrc
You can verify that the Zeek has been installed by running the following command:
zeek --version
Step 3. Configure Zeek.
Finally, you need to configure Zeek by creating the configuration file and defining the network interfaces to monitor:
nano /opt/zeek/etc/networks.cfg
Add more networks at the end of the file:
10.0.0.0/8          Private IP space
172.16.0.0/12       Private IP space
192.168.0.0/16      Private IP space
Save and close the file then edit the Zeek main configuration file using your favorite text editor:
nano /opt/zeek/etc/node.cfg
Comment on the following lines:
#[zeek]
#type=standalone
#host=localhost
#interface=eth0
Also, add the following configurations at the end of the file:
[zeek-logger]
type=logger
host=your-server-ip
#
[zeek-manager]
type=manager
host=your-server-ip
#
[zeek-proxy]
type=proxy
host=your-server-ip
#
[zeek-worker]
type=worker
host=your-server-ip
interface=eth0
#
[zeek-worker-lo]
type=worker
host=localhost
interface=lo
Save and close the file, then verify the Zeek configuration using the following command:
zeekctl check
Next, now deploy the Zeek using the following command below:
zeekctl deploy
Finally, check the Zeek status with the following command:
zeekctl status
Output:
Name         Type    Host             Status    Pid    Started
zeek-logger  logger   142.250.4.100    running   58935  1 Feb 05:46:02
zeek-manager manager  142.250.4.100    running   58985  1 Feb 05:46:03
zeek-proxy   proxy    142.250.4.100    running   59035  1 Feb 05:46:05
zeek-worker  worker   142.250.4.100    running   59107  1 Feb 05:46:06
zeek-worker-lo worker  localhost       running   59104  1 Feb 05:46:06
Congratulations! You have successfully installed Zeek. Thanks for using this tutorial for installing the Zeek Network Security Monitor on Ubuntu 22.04 LTS Jammy Jellyfish system. For additional help or useful information, we recommend you check the official Zeek website.