How To Set Up SSH to Use Two-Factor Authentication on Fedora 39

In this tutorial, we will show you how to set up SSH to use two-factor authentication on Fedora 39. Secure Shell (SSH) is a critical network protocol that provides a secure way to access a remote server. In an era where cyber threats are increasingly sophisticated, enhancing security measures is paramount. One such enhancement is Two-Factor Authentication (2FA), which adds an extra layer of security by requiring two types of identification before granting access.
This article assumes you have at least basic knowledge of Linux, know how to use the shell, and most importantly, you host your site on your own VPS. The installation is quite simple and assumes you are running in the root account, if not you may need to add ‘sudo‘ to the commands to get root privileges. I will show you the step-by-step set up SSH to use two-factor authentication on Fedora 39 on a Fedora 39.
Prerequisites
Before diving into the installation process, let’s ensure that you have everything you need:
- A server running one of the following operating systems: Fedora 39.
- It’s recommended that you use a fresh OS install to prevent any potential issues.
- You will need access to the terminal to execute commands. Fedora 39 provides the Terminal application for this purpose. It can be found in your Applications menu.
- A network connection or internet access to download the SSH packages.
- A
non-root sudo useror access to theroot user. We recommend acting as anon-root sudo user, however, as you can harm your system if you’re not careful when acting as the root. - Preconfigured Google Authenticator app on iOS or Android mobile.
Set Up SSH to Use Two-Factor Authentication on Fedora 39
Step 1. Before diving into the installation process, it’s crucial to ensure your Fedora 39 system is up-to-date. Regular system updates provide the latest features, improve system stability and patch security vulnerabilities. To update your Fedora system, open the terminal and execute the following command:
sudo dnf clean all
sudo dnf update
Step 2. Installing the OpenSSH server package.
Open your terminal and type the following command to install the OpenSSH server package:
sudo dnf install openssh-server
Once the installation is complete, start the SSH service with the following command:
sudo systemctl start sshd.service
To ensure the SSH service starts automatically at boot, enable it with this command:
sudo systemctl enable sshd.service
The SSH server can be configured by editing the SSH configuration file located at /etc/ssh/sshd_config. Use a text editor like nano or vi to open and edit this file. Remember to restart the SSH service for the changes to take effect:
sudo systemctl restart sshd.service
Step 3. Enabling Two-Factor Authentication for SSH.
The Google Authenticator PAM module provides the necessary tools to set up 2FA. Install it using the following command:
sudo dnf install google-authenticator
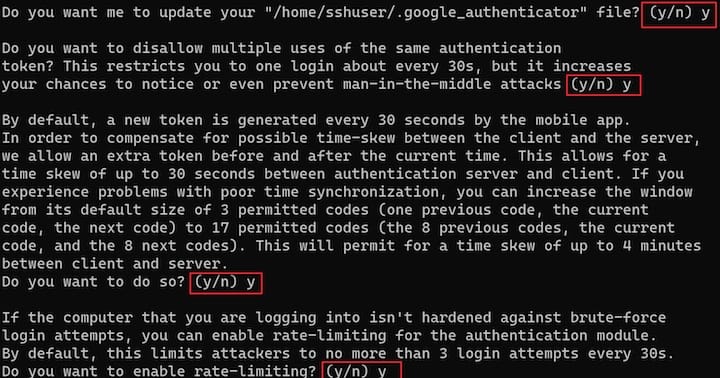
Run the Google Authenticator configuration tool with the following command:
google-authenticator
This will generate a new secret key and display a QR code. Scan this QR code with the Google Authenticator app on your smartphone.

On your mobile device, open the Google Authenticator app, and select + to add a new account. Then, select Scan a QR code, enabling you to scan the previously generated QR code. Scanning the QR code will show you the Linux virtual machine (VM) name, the user account, and a unique TOTP code that changes every 30 seconds.
Step 4. Testing Two-Factor Authentication.
After setting up 2FA, it’s important to test it to ensure it’s working as expected.
-
- Open a new terminal window or SSH client.
- Try to SSH into your server by running the command:
ssh username@your_server_ip - You should be prompted for your password and the verification code from your Google Authenticator app.
If you’re able to log in successfully, then your 2FA setup is working correctly.
Step 5. Troubleshooting Common Issues
During the setup, you might encounter some issues. Here are some common issues and their solutions:
- Issue: SSH connection refused.
Solution: Check if the SSH service is running withsudo systemctl status sshd.service. If it’s not running, start it withsudo systemctl start sshd.service. - Issue: Google Authenticator codes not working.
Solution: Ensure that the time on your server and your Google Authenticator app is synchronized. - Issue: Unable to log in after enabling 2FA.
Solution: Use one of your emergency scratch codes to log in and check your 2FA setup.
Congratulations! You have successfully set up SSH two-factor authentication. Thanks for using this tutorial to setting up SSH two-factor authentication on your Fedora 39 system. For additional or useful information, we recommend you check the official Fedora website.