![]()
In this tutorial, we will show you how to install and configure Cacti Monitoring on CentOS 7. For those of you who didn’t know, Cacti is an open-source, web-based network monitoring and graphing tool designed as a front-end application for the open-source, industry-standard data logging tool RRDtool. It is used by IT businesses and stores all of the necessary information about bandwidth, hard disk usage, CPU usage, load average, RAM statistics, etc in a MySQL database. Cacti create graphs and populate them with data. It offers SNMP support, 3rd party templates, and plugins and has built-in user authentications and user permission features.
This article assumes you have at least basic knowledge of Linux, know how to use the shell, and most importantly, you host your site on your own VPS. The installation is quite simple and assumes you are running in the root account, if not you may need to add ‘sudo‘ to the commands to get root privileges. I will show you the step-by-step installation of Cacti on a CentOS 7 server.
Prerequisites
- A server running one of the following operating systems: CentOS 7.
- It’s recommended that you use a fresh OS install to prevent any potential issues.
- SSH access to the server (or just open Terminal if you’re on a desktop).
- A
non-root sudo useror access to theroot user. We recommend acting as anon-root sudo user, however, as you can harm your system if you’re not careful when acting as the root.
Install Cacti Monitoring on CentOS 7
Step 1. First, let’s start by ensuring your system is up-to-date.
yum -y update
Step 2. Install the LAMP server.
A CentOS 7 LAMP server is required. If you do not have LAMP installed, you can follow our guide here. Also, install the required PHP modules:
yum install php php-mysql php-gd php-pear php-common php-cli php-devel php php-mbstring nano
Step 3. Installing the Cacti packages.
Now, we’ll gonna install snmp and cacti in our Linux machine:
yum install php-snmp net-snmp-utils net-snmp-libs rrdtool
Before we start the web configuration part, we need to start the snmpd service:
systemctl start snmpd.service
You need to install and enable the EPEL Repository. Once you’ve enabled the repository, type the following command to install the Cacti application:
yum install epel-release
yum install cacti
Step 4. Configuring MariaDB for the Cacti application.
By default, MariaDB is not hardened. You can secure MariaDB using the mysql_secure_installation script. you should read and below each step carefully which will set a root password, remove anonymous users, disallow remote root login, and remove the test database and access to secure MariaDB:
mysql_secure_installation
Configure it like this:
- Set root password? [Y/n] y
- Remove anonymous users? [Y/n] y
- Disallow root login remotely? [Y/n] y
- Remove test database and access to it? [Y/n] y
- Reload privilege tables now? [Y/n] y
Next, we will need to log in to the MariaDB console and create a database for the Cacti. Run the following command:
mysql -u root -p
This will prompt you for a password, so enter your MariaDB root password and hit Enter. Once you are logged in to your database server you need to create a database for Cacti installation:
MariaDB [(none)]> create database cacti;
MariaDB [(none)]> GRANT ALL ON cacti.* TO cacti@localhost IDENTIFIED BY 'cactipass';
MariaDB [(none)]> FLUSH privileges;
MariaDB [(none)]> quit;
Now, import cacti database tables from the cacti.sql file. First, locate cacti.sql file:
mysql -u cacti -p cacti < /usr/share/doc/cacti-0.8.8b/cacti.sql
After we have successfully imported the database table to our MariaDB database cacti, we’ll now configure our cacti configuration file. Open /etc/cacti/db.php file using nano editor and edit the below lines:
$database_type = "mysql";
$database_default = "cacti";
$database_hostname = "localhost";
$database_username = "cacti";
$database_password = "cactipass";
Step 5. Configuring Apache web server for Cacti.
We’ll now need to allow access to Cacti from over the internet. To do so, we’ll need to edit /etc/httpd/conf.d/cacti.conf using a text editor:
nano /etc/httpd/conf.d/cacti.conf
Add the following lines:
Alias /cacti    /usr/share/cacti

<Directory /usr/share/cacti/>
        <IfModule mod_authz_core.c>
                # httpd 2.4
                Require all granted
        </IfModule>
        <IfModule !mod_authz_core.c>
                # httpd 2.2
                Order deny,allow
                Deny from all
                Allow from all
        </IfModule>
</Directory>
Save and close the file. Restart the apache service for the changes to take effect:
systemctl restart httpd.service
Set cron for cacti:
*/5 * * * * cacti /usr/bin/php /usr/share/cacti/poller.php > /dev/null 2>&1
Step 6. Configuring firewall rules for Cacti.
firewall-cmd --permanent --zone=public --add-service=https
firewall-cmd --permanent --zone=public --add-service=http
firewall-cmd --reload
Step 7. Accessing cacti.
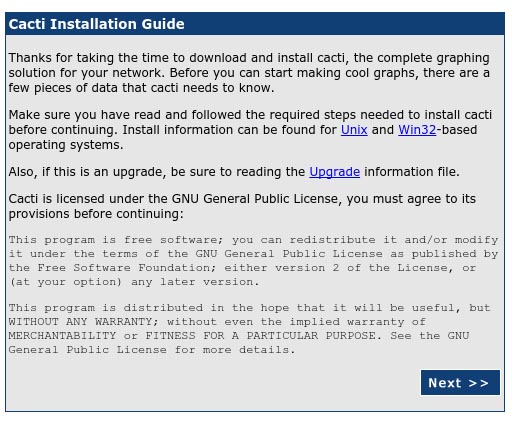
Cacti will be available on HTTP port 80 by default. Open your favorite browser and navigate to http://yourdomain.com/cacti or http://server-ip/cacti and complete the required steps to finish the installation. You will get the “Cacti Installation Guide” on the screen. Click on the ‘Next’ button.
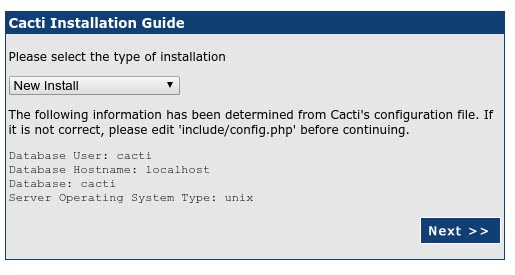
On the next screen, you will get a drop-down button. Because of this fresh installation select, ‘New Install’ and click the ‘Next’ button.
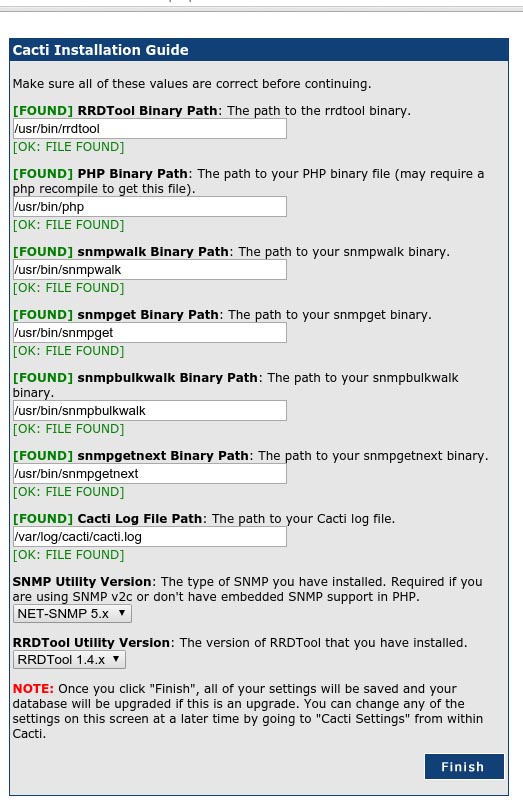
Cacti will now check for the packages it needs to run properly. Make sure all the checks appear with an “OK” status and then click Finish.
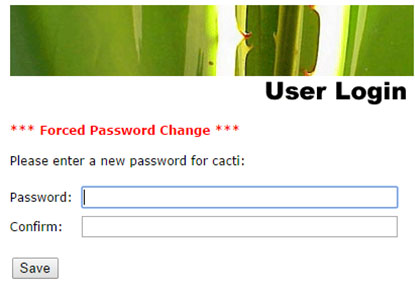
The next page is the login page. The first time you log into Cacti, use admin as username and password.
Congratulations! You have successfully installed Cacti. Thanks for using this tutorial for installing Cacti Monitoring on your CentOS 7 system. For additional help or useful information, we recommend you to check the official Cacti website.
[su_box title=”VPS Manage Service Offer” style=”bubbles” box_color=”#000000″ radius=”10″]If you don’t have time to do all of this stuff, or if this is not your area of expertise, we offer a service to do “VPS Manage Service Offer”, starting from $10 (Paypal payment). Please contact us to get the best deal![/su_box]