In this tutorial, we will show you how to upgrade from Ubuntu 16.10 to Ubuntu 17.04. For those of you who didn’t know, Ubuntu 17.04 was released, codenamed “Zesty Zapus”; bringing yet another version of a remarkable operating system in the Ubuntu ecosystem, with the latest and some of the greatest open source technologies in a high-quality, easy-to-use Linux distribution.
This article assumes you have at least basic knowledge of Linux, know how to use the shell, and most importantly, you host your site on your own VPS. The installation is quite simple and assumes you are running in the root account, if not you may need to add ‘sudo‘ to the commands to get root privileges. I will show you the step-by-step upgrade from Ubuntu 16.10 to Ubuntu 17.04 (Zesty Zapus).
Prerequisites
- SSH access to the server (or just open Terminal if you’re on a desktop).
- A
non-root sudo useror access to theroot user. We recommend acting as anon-root sudo user, however, as you can harm your system if you’re not careful when acting as the root.
Upgrade From Ubuntu 16.10 to Ubuntu 17.04
Step 1. First, make sure that all your system packages are up-to-date by running the following apt-get commands in the terminal.
sudo apt update
sudo apt dist-upgrade
Step 2. Upgrade Ubuntu 16.10 to 17.04.
You can upgrade to Ubuntu 17.04 in one of two ways, using the Software Updater app, or using the command line.
- Upgrade Ubuntu 16.10 to Ubuntu 17.04 Using the Command Line
Then make sure you have the update-manager-core package installed:
sudo apt install update-manager-core
Next, edit a configuration file using nano or your preferred command line text editor:
sudo nano /etc/update-manager/release-upgrades
At the bottom of this file, change the value of Prompt from lots to normal:
Prompt=normal
Afterward, launch the upgrade tool with the command below:
sudo do-release-upgrade
Once that upgrade has been completed reboot, log in, and run the command again, this time to upgrade to Ubuntu 17.04:
sudo do-release-upgrade -d
- Upgrade Ubuntu 17.04 Using Graphical Update Manager
Ensure that your system is fully up-to-date, run the commands below:
sudo apt update
sudo apt dist-upgrade
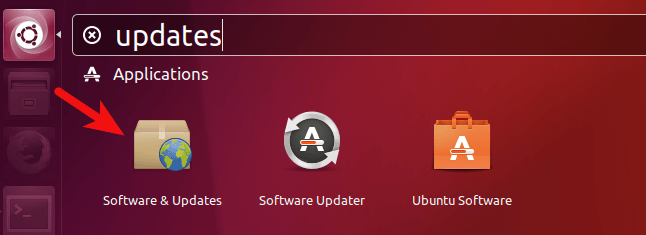
Then open Software & Updates from Unity Dash or your favorite application menu:

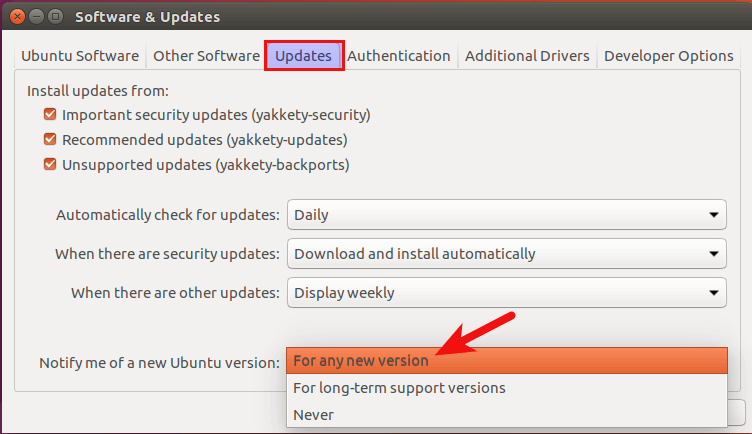
Next, select the Updates tab, and then at the bottom of the window, change notification settings from For long-term support version to For any new version:

Click the close button. You will be asked to enter your password to apply the above changes. Next, issue the following command in the terminal:
update-manager -d
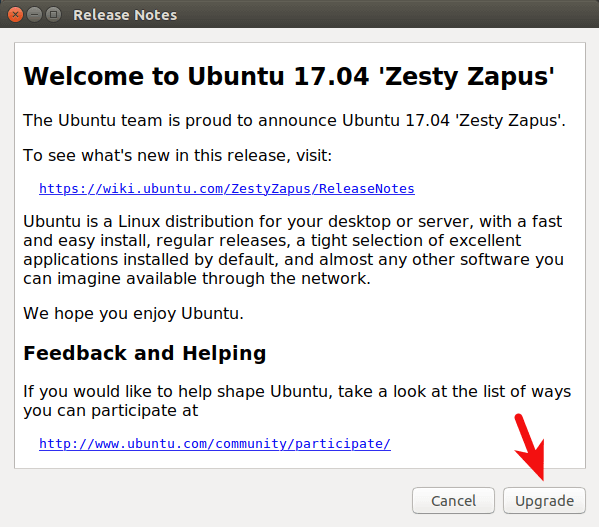
You should be notified that the software is up-to-date and Ubuntu 17.04 is now available. Click the Upgrade button:

Then enter your password. The Ubuntu 17.04 release notes window will appear. Click Upgrade and wait for the upgrade to finish:

Congratulations! You have successfully upgraded Ubuntu. Thanks for using this tutorial for an upgrade from Ubuntu 16.10 to Ubuntu 17.04 (Zesty Zapus) system. For additional help or useful information, we recommend you check the official Ubuntu website.