How To Install Jira on Fedora 40
![]()
In this tutorial, we will show you how to install Jira on Fedora 40. Jira is a powerful project management and issue-tracking tool widely used by agile teams across the globe. Whether you’re a software development team, an IT operations group, or any other project-based organization, Jira can help streamline your workflows, collaborate more effectively, and deliver high-quality results.
This article assumes you have at least basic knowledge of Linux, know how to use the shell, and most importantly, you host your site on your own VPS. The installation is quite simple and assumes you are running in the root account, if not you may need to add ‘sudo‘ to the commands to get root privileges. I will show you the step-by-step installation of the Jira project management tool on Fedora 40.
Prerequisites
Before we dive into the installation process, ensure that you have the following prerequisites in place:
- A server running one of the following operating systems: Fedora 40.
- It’s recommended that you use a fresh OS install to prevent any potential issues.
- You will need access to the terminal to execute commands. Fedora provides the Terminal application for this purpose. It can be found in your Applications menu.
- A stable internet connection to download the necessary packages.
- A non-root sudo user or access to the root user. We recommend acting as a non-root sudo user, however, as you can harm your system if you’re not careful when acting as the root.
Install Jira on Fedora 40
Step 1. Update Your System.
Begin by updating your Fedora system to ensure all packages are up to date. Open your terminal and execute the following commands:
sudo dnf clean all
sudo dnf update
Step 2. Installing Java.
Jira requires Java 11 or later to be installed on your system. You can install OpenJDK 11 on Fedora 40 by running the following command:
sudo dnf install java-11-openjdk-devel
Verify the Java installation by checking the version:
java -version
Jira requires the JAVA_HOME environment variable to be set correctly. Locate the Java installation directory and add JAVA_HOME to your system’s environment variables:
export JAVA_HOME=/usr/lib/jvm/java-11-openjdk
You can add this line to your shell configuration file (e.g., ~/.bashrc) to make the change persistent across reboots.
Step 3. Dedicated User Account.
It’s recommended to create a dedicated user account for running Jira. This separates the Jira process from other system activities and provides better security and resource management.
sudo -u postgres createuser -P jirauser
sudo -u postgres createdb -O jirauser jiradb
Step 4. Database Setup.
Jira requires an external database to store its data. You can use either PostgreSQL or MySQL/MariaDB. Install the appropriate database server package and create a database instance for Jira.
For PostgreSQL:
sudo dnf install postgresql-server
sudo /usr/bin/postgresql-setup --initdb
sudo systemctl start postgresql
For MySQL/MariaDB:
sudo dnf install mariadb-server
sudo systemctl start mariadb
Step 5. Installing Jira on Fedora 40.
Navigate to the official Atlassian website to find the Jira Software installer for Linux. Choose the appropriate version for Fedora 40 and download it using wget:
wget https://www.atlassian.com/software/jira/downloads/binary/atlassian-jira-software-8.x.x-x64.bin
Replace 8.x.x with the latest version number.
Make the downloaded installer executable by changing its permissions:
chmod a+x atlassian-jira-software-8.x.x-x64.bin
Run the installer and follow the on-screen instructions:
sudo ./atlassian-jira-software-8.x.x-x64.bin
During the installation, you’ll be prompted to choose the installation directory and whether to run Jira as a service. Make your selections based on your preferences and system setup.
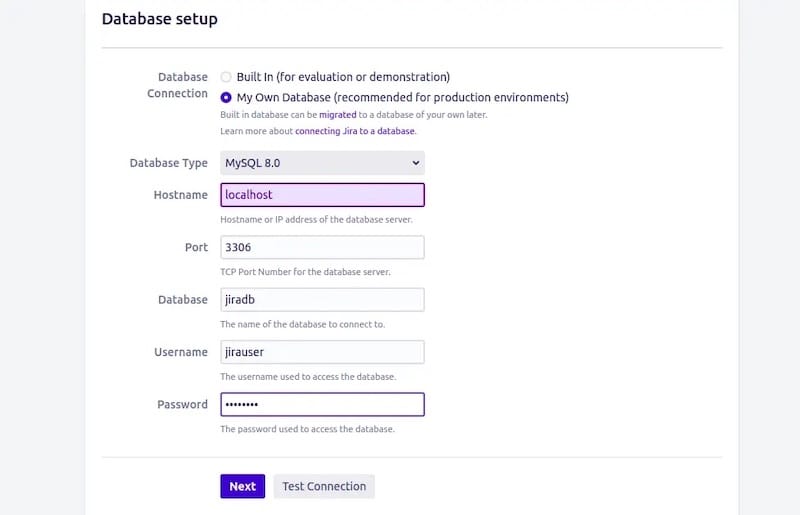
Configure Jira to connect to the database by editing the dbconfig.xml file located in the Jira home directory. Update the database type, name, user, and password accordingly.
Start Jira by running:
sudo /etc/init.d/jira start
Step 5. Configuring Firewall.
Adjust your firewall settings to allow traffic on the default Jira port, which is 8080:
sudo firewall-cmd --permanent --add-port=8080/tcp
sudo firewall-cmd --reload
If you have SELinux enabled, configure it to work with Jira by setting the appropriate context for the installation directory:
sudo semanage fcontext -a -t httpd_sys_content_t "/path/to/jira(/.*)?"
sudo restorecon -Rv /path/to/jira
Step 5. Accessing Jira Web UI.
Once the installation is complete, you can access the Jira web interface by navigating to http://your-server-ip:8080 in a web browser. Follow the prompts to select your preferred language, set up an application title, and configure email notifications and user management settings.
Congratulations! You have successfully installed Jira. Thanks for using this tutorial for installing the Jira project management tool on your Fedora 40 system. For additional or useful information, we recommend you check the official Jira website.