How To Install XFCE Desktop on Fedora 41

XFCE is a lightweight, open-source desktop environment designed for Unix-like operating systems. Known for its simplicity, speed, and low resource usage, XFCE provides a user-friendly interface without compromising performance. This makes it an ideal choice for users running older hardware or those who prefer a minimalistic desktop experience.
Fedora 41, the latest release of the popular Linux distribution, offers a stable and secure platform for running XFCE. By combining the power of Fedora with the efficiency of XFCE, users can enjoy a fast and reliable computing experience. In this comprehensive guide, we will walk you through the process of installing and configuring XFCE on Fedora 41, from preparing your system to customizing your new desktop environment.
Prerequisites and Preparation
Before embarking on the installation process, it’s essential to ensure that your system meets the minimum requirements for running XFCE on Fedora 41. While XFCE is known for its low resource usage, having sufficient CPU power, RAM, and disk space is crucial for a smooth experience. As a general guideline, your system should have at least a 1 GHz processor, 1 GB of RAM, and 10 GB of free disk space.
To safeguard your important data, it’s always a good practice to create a backup before making significant changes to your system. This precautionary measure ensures that you can restore your files in case anything goes wrong during the installation process.
Lastly, installing software packages on Fedora requires root or sudo privileges. Make sure you have the necessary permissions before proceeding with the installation.
Step-by-Step Guide to Installing XFCE on Fedora 41
Update Your System
To begin, open a terminal and run the following command to update your Fedora system:
sudo dnf updateThis command ensures that all installed packages are up-to-date, which is crucial for maintaining compatibility and security. The update process may take some time, depending on the number of packages that need to be updated.
Install XFCE Desktop Environment
Once your system is updated, you can proceed with installing the XFCE desktop environment. Use the DNF package manager to install the entire XFCE package group, including core applications like Thunar file manager and xfwm4 window manager:
sudo dnf groupinstall "Xfce Desktop"Confirm the installation when prompted, and wait for the process to complete. DNF will handle the download and installation of all the necessary packages and dependencies.
Set LightDM as the Default Display Manager (Optional)
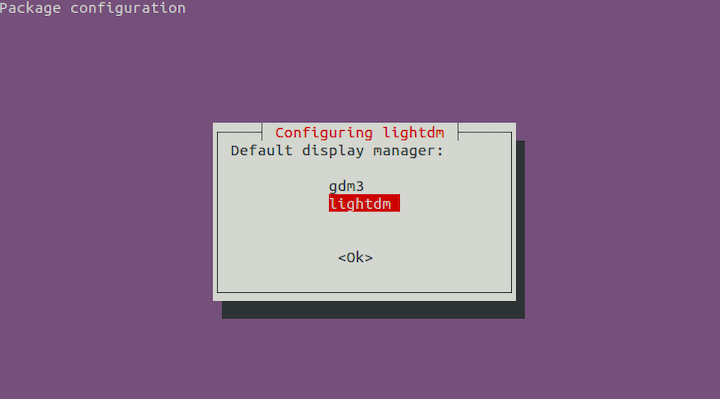
By default, Fedora uses the GNOME Display Manager (GDM) as its display manager. However, if you prefer a lightweight alternative, you can opt for LightDM. To install LightDM and set it as the default display manager, run the following commands:
sudo dnf install lightdm
sudo systemctl enable lightdm --force
LightDM is an excellent choice for XFCE, as it provides a simple and fast login experience that complements the lightweight nature of the desktop environment.

Reboot Your System
After the installation is complete, reboot your system to apply the changes:
sudo rebootSwitching to XFCE at Login
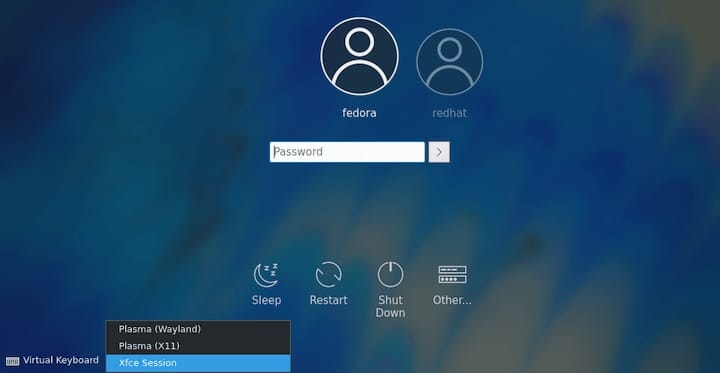
Once your system reboots, you will be greeted by the login screen. To switch to XFCE, click on the session options and select “XFCE” from the list. If you have multiple desktop environments installed, you can easily switch between them at the login screen by choosing the desired session.

Post-Installation Configuration of XFCE on Fedora 41
Basic Customization Options
XFCE offers a wide range of customization options to personalize your desktop experience. To access the appearance settings, right-click on the desktop and select “Appearance” from the menu. From here, you can change themes, icons, and fonts to suit your preferences. XFCE comes with a selection of pre-installed themes, but you can also download and install additional themes from various online repositories.
Another key aspect of customization in XFCE is panel configuration. Panels are the bars located at the edges of the screen that contain menus, shortcuts, and widgets. To customize panels, right-click on a panel and select “Panel Preferences.” You can adjust the panel’s position, size, and appearance, as well as add or remove widgets to tailor the panel to your needs.
Installing Additional Applications
While XFCE comes with a set of core applications, you may want to install additional software to enhance your productivity. The XFCE Goodies package provides a collection of useful tools and utilities that complement the lightweight nature of XFCE. To install XFCE Goodies, run the following command:
sudo dnf install xfce4-goodiesThis package includes applications like the XFCE Task Manager, Screenshot Tool, and Dictionary, among others.
Enabling RPM Fusion Repositories for Extra Software
Fedora’s default repositories provide a wide range of software, but some users may require additional packages that are not included due to licensing or other reasons. The RPM Fusion repositories offer access to these extra packages, including multimedia codecs and proprietary software. To enable the RPM Fusion repositories, run the following commands:
sudo dnf install https://download1.rpmfusion.org/free/fedora/rpmfusion-free-release-$(rpm -E %fedora).noarch.rpm
sudo dnf install https://download1.rpmfusion.org/nonfree/fedora/rpmfusion-nonfree-release-$(rpm -E %fedora).noarch.rpm
Once enabled, you can install software from the RPM Fusion repositories using the standard DNF package manager.
Troubleshooting Common Issues During Installation
XFCE Not Appearing in Session Options
If XFCE does not appear in the session options at the login screen, it may indicate that the installation was incomplete or encountered an error. To resolve this issue, try reinstalling the XFCE desktop environment using the following command:
sudo dnf groupinstall "Xfce Desktop"If the installation completes successfully, XFCE should appear in the session options after rebooting your system.
LightDM Fails to Start After Reboot
In some cases, LightDM may fail to start after rebooting your system. To troubleshoot this issue, check the status of the LightDM service using the following command:
sudo systemctl status lightdmThe output will provide information about any errors or issues preventing LightDM from starting. Common solutions include ensuring that LightDM is set as the default display manager and checking for any conflicting display manager services.
Switching Back to GNOME or Another Desktop Environment
If you decide to switch back to GNOME or another installed desktop environment, simply log out of your current session and select the desired environment from the session options at the login screen. This allows you to easily switch between different desktop environments without the need for additional configuration.
Uninstalling XFCE from Fedora 41
In the event that you no longer wish to use XFCE on your Fedora 41 system, you can easily uninstall it using the following command:
sudo dnf groupremove "Xfce Desktop"This command will remove the XFCE desktop environment and its associated packages from your system. If you installed LightDM as the display manager, you can remove it as well using:
sudo dnf remove lightdmAfter uninstalling XFCE, your system will default to the previously installed desktop environment, such as GNOME.
Congratulations! You have successfully installed XFCE. Thanks for using this tutorial for installing the XFCE desktop environment on Fedora 41 system. For additional help or useful information, we recommend you check the official XFCE website.