![]()
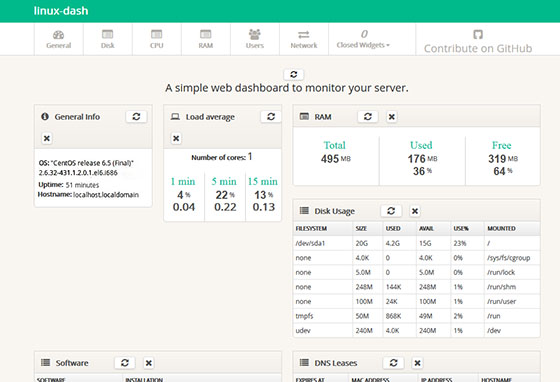
In this tutorial, we will show you how to install Linux Dash on CentOS 6. For those of you who didn’t know, Linux-dash is a web-based lightweight monitoring dashboard for Linux machines, which can display, in real-time, various system properties, such as CPU load, RAM usage, disk usage, Internet speed, network connections, installed software’s, running processes and many more. The web statistics page allows you to drag and drop the various widgets and rearrange the display as you desire.
This article assumes you have at least basic knowledge of Linux, know how to use the shell, and most importantly, you host your site on your own VPS. The installation is quite simple. I will show you the step-by-step installation of Linux dash on CentOS 6.
Prerequisites
- A server running one of the following operating systems: CentOS 6.
- It’s recommended that you use a fresh OS install to prevent any potential issues.
- SSH access to the server (or just open Terminal if you’re on a desktop).
- A
non-root sudo useror access to theroot user. We recommend acting as anon-root sudo user, however, as you can harm your system if you’re not careful when acting as the root.
Install Linux Dash on CentOS 6
Step 1. Install Nginx, PHP, and PHP modules.
To install, first, you must add the Webtatic yum repository information corresponding to your CentOS version to yum:
rpm -Uvh https://mirror.webtatic.com/yum/el6/latest.rpm
Install Nginx webserver:
yum update
yum install nginx16
Install php-fpm component:
yum install php56w php56w-opcache --enablerepo=webtatic-testing
yum install php56w-fpm --enablerepo=webtatic-testing
yum install git
Step 2. Configure the Nginx web server.
Create an Nginx Vhost for Linux-dash.
##nano /etc/nginx/conf.d/your-domain.com
server {
   listen  80;
   server_name  your-domain.com www.your-domain.com;

   access_log  /var/www/your-domain.com/logs/access.log ;
   error_log    /var/www/your-domain.com/logs/error.log ;

   location / {
       root   /var/www/your-domain.com/public_html;
       index  index.php index.html index.htm;

   }

   error_page   500 502 503 504  /50x.html;
   location = /50x.html {
       root   /var/www/your-domain.com/public_html;
   }

  # pass the PHP scripts to FastCGI server listening on 127.0.0.1:9000
  location ~ .php$ {
  fastcgi_pass   127.0.0.1:9000;
  fastcgi_index  index.php;
  root    /var/www/your-domain.com/public_html;
  fastcgi_param  SCRIPT_FILENAME  /var/www/your-domain/public_html$fastcgi_script_name;
  include fastcgi_params;
  }

   location ~ /.ht {
       deny  all;
   }
}
Add host on Nginx.conf:
# nano /etc/nginx/nginx.conf
### add line like this on http section:
include /etc/nginx/conf.d/*.conf;
Step 3. Configure php-fpm.
Make sure to edit “user”, “group” and “listen” directives as shown below. You can keep the rest of the configuration unchanged:
#nano /etc/php-fpm.d/www.conf

. . .
listen = 127.0.0.1:9000
user = nginx
group = nginx
. . .
Step 4. Download and Install Linux-dash.
git clone https://github.com/afaqurk/linux-dash.git
cp -r linux-dash/ /var/www/your-domain.com/public_html
chown -R nginx:nginx /var/www/your-domain.com/public_html
Step 5. Restart the Nginx web server as well as php-fpm.
service nginx restart
service php-fpm restart
Set in and PHP-fpm to auto-start upon boot:
chkconfig nginx on
chkconfig php-fpm on
Step 6. Access Linux Dash.
The Linux-dash web-based monitoring will be available on HTTP port 80 by default. Open your favorite browser and navigate to http://yourdomain.com or http://server-ip. If you are using a firewall, please open port 80 to enable access to the control panel.
Congratulations! You have successfully installed Linux Dash. Thanks for using this tutorial for installing Linux-dash web-based monitoring on CentOS 6 system. For additional help or useful information, we recommend you check the official Linux-dash website.
[su_box title=”VPS Manage Service Offer” style=”bubbles” box_color=”#000000″ radius=”10″]If you don’t have time to do all of this stuff, or if this is not your area of expertise, we offer a service to do “VPS Manage Service Offer”, starting from $10 (Paypal payment). Please contact us to get the best deal![/su_box]