How To Install AnyDesk on CentOS Stream 10

AnyDesk is a versatile remote desktop application that allows users to access and manage remote systems with minimal latency and robust security. It stands out for handling intensive tasks, ensuring a smooth experience even when collaborating in real-time. CentOS Stream 10 is a forward-looking distribution that offers a rolling-release approach, providing timely package updates and acting as the upstream for Red Hat Enterprise Linux. Combining the efficiency of AnyDesk with the stability of CentOS Stream 10 creates a powerful remote administration environment. This guide explains every step of installation, configuration, and usage scenarios. It also includes troubleshooting tips and best practices to keep remote connections secure.
Remote work has become increasingly common. Having a reliable solution for system management, customer support, or device troubleshooting is essential. AnyDesk’s lightweight design and advanced capabilities, such as file transfer, remote printing, and session recording, transform how professionals handle remote tasks. Moreover, the ability to customize permissions and security settings offers peace of mind. The steps below cover the essentials of setting up AnyDesk on CentOS Stream 10 using two popular methods (RPM and Flatpak). Following the details ensures a seamless experience, including post-installation configuration and advanced usage.
Prerequisites
Before installing AnyDesk on CentOS Stream 10, confirm that the system meets the following prerequisites:
- System Requirements: A CentOS Stream 10 machine with at least 1 GHz CPU, 1 GB of RAM, and a few hundred megabytes of available storage space.
- Root or Sudo Privileges: Administrative privileges are needed to install packages and modify system settings.
- Basic Terminal Knowledge: Familiarity with commands like
dnforyumsimplifies installing and configuring services. - Stable Internet Connection: Installations from online repositories and the ability to connect to remote systems require a consistent network connection.
- SELinux and Firewall Considerations: AnyDesk uses ports 80, 443, and 6568 for standard connections. Be prepared to adjust SELinux and firewall settings if needed.
Meeting these prerequisites ensures a trouble-free setup. Additionally, it is advisable to keep the CentOS Stream system updated. Running commands such as sudo dnf update routinely guarantees that the latest security patches and software improvements are in place.
Method 1: Installing AnyDesk via RPM Repository
1. System Update
It is best practice to refresh the package index and ensure that the system is up-to-date. Use the following commands to update the system:
sudo dnf update
sudo dnf upgrade
After the upgrade process completes, reboot if the system indicates a kernel update. A clean and updated operating system minimizes compatibility issues during the installation phase.
2. Repository Configuration
Next, add the AnyDesk repository to CentOS Stream 10. Creating a repository file and importing the GPG key ensures secure installation and trusted packages. Enter the following commands:
sudo tee /etc/yum.repos.d/AnyDesk.repo <<EOF
[AnyDesk]
name=AnyDesk CentOS - stable
baseurl=http://rpm.anydesk.com/centos/x86_64/
gpgcheck=1
repo_gpgcheck=1
gpgkey=https://keys.anydesk.com/repos/RPM-GPG-KEY
EOF
This step defines a repository named AnyDesk, pointing to AnyDesk’s official RPM mirror for CentOS systems. The gpgcheck and repo_gpgcheck parameters verify the authenticity of the packages. To confirm that the repository was added correctly, run:
sudo dnf repolist | grep AnyDesk
A matching repository entry ensures that the process was successful. Using an official repository grants direct access to new AnyDesk releases and security updates. Repositories often simplify future upgrades and keep software consistent with upstream providers. This approach is recommended for production environments where maintaining stability is crucial.
3. Installation Process
To proceed with the actual installation, use the following command:
sudo dnf install anydesk -y
The -y flag automatically confirms prompts, speeding up the installation. AnyDesk’s RPM package might prompt for additional libraries, such as GTK-based dependencies. Confirm the installation if asked to add extra packages, as ignoring these can cause startup errors. After finishing, verify the version by running:
anydesk --version
It should display the installed AnyDesk release. Installing from the official RPM repository ensures that the version remains updated and stable. This method is quick and straightforward, perfect for most users looking for the simplest option.
Method 2: Installing AnyDesk via Flatpak
Flatpak offers a sandboxed environment that keeps applications isolated from the base system, improving security and simplifying updates. This method is especially useful if there are concerns about system-wide dependencies. CentOS Stream 10 supports Flatpak. It may require extra configurations, especially if Flatpak is not installed by default.
1. Flatpak Setup
First, install Flatpak on CentOS Stream 10:
sudo dnf install flatpak -y
Once Flatpak is installed, add the Flathub repository, which hosts various Flatpak applications, including AnyDesk:
sudo flatpak remote-add --if-not-exists flathub https://flathub.org/repo/flathub.flatpakrepo
Adding Flathub is a critical step since it holds a library of popular software for Linux systems. After this, ensure the Flathub repository is enabled:
sudo flatpak remote-modify --enable flathub
Should any issues arise during the process, verify that your network is working properly. Occasionally, you might need to log out and back in for Flatpak changes to take effect.
2. Installation Steps
With Flathub enabled, the next step is to install AnyDesk using the Flatpak command:
sudo flatpak install flathub com.anydesk.Anydesk -y
This command triggers a download of the latest AnyDesk Flatpak package from Flathub. Depending on the network speed, the installation can take a few minutes. Flatpak handles all runtime dependencies, isolating the AnyDesk application to minimize conflicts with host system libraries. If asked to confirm runtime dependencies, proceed by selecting yes when prompted. Once installation completes, verify by running:
flatpak run com.anydesk.Anydesk --version
Flatpak ensures that AnyDesk remains in its sandbox environment, making it well-suited for systems with strict compliance requirements or multi-application servers where library collisions are a concern. Additionally, removing or updating Flatpak applications is simpler and less prone to dependency complexities.
Configuring AnyDesk
1. Initial Setup
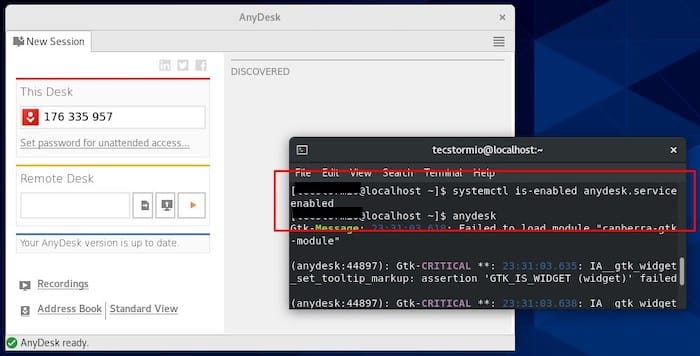
After installation, Always ensure that AnyDesk runs smoothly by enabling its service. For RPM-based installations, check the service status:
systemctl status anydesk.service
If it’s not active, start and enable it:
sudo systemctl start anydesk.service
sudo systemctl enable anydesk.service
On systems using the Flatpak version, AnyDesk may not run as a typical service. Instead, simply launch the AnyDesk GUI or CLI as needed. Although a systemd approach is less common with Flatpak-based apps, consult local documentation for advanced usage.
2. Autostart and Password Protection
Some deployment scenarios require AnyDesk to launch at boot. If the RPM version is installed and you want it available on system login screens, keep the service enabled above. For top-notch security, set a password for unattended access:
- Open AnyDesk.
- Navigate to Settings > Security.
- Enable “Allow unattended access” and create a strong password with at least 12 characters.
Unattended access allows remote connections without manual acceptance, but always handle it carefully to minimize unauthorized logins. The password-based approach is a must for server environments.
3. Customization and Permissions
Consider customizing global settings. Check the following parameters:
- Display: Adjust resolution or quality for slower networks.
- Clipboard: Allow or restrict clipboard synchronization for data security.
- Sessions: Configure idle-session timeouts or maximum connection durations.
Tweaks like these provide a personalized remote desktop experience. The ability to limit the data exchange or employ privacy mode are popular choices in corporate settings. Setting them up after the initial install helps maintain a safe environment from the start.
Using AnyDesk on CentOS Stream 10
1. Basic Operations
Once installed and configured, AnyDesk usage is straightforward. On GUI-based environments, launch it from the Applications menu or search for “AnyDesk” in the activity overview. The interface typically displays two areas:
- AnyDesk ID/Address: A unique ID for connecting from remote endpoints.
- Remote Desk Field: Where users enter the target device’s AnyDesk address to initiate a connection.
Type or paste the remote device’s ID into the Remote Desk field and press Enter. The remote computer must be running AnyDesk and be connected to the internet. Once the request is accepted or the unattended password is confirmed, a window displaying the remote system’s desktop appears. An ephemeral toolbar at the top of the screen typically offers session control and additional features.

2. Finding and Sharing Your AnyDesk ID
An AnyDesk ID is automatically assigned. Local contacts can also be added to the Address Book for quick reconnects. Share your ID with any partner that needs remote access. For security, only provide it to authorized individuals or teams.
3. Advanced Features
File Transfer
To send files between the local and remote system:
- Click the paper-clip icon or File Transfer tab in the session toolbar.
- Choose files from the local system and specify the remote directory.
- Launch the file transfer by confirming selection.
This approach eliminates the need for external file-sharing tools, increasing efficiency.
Remote Printing
AnyDesk supports printing documents from the remote host to a local printer. Activate Remote Printing under session settings. A prompt typically confirms that a virtual printer is added to the remote system. Completing a print job from that device sends the output and prints it locally.
Session Recording
To keep an audit trail or record tutorials, enable the Session Recording feature within the settings. The local machine captures all screen motions and inputs. This data can be valuable for compliance or training. Manage these recordings securely to avoid data leakage.
Privacy Mode
Selecting Privacy Mode blackens the remote screen, preventing onlookers at the remote location from viewing sensitive actions. This mode is beneficial for private tasks. However, be sure it’s enabled only when permissible.
Troubleshooting Common Issues
1. Dependency Errors
Sometimes, older CentOS Stream 10 installations lack required libraries (like libpangox or libgtkglext-x11-1_0-0). If installation fails due to dependency issues, install missing packages:
sudo dnf install redhat-lsb-core
Or:
sudo dnf install pangox-compat.x86_64
This can correct library conflicts [12][18]. Always confirm that the environment is consistent with 64-bit libraries if running a 64-bit system. Additional commands may be required if specialized software is installed.
2. Connection Problems
Anydesk connections rely on stable networking. If “Waiting for image” or “Not connected to server” errors appear, verify that:
- The internet connection is active and stable, using a wired connection if possible.
- Firewall configurations permit ports 80, 443, and 6568, or any custom port assigned to AnyDesk.
- Anydesk is added to allowable apps in SELinux or within security solutions if present.
If the problem persists, consider disabling direct connections by heading to Settings > Connection > General and unchecking direct connections. This forces routing through AnyDesk’s servers, sometimes resolving local network restrictions.
3. Performance Optimization
When dealing with low bandwidth, adjust settings in the Display menu. Lowering image quality or disabling background images can improve performance. Additionally, hide wallpaper at the remote host. This is especially useful during large data transfers or resource-intensive tasks like video editing.
4. Security Warnings
AnyDesk might trigger antivirus or firewall alerts. These are typically due to real-time scanning engines and are remedied by adding anydesk to exception lists. If a system is highly locked down, consult the relevant documentation on whitelisting *.net.anydesk.com within a corporate network environment.
Congratulations! You have successfully installed AnyDesk. Thanks for using this tutorial for installing the AnyDesk on your CentOS Stream 10 system. For additional help or useful information, we recommend you check the official AnyDesk website.