How To Install Apache Hadoop on Ubuntu 22.04 LTS

In this tutorial, we will show you how to install Apache Hadoop on Ubuntu 22.04 LTS. For those of you who didn’t know, Apache Hadoop is an open-source, Java-based software platform that can be used to manage and process large datasets for applications that require fast and scalable data processing. It is based on Java and uses HDFS (Hadoop Distributed File System) to store its data. Hadoop is designed to be deployed across a network of hundreds or more than 1000 dedicated servers. They all together to deal with and process the large quantity and variety of datasets.
This article assumes you have at least basic knowledge of Linux, know how to use the shell, and most importantly, you host your site on your own VPS. The installation is quite simple and assumes you are running in the root account, if not you may need to add ‘sudo‘ to the commands to get root privileges. I will show you the step-by-step installation of Apache Hadoop on Ubuntu 22.04 (Jammy Jellyfish). You can follow the same instructions for Ubuntu 22.04 and any other Debian-based distribution like Linux Mint, Elementary OS, Pop!_OS, and more as well.
Prerequisites
- A server running one of the following operating systems: Ubuntu 22.04, 20.04, and any other Debian-based distribution like Linux Mint.
- It’s recommended that you use a fresh OS install to prevent any potential issues.
- SSH access to the server (or just open Terminal if you’re on a desktop).
- A
non-root sudo useror access to theroot user. We recommend acting as anon-root sudo user, however, as you can harm your system if you’re not careful when acting as the root.
Install Apache Hadoop on Ubuntu 22.04 LTS Jammy Jellyfish
Step 1. First, make sure that all your system packages are up-to-date by running the following apt commands in the terminal.
sudo apt update
sudo apt upgrade
sudo apt install wget apt-transport-https gnupg2 software-properties-common
Step 2. Installing Java OpenJDK.
Apache Hadoop is based on Java, so you will need to install the Java JDK on your server. Let’s run the command below to install default JDK version 11:
sudo apt install default-jdk
Verify the Java version using the following command:
java --version
For additional resources on installing and managing Java OpenJDK, read the post below:
Step 3. Create a User for Hadoop.
Run the following command to create a new user with the name Hadoop:
sudo adduser hadoop
Next, switch to the newly created account by running the commands below:
su - hadoop
Now configure password-less SSH access for the newly created Hadoop user. Generate an SSH keypair first:
ssh-keygen -t rsa
cat ~/.ssh/id_rsa.pub >> ~/.ssh/authorized_keys
chmod 640 ~/.ssh/authorized_keys
After that, verify the passwordless SSH with the following command:
ssh localhost
If you log in without a password, you can proceed to the next step.
Step 4. Installing Apache Hadoop on Ubuntu 22.04.
By default, Apache Hadoop is available on Ubuntu 22.04 base repository. Now run the following command below to download the latest version of Hadoop to your Ubuntu system:
wget https://dlcdn.apache.org/hadoop/common/hadoop-3.3.4/hadoop-3.3.4.tar.gz
Next, extract the downloaded file:
tar xzf hadoop-3.3.4.tar.gz
mv hadoop-3.3.4 ~/hadoop
Now configure Hadoop and Java Environment Variables on your system. Open the ~/.bashrc file in your favorite text editor:
nano ~/.bashrc
Add the following content at the bottom of the file:
export JAVA_HOME=/usr/lib/jvm/java-11-openjdk-amd64
export HADOOP_HOME=/home/hadoop/hadoop
export HADOOP_INSTALL=$HADOOP_HOME
export HADOOP_MAPRED_HOME=$HADOOP_HOME
export HADOOP_COMMON_HOME=$HADOOP_HOME
export HADOOP_HDFS_HOME=$HADOOP_HOME
export HADOOP_YARN_HOME=$HADOOP_HOME
export HADOOP_COMMON_LIB_NATIVE_DIR=$HADOOP_HOME/lib/native
export PATH=$PATH:$HADOOP_HOME/sbin:$HADOOP_HOME/bin
export HADOOP_OPTS="-Djava.library.path=$HADOOP_HOME/lib/native"
Save and close the file, then load the new config:
source ~/.bashrc
You also need to configure JAVA_HOME in hadoop-env.sh file. Edit the Hadoop environment variable file in a text editor:
nano $HADOOP_HOME/etc/hadoop/hadoop-env.sh
Add the following lines:
###
# Generic settings for HADOOP
Many sites configure these options outside of Hadoop,
# such as in /etc/profile.d
# The java implementation to use. By default, this environment
# variable is REQUIRED on ALL platforms except OS X!

export JAVA_HOME=/usr/lib/jvm/java-11-openjdk-amd64
Step 5. Configure Apache Hadoop.
We’re ready to configure Hadoop to begin accepting connections. First, create two folders (namenode and datanode) inside the hdfs directory:
mkdir -p ~/hadoopdata/hdfs/{namenode,datanode}
Next, edit the core-site.xml file below:
nano $HADOOP_HOME/etc/hadoop/core-site.xml
Change the following name as per your system hostname:
See the License for the specific language governing permissions and
limitations under the License. See accompanying LICENSE file.
-->
<!-- Put site-specific property overrides in this file. -->

<configuration>
    <property>
        <name>fs.defaultFS</name>
        <value>hdfs://localhost:9000</value>
    </property>
</configuration>
Next, edit the hdfs-site.xml file:
nano $HADOOP_HOME/etc/hadoop/hdfs-site.xml
Change the NameNode and DataNode directory paths as shown below:
See the License for the specific language governing permissions and
limitations under the License. See accompanying LICENSE file.
-->
<!-- Put site-specific property overrides in this file. -->

<configuration>
    <property>
        <name>dfs.replication</name>
        <value>1</value>
    </property>
        <name>dfs.name.dir</name>
        <value>file:///home/hadoop/hadoopdata/hdfs/namenode</value>
        <name>dfs.data.dir</name>
        <value>file:///home/hadoop/hadoopdata/hdfs/datanode</value>
</configuration>
Next, edit the mapred-site.xml file:
nano $HADOOP_HOME/etc/hadoop/mapred-site.xml
Make the following changes:
See the License for the specific language governing permissions and
limitations under the License. See accompanying LICENSE file.
-->
<!-- Put site-specific property overrides in this file. -->

<configuration>
    <property>
        <name>mapreduce.framework.name</name>
        <value>yarn</value>
    </property>
</configuration>
Next, edit the yarn-site.xml file:
nano $HADOOP_HOME/etc/hadoop/yarn-site.xml
Create configuration properties for yarn:
See the License for the specific language governing permissions and
limitations under the License. See accompanying LICENSE file.
-->
<configuration>
    <property>
        <name>yarn.nodemanager.aux-services</name>
        <value>mapreduce_shuffle</value>
    </property>
</configuration>
We have to start the Hadoop cluster to operate Hadoop. For this, we will format our “namenode” first:
hdfs namenode -format
Next, run the commands below to start Hadoop:
start-all.sh
Output:
Starting namenodes on [localhost]
Starting datanodes
Starting secondary namenodes [Ubuntu2204]
Ubuntu2204: Warning: Permanently added 'ubuntu2204' (ED10019) to the list of known hosts.
Starting resourcemanager
Starting nodemanagers
Step 7. Configure Firewall.
Now we set up an Uncomplicated Firewall (UFW) with Apache to allow public access on default web ports for 8088 and 9870:
sudo firewall-cmd --permanent --add-port=8088/tcp
sudo firewall-cmd --permanent --add-port=9870/tcp
sudo firewall-cmd --reload
Step 8. Accessing Apache Hadoop Web Interface.
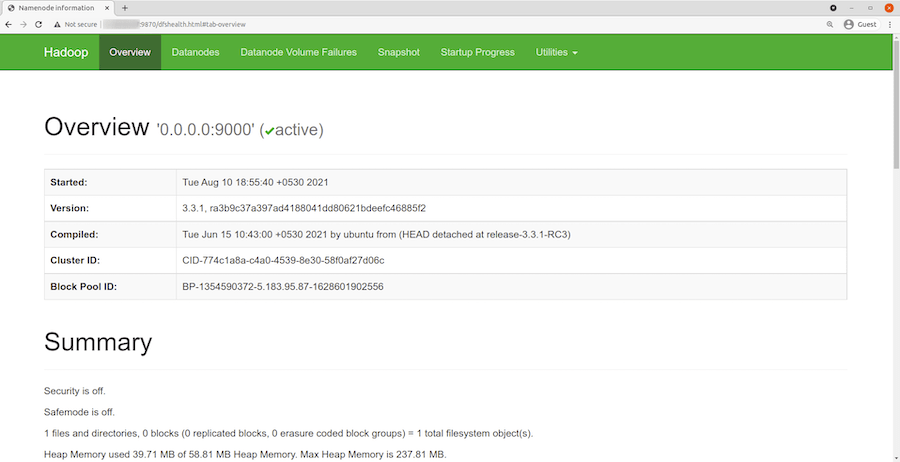
Once successfully installed, open your web browser and access the Apache Hadoop installation wizard using the URL http://your-IP-address:9870. You will be redirected to the following page:

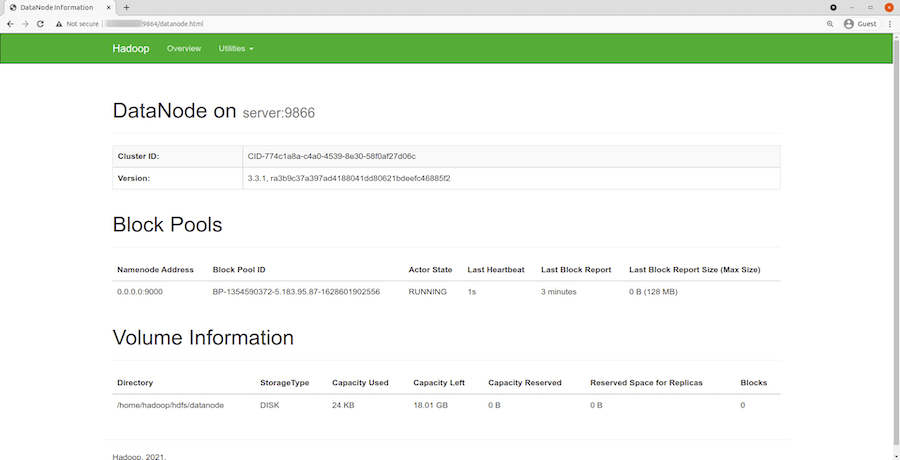
You can also access the individual DataNodes using the URL http://your-IP-address:8088. You should see the following screen:

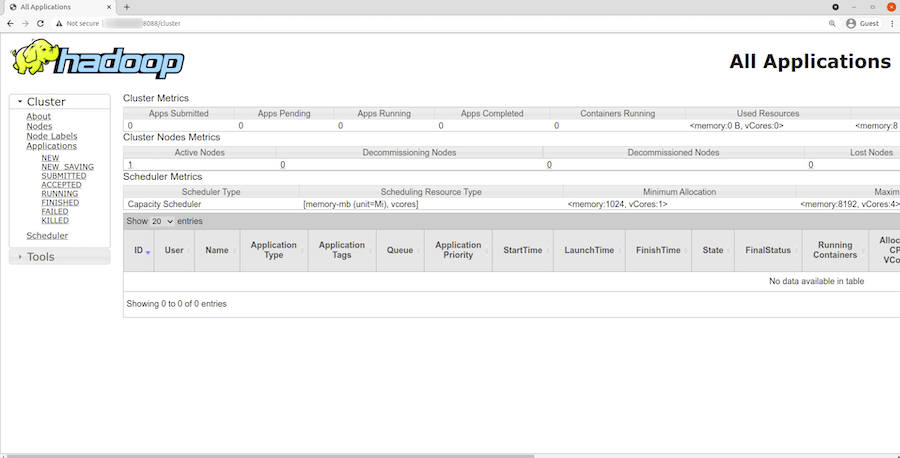
To access the YARN Resource Manager, use the URL http://your-IP-address:8088. You should see the following screen:

Congratulations! You have successfully installed Apache Hadoop. Thanks for using this tutorial for installing Apache Hadoop on Ubuntu 22.04 LTS Jammy Jellyfish system. For additional help or useful information, we recommend you check the official Apache Hadoop website.