How To Install balenaEtcher on Linux Mint 22

Creating bootable USB drives is a common task for Linux users, and having a reliable tool like BalenaEtcher can make the process much easier. BalenaEtcher is a popular, user-friendly utility that simplifies the creation of bootable USB drives for various operating systems, including Linux distributions. In this article, we will guide you through the process of installing BalenaEtcher on Linux Mint 22, providing step-by-step instructions and troubleshooting tips to ensure a smooth experience.
Understanding BalenaEtcher
BalenaEtcher is an open-source utility that allows users to create bootable USB drives from image files. It offers a simple, intuitive interface that makes the process of flashing an image to a USB drive straightforward, even for beginners. BalenaEtcher supports a wide range of image formats, including ISO, IMG, and ZIP, making it a versatile tool for creating bootable media for various operating systems.
Prerequisites
Before installing BalenaEtcher on your Linux Mint 22 system, ensure that your computer meets the following requirements:
- A 64-bit processor
- At least 2 GB of RAM
- Sufficient free disk space (around 200 MB)
- An active internet connection for downloading the necessary files
It is also recommended to update your Linux Mint 22 system to the latest version before proceeding with the installation. You can do this by opening the Terminal and running the following commands:
sudo apt update
sudo apt upgrade
Method 1: Installing BalenaEtcher using AppImage
One of the easiest ways to install BalenaEtcher on Linux Mint 22 is by using an AppImage file. AppImage is a format that allows applications to be distributed as a single file, making installation and removal simple. Follow these steps to install BalenaEtcher using an AppImage:
Step 1: Downloading the AppImage
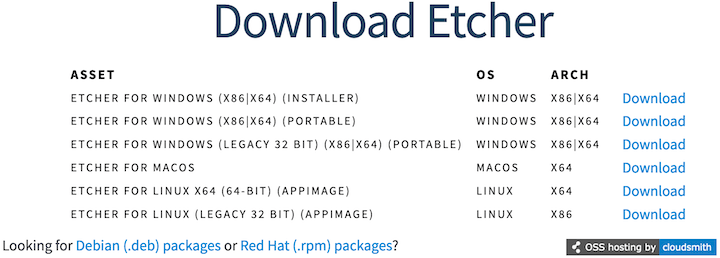
- Visit the official BalenaEtcher website.
- Click on the “Download for Linux” button to download the AppImage file.
- Save the file to a location of your choice, such as your Downloads folder.

Step 2: Making the AppImage Executable
- Open the Terminal and navigate to the directory where you saved the AppImage file using the
cdcommand. For example, if you saved it in your Downloads folder, type:
cd ~/Downloads
- Make the AppImage file executable by running the following command:
chmod +x balena-etcher-electron-*-x86_64.AppImage
Replace balena-etcher-electron-*-x86_64.AppImage with the actual filename of the downloaded AppImage.
Step 3: Running the AppImage
- To launch BalenaEtcher, simply double-click on the AppImage file in your file manager, or run the following command in the Terminal:
./balena-etcher-electron-*-x86_64.AppImage
BalenaEtcher should now open, and you can start using it to create bootable USB drives.
Method 2: Installing BalenaEtcher using Debian Binary (.deb)
Another way to install BalenaEtcher on Linux Mint 22 is by using a Debian binary package (.deb). This method involves downloading the .deb file and installing it using the Terminal. Follow these steps to install BalenaEtcher using a .deb file:
Step 1: Downloading the Debian Package
- Visit the BalenaEtcher releases page on GitHub.
- Scroll down to the latest release and look for the .deb file under the “Assets” section.
- Click on the .deb file to download it to your computer.
Step 2: Installing via Terminal
- Open the Terminal and navigate to the directory where you downloaded the .deb file using the
cdcommand. For example, if you saved it in your Downloads folder, type:
cd ~/Downloads
- Install the .deb package by running the following command:
sudo dpkg -i balena-etcher-electron_*_amd64.deb
Replace balena-etcher-electron_*_amd64.deb with the actual filename of the downloaded .deb file.
- If there are any missing dependencies, you can resolve them by running:
sudo apt-get install -f
Step 3: Launching BalenaEtcher
After the installation is complete, you can launch BalenaEtcher from your application menu or by typing the following command in the Terminal:
balena-etcher-electron
Troubleshooting Common Issues
If you encounter any issues during the installation process or while using BalenaEtcher, try the following troubleshooting tips:
- Ensure that you have downloaded the correct version of BalenaEtcher for your system architecture (64-bit).
- Double-check that you have followed the installation steps correctly, especially when making the AppImage executable or installing the .deb package.
- If you receive an error message about missing dependencies, run
sudo apt-get install -fto automatically install the required packages. - If BalenaEtcher fails to launch or crashes, try running it from the Terminal to see if any error messages are displayed. This can help identify the cause of the issue.
If you continue to face problems, consult the official BalenaEtcher documentation or seek support from the BalenaEtcher community forums.
Using BalenaEtcher to Create a Bootable USB Drive
Once you have successfully installed BalenaEtcher on your Linux Mint 22 system, creating a bootable USB drive is a straightforward process. Follow these steps:
- Insert a USB drive into your computer.
- Launch BalenaEtcher.
- Click on the “Flash from file” button and select the image file you want to write to the USB drive (e.g., an ISO file of a Linux distribution).
- Click on the “Select target” button and choose the USB drive you want to use.
- Verify that the selected image file and target device are correct, then click on the “Flash!” button to start the flashing process.
- Wait for BalenaEtcher to finish writing the image to the USB drive. This may take several minutes, depending on the size of the image and the speed of your USB drive.
- Once the flashing process is complete, safely eject the USB drive from your computer.
Your bootable USB drive is now ready to use. You can insert it into another computer and boot from the USB drive to install the operating system or run a live environment.
Alternatives and Additional Tools
While BalenaEtcher is a popular choice for creating bootable USB drives on Linux Mint 22, there are other alternatives available, such as:
- Ventoy: A tool that allows you to create a bootable USB drive with multiple ISO files, making it easy to boot different operating systems from a single USB drive.
- USB Image Writer: A simple utility that comes pre-installed on Linux Mint for writing image files to USB drives.
- dd command: A powerful command-line tool that can be used to write image files to USB drives, but requires careful usage to avoid data loss.
Each of these tools has its own strengths and weaknesses, so choose the one that best suits your needs and preferences.
Congratulations! You have successfully installed balenaEtcher. Thanks for using this tutorial for installing the balenaEtcher on the Linux Mint 22 system. For additional help or useful information, we recommend you check the balenaEtcher website.