How To Install BleachBit on AlmaLinux 9

Maintaining a clean and efficient system is essential for optimal performance and privacy. One of the most effective tools for this purpose is BleachBit, a powerful open-source application that helps users free up disk space and protect their privacy by cleaning unnecessary files. This comprehensive guide will walk you through the process of installing BleachBit on AlmaLinux 9, covering various installation methods, usage tips, and troubleshooting advice.
Understanding BleachBit
What is BleachBit?
BleachBit is a free and open-source disk cleaning software that allows users to delete unnecessary files, clear cache, and protect their privacy by removing traces of their online activities. It supports various applications, making it a versatile tool for Linux users. Key features include:
- Disk Space Cleaning: Frees up space by removing temporary files, logs, and cache.
- Privacy Protection: Deletes cookies, browsing history, and other sensitive data.
- Customizable Cleaning Options: Users can select specific items to clean based on their needs.
- Shredding Files: Securely deletes files to prevent recovery.
Why Use BleachBit on AlmaLinux?
AlmaLinux is designed to be a stable and reliable operating system that is binary-compatible with Red Hat Enterprise Linux (RHEL). Using BleachBit on AlmaLinux provides several advantages:
- Community Support: A robust community offers assistance and documentation.
- Security: Frequent updates ensure that your system remains secure while cleaning.
- Performance Optimization: Regular cleaning helps maintain optimal performance.
Prerequisites for Installation
System Requirements
Before installing BleachBit, ensure your system meets the following requirements:
- Operating System: AlmaLinux 9 or compatible distributions.
- RAM: Minimum of 1 GB (2 GB recommended).
- Disk Space: At least 100 MB of free space for installation.
User Privileges
You will need sufficient privileges to install software on your system. Ensure you have access to a user account with sudoprivileges. This allows you to execute commands that require administrative access.
Preparing AlmaLinux for Installation
Updating the System
Keeping your system updated is crucial for a smooth installation process. Open the terminal and execute the following commands:
sudo dnf update -y && sudo dnf upgrade -yThis command updates the package list and upgrades any outdated packages, ensuring your system is stable before installing BleachBit.
Enabling EPEL Repository
The Extra Packages for Enterprise Linux (EPEL) repository contains additional packages that are not included in the standard repositories. To enable EPEL on AlmaLinux 9, run the following command:
sudo dnf install epel-release -yThis command installs the EPEL repository, allowing you to access a wider range of software packages, including BleachBit.
Installing BleachBit via DNF
The DNF Package Manager
The easiest way to install BleachBit on AlmaLinux 9 is through the DNF package manager. This method retrieves the software from the official repositories.
Installation Steps
To install BleachBit using DNF, run the following command in your terminal:
sudo dnf install bleachbit -yThe -y flag automatically confirms the installation, streamlining the process. DNF will handle all dependencies required for BleachBit.
Verifying Installation
You can verify that BleachBit has been installed correctly by running:
bleachbit --versionThis command should display the installed version of BleachBit if the installation was successful. If you encounter any issues, check the output for error messages that may indicate what went wrong.
Alternative Installation Methods
Installing from Source
If you prefer to have the latest features or if BleachBit is not available in your repositories, you can install it from source. Follow these steps:
-
- Install Required Dependencies:
sudo dnf install git python3 python3-pip -y-
- Clone the BleachBit Repository:
git clone https://github.com/bleachbit/bleachbit.git-
- Navigating to Cloned Directory:
cd bleachbit-
- Run BleachBit from Source Code:
python3 bleachbit.pyUsing Snap Package Manager
The Snap package manager allows you to install applications in a sandboxed environment. This method can provide access to newer versions of applications than those available in standard repositories. To use Snap for installing BleachBit, follow these steps:
-
- If Snap is not installed, install it first:
sudo dnf install snapd -y-
- Add Snap’s core service:
sudon snap install core-
- You can now install BleachBit via Snap by running:
sudon snap install bleachbit -yLaunching and Using BleachBit
Starting BleachBit
You can launch BleachBit from the terminal by running the following command:
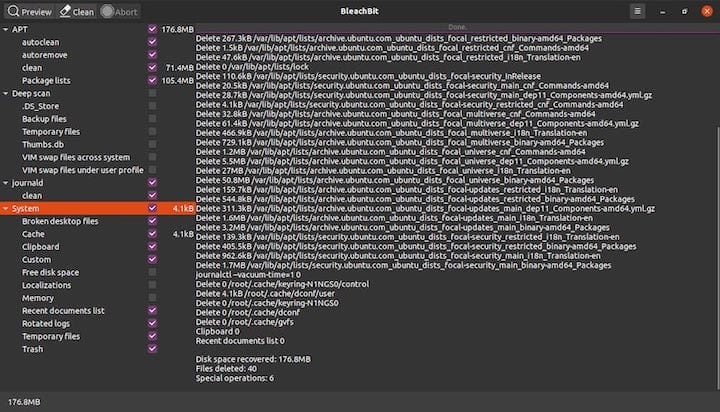
bleachbitYou can also find it in your application menu under “System Tools” or “Utilities.” Upon launching, you will see a user-friendly interface that allows you to choose what files and applications you want to clean up.

User Interface Overview
The main interface consists of several sections where you can select different cleaning options. You will see categories such as “System,” “Applications,” and “Internet.” Each category contains specific items that can be cleaned. You can check or uncheck items based on your preferences before proceeding with cleaning.
Best Practices for Using BleachBit
A Regular Maintenance Schedule
A regular maintenance schedule helps keep your system clean and efficient. It is recommended to run BleachBit at least once a month or whenever you notice performance issues or excessive disk usage. Consistent cleaning helps prevent clutter from accumulating over time.
Selecting Cleaning Options Wisely
BleachBit offers various options for cleaning different types of files. Before running a cleaning session, carefully review each option. Some options may require root permissions to clean system files effectively. If running as a normal user, uncheck options that require elevated permissions unless you are certain about what they do.
Troubleshooting Common Issues
Pitfalls During Installation
If you encounter issues during installation, consider these common troubleshooting steps:
-
- If you receive dependency errors during installation, ensure all required repositories are enabled and updated by running:
sudon dnf update -y - If an installation fails due to missing packages or libraries, use:
sudon dnf deplist bleachbitto identify missing dependencies and install them individually.
- If using Snap or Flatpak results in errors, ensure that both package managers are properly configured and updated:
sudon snap refreshand
sudon flatpak update - If permissions denied errors occur while running BleachBit:
Run it with root permissions using:sudon bleachbit - If problems persist after trying these solutions, consult community forums or documentation related to AlmaLinux or BleachBit for further assistance.
- If necessary, consider reinstalling BleachBit using different methods (DNF vs Snap) to see if one works better than another.
- If none of these solutions work, consider checking official support channels or community forums for similar issues reported by other users.
- If you receive dependency errors during installation, ensure all required repositories are enabled and updated by running:
Congratulations! You have successfully installed BleachBit. Thanks for using this tutorial for installing the BleachBit open-source system cleaner and privacy tool on AlmaLinux 9 system. For additional or useful information, we recommend you check the official BleachBit website.