How To Install Bottles on openSUSE

In today’s Linux ecosystem, running Windows applications seamlessly remains a challenge for many users. Bottles offers an elegant solution by creating managed Windows environments on Linux systems with remarkable ease. This guide provides detailed instructions for installing and configuring Bottles on openSUSE, empowering you to run Windows software without dual-booting or using resource-intensive virtual machines.
Understanding Bottles and Its Benefits
Bottles is a powerful application designed specifically for Linux users who need to run Windows software. Unlike traditional Wine usage, which can be technically challenging, Bottles provides a user-friendly graphical interface that simplifies the entire process.
What Makes Bottles Special?
Bottles creates contained environments called “bottles” where Windows applications can run isolated from your Linux system. These environments use compatibility layers (runners) that translate Windows API calls into something Linux can understand. The application handles the complex configurations automatically, making it significantly easier than manual Wine setups.
For openSUSE users specifically, Bottles offers several advantages:
- Pre-configured environments optimized for different application types
- Easy installer integration
- Simplified dependency management
- Clean interface for managing multiple Windows applications
- Desktop shortcuts for Windows applications
Prerequisites for Installation
Before installing Bottles on your openSUSE system, ensure your setup meets these requirements:
- A 64-bit openSUSE system (Leap or Tumbleweed)
- At least 4 GB of RAM (8 GB recommended for resource-intensive applications)
- Administrative (root) access or sudo privileges
- Active internet connection
- At least 1 GB of free disk space for Bottles (plus additional space for Windows applications)
Preparing Your System
To ensure a smooth installation process, first update your openSUSE system packages:
sudo zypper refresh
sudo zypper update
These commands refresh your repository cache and update all installed packages to their latest versions. This process may take several minutes depending on your internet connection and how many updates are available.
Installing Bottles via Flatpak
Why Choose Flatpak Installation
The Flatpak package is the most supported and tested release of Bottles. It comes fully sandboxed with all necessary dependencies and tools bundled together, making it the recommended installation method for most users.
Verifying Flatpak Installation
First, check if Flatpak is already installed on your system:
flatpak --version
If Flatpak isn’t installed (you’ll see a “command not found” error), install it with:
sudo zypper install flatpak
OpenSUSE Tumbleweed typically comes with Flatpak pre-installed, so this step might be unnecessary for Tumbleweed users.
Adding the Flathub Repository
To install Bottles, you need to add the Flathub repository:
flatpak remote-add --if-not-exists flathub https://flathub.org/repo/flathub.flatpakrepo
This command adds the Flathub repository to your system if it doesn’t already exist.
Installing Bottles
With the repository added, install Bottles using:
flatpak install flathub com.usebottles.bottles
This will download and install Bottles along with its dependencies. The installation may take several minutes, especially if this is your first Flatpak installation, as it needs to download the GNOME runtime and other dependencies.
Running Bottles After Installation
Once installed, you can launch Bottles using:
flatpak run com.usebottles.bottles
Alternatively, you can find Bottles in your application menu after installation.
Installing Bottles via Snap
While Flatpak is the recommended method, Snap provides an alternative installation approach that some users might prefer.
Setting Up Snap on openSUSE
To use Snap on openSUSE:
1. First, add the Snappy repository. For openSUSE Leap 15.5, use:
sudo zypper addrepo --refresh https://download.opensuse.org/repositories/system:/snappy/openSUSE_Leap_15.5 snappy
For Tumbleweed, replace “openSUSE_Leap_15.5” with “openSUSE_Tumbleweed”.
2. Import the repository’s GPG key:
sudo zypper --gpg-auto-import-keys refresh
3. Update the package cache:
sudo zypper dup --from snappy
4. Install Snap:
sudo zypper install snapd
5. Enable and start the Snap services:
sudo systemctl enable --now snapd
sudo systemctl enable --now snapd.apparmor
You may need to log out and back in or reboot to have /snap/bin added to your PATH.
Installing Bottles via Snap
Once Snap is set up, install Bottles with:
sudo snap install --classic bottles
The --classic flag provides Bottles with the necessary system access to function properly.
Running Bottles Installed via Snap
Launch Bottles using:
sudo snap run bottles
You can also find Bottles in your application menu after installation.
First-Time Setup and Configuration
Initial Launch
The first time you launch Bottles, it will need to download additional components such as Wine versions (runners), DXVK (for DirectX support), and various libraries. This is normal and may take some time depending on your internet connection. Be patient during this process.
After the initial setup, you’ll be presented with the main Bottles interface where you can create and manage your Windows environments.
Understanding the Interface
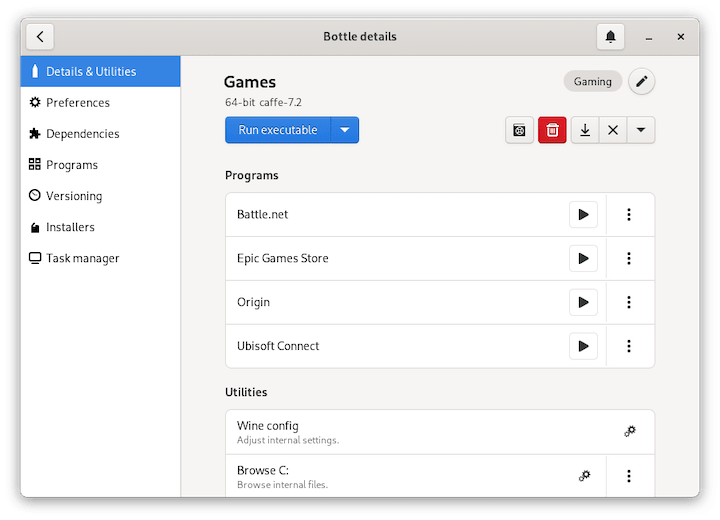
Bottles presents a clean, user-friendly interface with several key sections:
- Dashboard: Shows your created bottles (Windows environments)
- Create new bottle: Option to create a new Windows prefix
- Settings: Global configuration options for Bottles
Take some time to explore the interface and become familiar with its layout before proceeding.
Initial Configuration
Before creating your first bottle, you may want to configure some global settings:
- Default installation directory
- Preferred runner version
- Graphics driver preferences
- System integration options
- Environmental variables
These settings will apply to all bottles you create unless overridden in individual bottle configurations.

Creating Your First Bottle
Types of Bottles
Bottles offers several environment templates:
- Gaming: Optimized for Windows games with DXVK for DirectX support
- Application: Best for productivity software and general Windows applications
- Custom: For advanced users who want complete control over configurations
Each template comes with pre-configured settings optimized for different use cases.
Step-by-Step Creation Process
- Click “Create new bottle” from the main interface
- Select an environment type (Gaming, Application, or Custom)
- Name your bottle (e.g., “Office” for productivity applications)
- Choose your preferred runner version (the compatibility layer)
- For advanced users, expand the “Advanced” section to configure:
- Wine architecture (32-bit or 64-bit)
- Display settings
- Audio settings
- Network configuration
- Click “Create” to finalize
Bottles will create the environment, which includes setting up a virtual C: drive, configuring Windows settings, and preparing the environment for your applications.
Recommended Settings for Beginners
For new users, the “Application” environment with default settings is recommended for most Windows software. The “Gaming” environment is optimized for DirectX applications and games with appropriate performance tweaks already configured.
Installing Windows Applications
Methods for Installing Applications
Bottles offers several ways to install Windows applications:
- Run Executable: Browse to your .exe or .msi installer and run it directly
- Bottles installer: Search and install from Bottles’ application database
- Import from archive: Install applications from compressed archives
- Manual installation: For complex applications requiring special setup
Step-by-Step Installation Guide
To install a Windows application:
- Download the Windows application installer (.exe or .msi file) from its official website
- In Bottles, select the bottle where you want to install the application
- Click the “Run Executable” or “Install” button
- Browse to and select the installer file you downloaded
- Follow the Windows installation wizard as you would on a regular Windows system
- Your application will appear in the “Programs” list once installed
For applications with specific requirements:
- If an application requires additional Windows components (e.g., .NET Framework, Visual C++ Redistributables), you can install these through the “Dependencies” tab in your bottle’s settings
- Some applications may require specific DLL overrides, which can be configured in the “DLL Overrides” section
Managing Installed Applications
After installation, you can:
- Create desktop shortcuts for quick access
- Configure application-specific settings
- Add launch parameters for specialized needs
- Uninstall applications when no longer needed
- Backup your bottles for safekeeping
Troubleshooting Common Issues
Installation Problems
- Error: “Flatpak not found”: Install Flatpak using
sudo zypper install flatpak - Error: “Failed to add Flathub repository”: Check your internet connection and ensure that your system can access https://flathub.org
- Error: “Snap not found”: Ensure you’ve properly installed Snap as outlined earlier
- Repository connectivity issues: Check your internet connection and firewall settings
Application Compatibility Issues
If a Windows application doesn’t run properly:
- Try a different runner version in bottle settings
- Install additional dependencies through the Dependencies tab
- Enable or disable DXVK to see if it affects compatibility
- Check if the application requires specific Windows components
- For games, ensure the Gaming bottle template is used
- Check the Bottles community forums for application-specific fixes
Performance Optimization
For sluggish application performance:
- Enable Esync/Fsync if supported by your kernel
- Adjust memory allocation in bottle settings
- Use a more recent runner version
- Disable unnecessary visual effects
- Close resource-intensive background applications
- Use the appropriate bottle type for your application
Debugging Techniques
For persistent issues:
- Enable logging in bottle settings
- Check logs for specific error messages
- Run the application from terminal for detailed error output
- Try running in a fresh bottle with different settings
- Search for specific error messages in the Bottles community forums
Keeping Bottles Updated
Updating via Flatpak
To update Bottles installed through Flatpak:
flatpak update
This will update all Flatpak applications, including Bottles.
Updating via Snap
For Snap installations:
sudo snap refresh bottles
Updating Runners and Components
Bottles will usually notify you when runner updates are available. To update:
- Open Bottles
- Go to Settings
- Check the Runners section for updates
- Apply updates as needed
Keeping your runners updated can improve compatibility with newer Windows applications.
Advantages of Using Bottles on openSUSE
Using Bottles on openSUSE offers several benefits compared to traditional methods:
- Simplified management: Bottles provides a user-friendly interface for managing Windows applications
- Isolated environments: Each bottle is independent, preventing conflicts between applications
- Pre-configured templates: Optimized environments for different application types
- Integration with desktop: Create shortcuts to launch Windows applications directly
- Community support: Access to a growing community of users sharing configurations
These advantages make Bottles a compelling choice for openSUSE users who need to run Windows applications.
Congratulations! You have successfully installed Bottles. Thanks for using this tutorial for installing Bottles on your openSUSE Linux system. For additional or useful information, we recommend you check the official Bottles website.