How To Install CPU-X on Manjaro

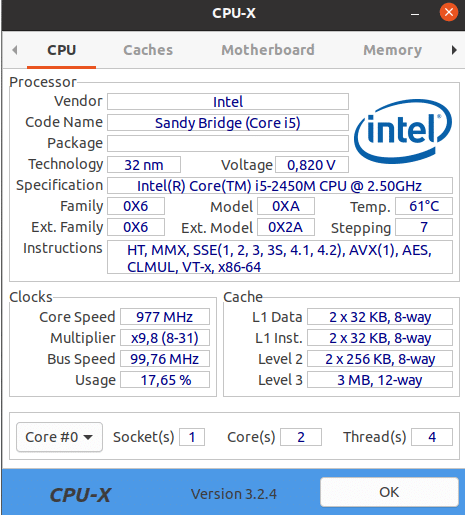
In this tutorial, we will show you how to install CPU-X on Manjaro. CPU-X is an open-source system profiling and monitoring tool designed for Linux users. It offers a user-friendly interface that displays crucial information about your computer’s hardware components. With CPU-X, you can access detailed specifications of your CPU, including its architecture, clock speed, cache levels, and more. The tool also provides insights into your motherboard’s chipset, BIOS version, and other vital details.
In addition to CPU and motherboard information, CPU-X offers monitoring capabilities for your system’s memory and GPU. It displays the total amount of RAM installed, memory type, speed, and timings. For GPU monitoring, CPU-X shows the graphics card model, vendor, clock speeds, and driver version.
This article assumes you have at least basic knowledge of Linux, know how to use the shell, and most importantly, you host your site on your own VPS. The installation is quite simple and assumes you are running in the root account, if not you may need to add ‘sudo‘ to the commands to get root privileges. I will show you the step-by-step installation of the CPU-X on a Manjaro Linux.
Prerequisites
- A server or desktop running one of the following operating systems: Manjaro, and other Arch-based distributions.
- It’s recommended that you use a fresh OS install to prevent any potential issues.
- SSH access to the server (or just open Terminal if you’re on a desktop).
- A stable internet connection is crucial for downloading and installing packages. Verify your connection before proceeding.
- Access to a Manjaro Linux system with a non-root sudo user or root user.
Install CPU-X on Manjaro
Step 1. Before installing any new software on your Manjaro Linux system, it’s crucial to ensure that your package repositories and system packages are up-to-date. This step not only ensures compatibility with the latest software versions but also addresses potential security vulnerabilities and bug fixes:
sudo pacman -Syu
Step 2. Installing CPU-X on Manjaro.
Manjaro Linux utilizes the Arch User Repository (AUR), a community-driven repository that contains a wide range of packages not found in the official Manjaro repositories. CPU-X is available in the AUR, making the installation process straightforward.
To install CPU-X from the AUR, we’ll be using Pamac, the graphical package manager for Manjaro. Pamac provides a user-friendly interface for searching, installing, and managing packages from both the official repositories and the AUR.
Here’s a step-by-step guide to installing CPU-X using Pamac:
-
- Open Pamac by clicking on the Manjaro icon in your taskbar and selecting “Add/Remove Software.”
- In the Pamac window, click on the search icon and type “CPU-X” into the search bar.
- From the search results, locate the “CPU-X” package and click on it to view more details.
- Click on the “Install” button to begin the installation process.
- Pamac will display a list of dependencies that need to be installed along with CPU-X. Review the list and click “Apply” to proceed.
- Enter your password when prompted to authorize the installation.
- Pamac will now download and install CPU-X and its dependencies. This process may take a few minutes, depending on your internet connection speed and the number of dependencies required.
- Once the installation is complete, you will see a success message in Pamac.
If you encounter any issues during the installation process, such as missing dependencies or conflicts, Pamac will provide error messages with instructions on how to resolve them. In most cases, updating your system and retrying the installation will fix the problem.
Alternatively, if you prefer using the command line, you can install CPU-X by running the following command in the terminal:
yay -S cpu-x
Step 3. Launching and Using CPU-X on Manjaro.
Now that CPU-X is installed on your Manjaro system, let’s explore how to launch the application and navigate its interface. There are two primary methods to launch CPU-X:
- Command Line:
- Open a terminal window by pressing
Ctrl+Alt+Tor by searching for “Terminal” in your application launcher. - Type
cpu-xand press Enter to launch the application.
- Open a terminal window by pressing
- Graphical User Interface (GUI):
- Click on your application launcher or taskbar menu.
- Navigate to the “System” category.
- Locate and click on “CPU-X” to launch the application.

Once CPU-X is launched, you’ll be greeted with its main interface, which is divided into several tabs. Each tab provides detailed information about different aspects of your system’s hardware. Let’s take a closer look at each tab:
- CPU: This tab displays information about your processor, including its model, architecture, clock speed, cache levels, and more. You can also view the CPU’s temperature, voltage, and usage statistics.
- Caches: The Caches tab provides detailed information about your CPU’s cache hierarchy, including the size and type of each cache level.
- Motherboard: Here, you can find information about your system’s motherboard, such as the manufacturer, model, chipset, BIOS version, and more.
- Memory: The Memory tab shows the total amount of RAM installed, memory type (e.g., DDR4), speed, and timings. It also displays information about each individual memory module.
- System: This tab provides an overview of your system, including the operating system version, kernel version, hostname, and uptime.
- Graphics: The Graphics tab displays information about your GPU, such as the vendor, model, clock speeds, driver version, and available memory.
Congratulations! You have successfully installed CPU-X. Thanks for using this tutorial to install the latest version of CPU-X on the Manjaro system. For additional help or useful information, we recommend you check the official CPU-X website.