How To Install Deepin Desktop Environment on Ubuntu 24.04 LTS

In this tutorial, we will show you how to install Deepin Desktop Environment on Ubuntu 24.04. Ubuntu 24.04 LTS is a powerful and popular Linux distribution that provides stability, long-term support, and a rich ecosystem of applications. However, some users may wish to explore alternative desktop environments beyond the default GNOME interface. This is where the Deepin Desktop Environment steps in. Deepin Desktop Environment (often referred to as Deepin DE) stands out for its visually appealing design, user-friendly layout, and feature-rich experience.
By combining Ubuntu’s robust base with Deepin’s gorgeous aesthetics, you gain the ability to enjoy a modern and elegant interface without leaving the comfort of Ubuntu. In this guide, you will learn how to install the Deepin Desktop Environment on Ubuntu 24.04 LTS, step by step. From meeting prerequisites and adding repositories, to customizing themes and optimizing performance, you will discover everything needed to create a stable, secure, and visually pleasing system that aligns with your personal taste and workflow.
Prerequisites
Before installing Deepin Desktop Environment on Ubuntu 24.04 LTS, ensure that you meet the following prerequisites:
- Updated System: Confirm that your Ubuntu 24.04 LTS installation is up-to-date using the
sudo apt updateandsudo apt upgradecommands. - Root or Sudo Privileges: You need administrative access to run installation commands.
- Adequate Disk Space: Make sure you have at least 2 GB of free storage for the Deepin DE packages and related dependencies.
- Internet Connection: A stable internet connection is required to download packages from Ubuntu’s repositories.
- System Backup: It is always advisable to create a data backup or snapshots in case anything goes wrong during the installation.
Understanding Deepin Desktop Environment
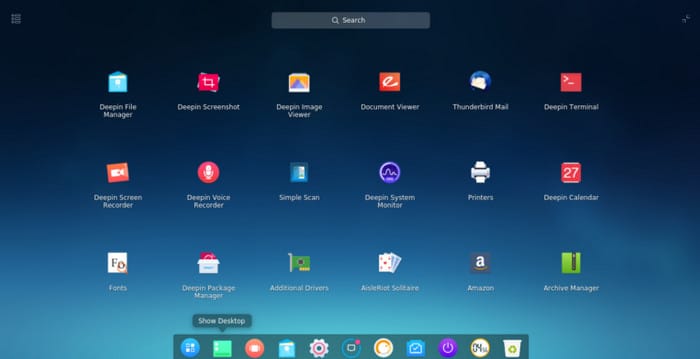
Deepin Desktop Environment originates from the Deepin Linux distribution, a project known for its focus on a sleek, modern look and a cohesive user experience. The desktop introduces a polished design aesthetic, featuring a dock reminiscent of macOS, intuitive system settings, and minimal system overhead for a smooth performance. It’s crafted with simplicity and elegance, aiming to make daily computing tasks more streamlined and visually appealing.
One of the main attractions of the Deepin environment lies in its creative approach to usability. The graphical interface integrates a unified control center for managing your system, audio settings, and network configurations with minimal fuss. Additionally, Deepin Desktop Environment includes a custom suite of applications, such as Deepin File Manager, Deepin Terminal, and a variety of other tools designed to blend seamlessly with its unique look and feel.
While Ubuntu’s default GNOME desktop is robust and flexible, Deepin offers an alternate dimension for those wanting fresh features or a distinct appearance. Users who favor a more aesthetic experience, especially for multimedia consumption or everyday tasks, often find Deepin Desktop Environment visually appealing and easy to navigate, making it a worthwhile choice on Ubuntu 24.04 LTS.
Installation Process
Adding the Deepin Repository
On Ubuntu 24.04 LTS, official repositories might not always include the latest Deepin packages. First, check if there is a Personal Package Archive (PPA) or official repository that hosts the Deepin Environment:
- Open Terminal: Launch the Terminal application from the applications menu or by pressing
Ctrl + Alt + T. - Add the Repository: While some Deepin DE components may already exist in Ubuntu’s universe repository, you might need a dedicated PPA or additional repository for up-to-date suites. For example, if there’s a well-known PPA maintained by the community, you can add it:
sudo add-apt-repository ppa:example-deepin/ppa
sudo apt update
Substitute example-deepin/ppa with the actual PPA if available. If you rely solely on official repositories, you may skip this step.
- Verify Package Sources: Run
sudo apt updateagain and ensure that your system recognizes the newly added sources.
By adding the appropriate repository, you gain access to the most recent version and bug fixes of Deepin Desktop, ensuring a smoother interface and fewer compatibility issues.
Core Installation of Deepin DE
Once the repository is in place, you can install the Deepin Desktop Environment packages. Follow these steps carefully:
- Refresh Repositories: Ensure your package index is up to date by running:
sudo apt update - Install Deepin DE: To install the full Deepin Desktop Environment along with its core applications, execute:
sudo apt install ddeThis command usually pulls in essential components, including the Deepin File Manager, Deepin Terminal, Deepin Control Center, and any additional libraries needed for a smooth user experience.
- Select the Display Manager: During the installation, you may be prompted to choose a display manager, such as lightdm or gdm3. Typically, lightdm pairs seamlessly with Deepin’s login screen, offering a cohesive login and lock screen design.
- Confirm Installation: Once the process completes, verify if all packages were installed without errors. If you encounter unresolved dependencies, fix them using:
sudo apt --fix-broken install
By installing all core Deepin packages together, users receive a consistent set of tools. This unified approach eliminates the guesswork of which components to include, saving time in the long run.
Post-Installation Setup
After the core packages are installed, a few key configuration steps can help you get the most from Deepin:
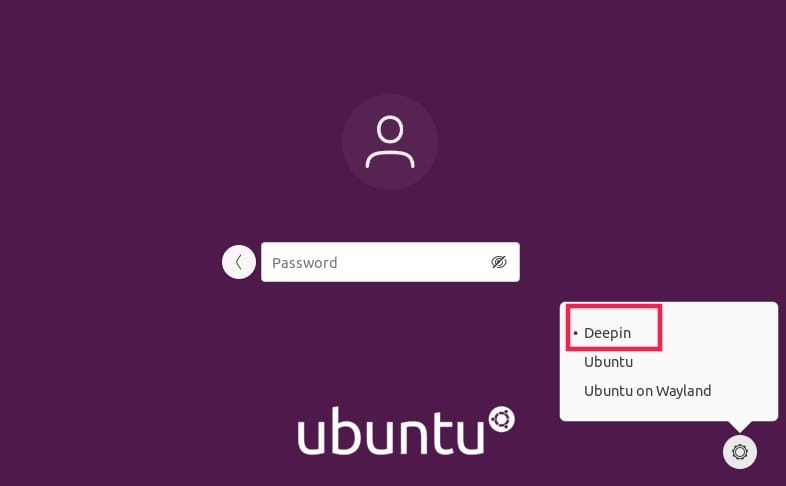
- Restart and Select Deepin Session: Log out or restart your computer. At the login screen, you will see a gear or session selection icon. Choose Deepin as your desktop environment and then log in with your usual credentials.

- Initial Deepin Desktop Configuration: Deepin may launch a welcome tool or a quick setup wizard to guide you through changing system fonts, setting preferred languages, or customizing color themes. Complete each step as needed.
- Check Display Manager Settings: If you opted for lightdm, confirm it is functioning correctly. The interface should present the Deepin-styled login screen, along with your username and login prompt. If you run into issues, you can install a different display manager using:
sudo apt install gdm3Then switch by running:
sudo dpkg-reconfigure gdm3Choose the desired manager and reboot once more.
- Update Any Remaining Packages: After your system reboots and you’re in the Deepin environment, run:
sudo apt update && sudo apt upgradeThis final step ensures all Deepin and Ubuntu packages are fully updated.
Completing these steps usually finalizes a stable Deepin Desktop Environment on Ubuntu 24.04 LTS, offering an elegant and modern desktop that merges seamlessly with Ubuntu’s underlying structure.

Customization Guide
After you have installed Deepin Desktop Environment on Ubuntu 24.04 LTS, you may want to further enhance your system for a unique look and feel. Below are several ways to customize and tailor your Deepin environment according to personal taste.
Theme Customization
Deepin’s default theme is already refined, but you can switch to additional themes or styles if you prefer. To change the theme:
- Open the Control Center from the dock or your system tray.
- Navigate to Personalization or Appearance.
- Select from the available theme options or install new ones through the package manager:
sudo apt install deepin-themes - Apply your preferred theme and enjoy the updated desktop visuals.
Icon Packs
Icon packs can give your system a distinct aesthetic. Many community-created icon packs for Deepin are compatible as well. For instance:
- Download or install your desired icon theme, for example:
sudo apt install deepin-icon-theme - Head into Control Center > Appearance > Icons and pick the new icon set.
Experimenting with different styles can help you achieve a cohesive desktop look that matches your wallpaper or color schemes.
Dock Configuration
Deepin Desktop Environment’s signature dock sits at the bottom of your screen, but you can customize it further:
- Position: Move the dock to the top, left, or right side of the screen by selecting Location in the dock settings.
- Mode: Switch between Fashion Mode (macOS-like) and Efficient Mode (Windows-like) depending on your preference.
- Size and Status: Adjust the dock’s size or set it to auto-hide. Auto-hide is handy if you want more screen space when working with multiple apps.
Control Center Settings
The Deepin Control Center is a one-stop hub for system tweaks. From here, you can modify:
- Network Configurations: Fine-tune Wi-Fi connections, VPN, or firewall settings.
- Sound Settings: Switch between audio output devices, adjust microphone levels, or set advanced audio profiles.
- Accounts and Personalization: Manage user accounts, change lock screen wallpapers, or enable guest sessions.
With a bit of exploration, you will discover multiple custom settings that allow you to shape Deepin Desktop to your liking.
Performance Optimization
Although Deepin Desktop Environment is known for striking visuals and fluid animations, it can be optimized further to ensure efficient performance on Ubuntu 24.04 LTS. Below are some useful strategies:
- Disable Unused Services: Check which services or processes are running by default. Stopping or disabling unneeded services through the
systemctlcommand can free up resources. - Manage Startup Applications: Open the Control Center’s Startup or Startup Programs section and remove any applications that you do not need to launch at boot.
- Adjust Effects and Animations: Deepin provides advanced visual effects. If you prefer speed over eye candy, navigate to Control Center > Display or Appearance and reduce animations, disable transparency, or lower the resolution.
- Keep System Updated: Running
sudo apt update && sudo apt upgradeensures you have the latest bug fixes and performance improvements for both Ubuntu and Deepin components.
By fine-tuning resource usage, you maintain a balance between visual appeal and system responsiveness. Whether you are on a high-end workstation or a modest laptop, these tweaks help Deepin Desktop Environment run efficiently and reliably.
Troubleshooting Common Issues
While installing and running Deepin Desktop on Ubuntu 24.04 LTS is straightforward, occasional hiccups may arise. Here are solutions to frequent problems:
- Black Screen on Login: Switch to a virtual console (
Ctrl + Alt + F2), log in, and reinstall your display manager or reconfigure it withsudo dpkg-reconfigure lightdm - Missing Panels or Dock: Sometimes the dock may fail to load. Restart the dock with
dde-dockor reinstalldde-dockpackage if needed. - Graphics Driver Compatibility: If the desktop animations stutter or the system lags, confirm you are using the most recent drivers. For NVIDIA cards, try installing proprietary drivers via
Additional Driversin the Software & Updates tool. - Unusual App Behavior: If certain apps appear distorted, forcing them to run under X11 session instead of Wayland (if available) can sometimes solve the issue.
Addressing these common glitches restores Deepin’s sleek interface, letting you continue work or play with minimal disruption.
Uninstallation Guide
If you decide to remove Deepin Desktop Environment and revert to Ubuntu’s original setup, follow these steps:
- Switch Desktop Environment: Log out and choose GNOME or your preferred environment on the login screen.
- Remove Deepin Packages: From the Terminal, run:
sudo apt remove dde --autoremoveThis command removes most Deepin packages along with any dependencies no longer required.
- Reconfigure Display Manager: If you switched to lightdm, revert to gdm3:
sudo dpkg-reconfigure gdm3 - Restart Your System: Once done, log back in to confirm you have removed Deepin successfully.
Tips and Best Practices
Maintaining a healthy system can prevent disruptions and enhance productivity. Below are a few extra pointers:
- Regular Backups: Utilize tools like Timeshift or Deja Dup to backup files or create system snapshots, especially before major updates.
- System Cleaning: Regularly remove cached files and old kernels to free up space. Commands like
sudo apt autoremovehelp tidy up unused packages. - Security Updates: Run
sudo apt update && sudo apt upgradefrequently. Patch any vulnerabilities or security flaws promptly. - Explore Community Forums: If you run into configuration challenges, check Ubuntu and Deepin forums for insights and solutions offered by fellow users.
Congratulations! You have successfully installed Deepin. Thanks for using this tutorial for installing the Deepin desktop environment (DDE) on Ubuntu 24.04 LTS system. For additional help or useful information, we recommend you check the official Deepin website.