How To Install Gnome on Ubuntu 22.04 LTS

In this tutorial, we will show you how to install Gnome on Ubuntu 22.04 LTS. Ubuntu is one of the most popular Linux distributions, renowned for its user-friendly interface and extensive software repository. While the default desktop environment, GNOME, offers a sleek and modern experience, some users prefer alternative options like KDE Plasma or Xfce. However, if you’re a fan of GNOME’s simplicity and functionality, you can easily install it on Ubuntu 22.04
This article assumes you have at least basic knowledge of Linux, know how to use the shell, and most importantly, you host your site on your own VPS. The installation is quite simple and assumes you are running in the root account, if not you may need to add ‘sudo‘ to the commands to get root privileges. I will show you the step-by-step installation of the Gnome desktop environment on Ubuntu 22.04 (Jammy Jellyfish). You can follow the same instructions for Ubuntu 22.04 and any other Debian-based distribution like Linux Mint, Elementary OS, Pop!_OS, and more as well.
Prerequisites
- A server running one of the following operating systems: Ubuntu 22.04, 20.04, and any other Debian-based distribution like Linux Mint.
- SSH access to the server (or just open Terminal if you’re on a desktop).
- Basic knowledge of the Linux command-line interface (CLI). This guide assumes you’re comfortable with executing commands in a terminal.
- An active internet connection. You’ll need an internet connection to download the necessary packages and dependencies for Gnome.
- A
non-root sudo useror access to theroot user. We recommend acting as anon-root sudo user, however, as you can harm your system if you’re not careful when acting as the root.
Install Gnome on Ubuntu 22.04 LTS Jammy Jellyfish
Step 1. Keeping your system up-to-date is essential for maintaining security and stability. Before installing GNOME, update and upgrade your Ubuntu system by executing the following commands in the terminal:
sudo apt update
sudo apt upgrade
These commands will fetch the latest package information and install any available updates, ensuring that your system is running the most recent software versions.
Step 2. Installing GNOME Desktop Environment on Ubuntu 22.04.
There are two primary options for installing GNOME on Ubuntu 22.04 LTS: Full GNOME Desktop and Vanilla GNOME. The Full GNOME Desktop includes the complete set of GNOME applications and features, while Vanilla GNOME offers a minimalistic version with only the essential components.
- Install Vanilla GNOMETo install Vanilla GNOME, execute the following command:
sudo apt install gnome-session
- Install Full GNOME Desktop
For a more comprehensive experience, install the Full GNOME Desktop with the following command:
sudo apt install ubuntu-gnome-desktop
Step 3. Select Default Window Manager.
A window manager is responsible for managing the appearance and behavior of application windows on your desktop. During the GNOME installation, you’ll be prompted to choose a default window manager. Select gdm3 as the default window manager to ensure seamless integration with GNOME.
After installing GNOME and selecting the default window manager, reboot your system to apply the changes. Use the following command to restart your computer:
sudo reboot
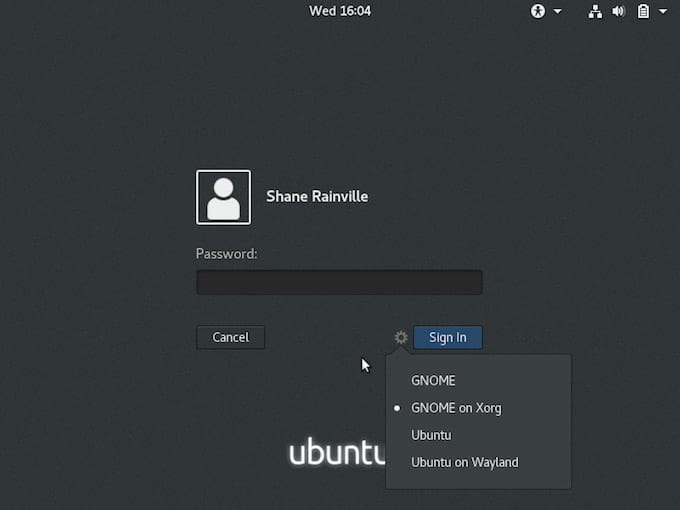
Once your system has restarted, At the login screen, click on the gear icon and select the GNOME version you installed. This flexibility allows you to switch between different desktop environments as per your needs.

You can also check the installed GNOME version by executing the following command in the terminal:
gnome-shell --version
Step 4. Configure GNOME.
- Enable Automatic Login
If you prefer to bypass the login screen and directly enter the GNOME desktop after booting, you can enable automatic login. Open the /etc/gdm3/custom.conf file with a text editor:
sudo nano /etc/gdm3/custom.conf
Find the line # AutomaticLoginEnable = true and uncomment it by removing the #. Similarly, uncomment the line # AutomaticLogin = user1 and replace user1 with your username. Save and close the file, then reboot your system to apply the changes.
- Change Default Applications
GNOME allows you to set your preferred applications as defaults. To change the default web browser, email client, or terminal, open the ‘Details’ application from the ‘Show Applications’ menu. Navigate to ‘Default Applications’ and select your preferred applications from the dropdown menus.
- Install GNOME Extensions
GNOME extensions enhance your user experience by adding extra features and functionality. To install GNOME extensions, first install the host connector:
sudo apt install chrome-gnome-shell
Next, install the GNOME Shell integration extension from your web browser’s extension store. Now, you can browse and install extensions from the GNOME extensions website.
- Customize Appearance
GNOME’s appearance can be customized to your liking using the GNOME Tweaks tool. If it’s not already installed, you can install it with:
sudo apt install gnome-tweaks
Open GNOME Tweaks and navigate to the ‘Appearance’ tab. Here, you can change the GTK theme, icon theme, cursor theme, and shell theme. You can also change the background and lock screen images under the ‘Background’ tab.
Congratulations! You have successfully installed Gnome. Thanks for using this tutorial for installing the Gnome desktop environment on Ubuntu 22.04 LTS Jammy Jellyfish system. For additional help or useful information, we recommend you check the official Gnome website.